docassemble can easily be scaled in the cloud. A cluster of web servers can serve responses to client browsers, while communicating with centralized services. The limit to scalability will then be a question of how responsive a single SQL server can be and how responsive a single Redis server can be.
You probably do not need to deploy docassemble with multiple application servers. A single application server can handle a lot of traffic, and if it starts to get overloaded, you can always upgrade to a more powerful machine. Deploying docassemble on a single server involves far fewer steps than setting up a multi-server arrangement. The slightest deviation from the instructions in this section could cause your cluster not to function, and the reasons could be mysterious. Unless you really understand the technologies, it might be difficult for you to debug issues with multi-server arrangements.
If you want to run docassemble in a scalable multi-server arrangement, there are a variety of ways to do so. This section of the documentation discusses two possible methods, one that uses Kubernetes and Helm, and the other that uses Amazon Web Services (AWS).
Multi-server configuration on Kubernetes
The recommended method of deploying docassemble in a multi-server
configuration is to use Kubernetes and Helm. This deployment
method is documented separately in the jhpyle/charts repository on
GitHub.
Multi-server configuration on EC2 Container Service
Overview
In this example, one server will perform central functions (SQL, Redis, RabbitMQ, and log message aggregation) and two separate servers will act as application servers. The application servers will act as web servers, receiving requests that are distributed by a load balancer. These servers will also operate as Celery nodes, running background processes for docassemble interviews. All three of the servers will be EC2 virtual machines situated within a private network on AWS called a Virtual Private Cloud (VPC).
Users will point their browsers at a URL like
https://docassemble.example.com, where the DNS entry for
docassemble.example.com is a CNAME that points to an
Application Load Balancer (at an address like
myloadbalancer-198225082.us-west-1.elb.amazonaws.com). The
Application Load Balancer will take care of generating and serving
SSL certificates for the encrypted connection.
The Application Load Balancer will convert the HTTPS requests into HTTP requests and send them to the web servers. From the perspective of the web servers, all incoming requests will use the HTTP scheme. But from the perspective of the user’s web browser, the web site uses the HTTPS scheme.
Within the VPC, the web servers will communicate with the central server using a variety of TCP ports.
The three servers will all be part of an Auto Scaling Group. This means that as more people use your site, you can expand beyond three virtual machines to any number of virtual machines. The new virtual machines that are created will act as web servers, and the Application Load Balancer will distribute the traffic among them. If traffic dies down, some of those virtual machines can be turned off.
The software will be deployed on the servers by the EC2 Container Service (ECS). ECS is Amazon’s system for automatically deploying Docker containers on EC2 instances.
In the vocabulary of ECS, there will be one “cluster” (the default cluster) running two services: “backend” and “app.”
The “backend” service consists of a single “task,” where the task is
defined as a single Docker “container” running the “image”
jhpyle/docassemble with the environment variable CONTAINERROLE set
to sql:redis:rabbitmq:log:cron:mail. You will ask for one of these services
to run (i.e. the “desired count” of this service is set to 1).
The “app” service consists of a single “task,” where the task is
defined as a single Docker “container” running the “image”
jhpyle/docassemble with the environment variable CONTAINERROLE set
to web:celery. You will ask for two of these services to run
(i.e. the “desired count” of this service is set to 2). (You will be
able to change this count in the future.)
The result of this configuration will be that three EC2 virtual machines will exist, all of which will be running Docker. Each virtual machine will “run” the same Docker container, except that the “backend” instance will run with different environment variables than the “app” instances.
To shutdown your docassemble setup, you would first edit the “app” service and set the “count” to zero. Then, after a few minutes, the Docker containers will stop. Once the “app” services are no longer running, you will then do the same with the “backend” service. Then, if you want to turn off your EC2 virtual machines, you would edit the Auto Scaling Group and set the desired number of instances to zero.
You can then restart your docassemble system and it will pick up exactly where it left off. This is because docassemble will back up SQL, Redis, and other information to S3 (or Azure blob storage if you prefer) when the containers shut down, and restore from the backups when they start up again. To restart, you would edit the Auto Scaling Group to set the desired number of instances to 3. When they are up and running, you would then update the “backend” service and set the “desired count” to 1. Once that service is up and running, you would update the “app” service and set the “desired count” to 2.
Instructions
The following instructions will guide you through the process of using AWS to set up a docassemble installation. AWS itself is beyond the scope of this documentation. If you have never used AWS before, you are encouraged to consult the AWS documentation.
These instructions assume that you own a domain name and can add
DNS entries for the domain. (If you do not have a domain name,
you can purchase one from a site like GoDaddy or Google Domains.)
In this example, we will use docassemble.example.com as the example
hostname, but you will need to replace this with whatever hostname you
are going to use.
First, sign up for an Amazon Web Services account.
Log in to the AWS Console. If you have not used ECS before,
navigate to the service called “EC2 Container Service” and click “Get
Started” to follow the steps of the introductory “wizard.” Check the
option for “deploy a sample application onto an Amazon ECS Cluster.”
Follow the default selections. The wizard will create a cluster
called “default,” an IAM role called ecsInstanceRole, and several
resources, including a CloudFormation stack, an Internet Gateway,
VPC, a Route Table, a VPC Attached Gateway, two subnets, a
Security Group for an Elastic Load Balancer, a Security Group
for ECS instances, a Launch Configuration, and an
Auto Scaling Group.
The resources the wizard creates are helpful for educational purposes, but in the long term they are not needed and should be deleted. The running EC2 instance may also cost you money. To delete the unnecessary resources:
- Go to the ECS Console, find the service “sample-webapp,” update it, and set the “Number of tasks” to 0. Then you can delete “sample-webapp.” Also go into “Task Definitions” and delete the one Task Definition there.
- Go to the EC2 Console, go into the “Instances” section, and change the “Instance State” of the one running instance to “Terminate.”
- Then go into the “Auto Scaling Groups” section and delete the one Auto Scaling Group.
- Then go into the “Launch Configurations” section and delete the one Launch Configuration.
- Then go to the VPC Console, select the VPC for which “Default VPC” is “No,” and delete it. (Be careful not to delete the default VPC!)
Next, we need to create an S3 “bucket” in which
your docassemble system can store files, backups, and other
things. To do this, go to the S3 Console, click “Create Bucket,”
and pick a name. If your site is at docassemble.example.com, a good
name for the bucket is docassemble-example-com. (Client software
will have trouble accessing your bucket if it contains .
characters.) Under “Region,” pick the region nearest you.
Next, we need to create an IAM role for the EC2 instances that will run docassemble. This role will empower the server to operate on ECS and to access the S3 “bucket” you created. To do this, go to the IAM Console and go to “Roles” -> “Create New Role.” Call your new role “docassembleInstanceRole” or some other name of your choosing. Under “AWS Service Roles,” select “Amazon EC2 Role for EC2 Container Service.” On the “Attach Policy” screen, check the checkbox next to “AmazonEC2ContainerServiceforEC2Role,” and continue on to create the role.
Once the role is created, go into the “Inline Policies” area of the
role and create a new inline policy. Select “Custom Policy,” enter a
“Policy Name” like “S3DocassembleExampleCom,” and set the “Policy
Document” to the following (substituting the name of the bucket you
created in place of docassemble-example-com in the two places it
appears):
{
    "Version": "2012-10-17",
    "Statement": [
        {
            "Effect": "Allow",
            "Action": [
                "s3:ListBucket"
            ],
            "Resource": [
                "arn:aws:s3:::docassemble-example-com"
            ]
        },
        {
            "Effect": "Allow",
            "Action": [
                "s3:PutObject",
                "s3:GetObject",
                "s3:DeleteObject"
            ],
            "Resource": [
                "arn:aws:s3:::docassemble-example-com/*"
            ]
        }
    ]
}
(Note that instead of creating an inline policy that limits access to a particular bucket, you could attach the “AmazonS3FullAccess” policy to the role and give EC2 instances full access to all of your account’s S3 buckets.)
This inline policy allows any application running on a machine given
the docassembleInstanceRole role to access your S3 bucket. This
saves you from having to include long and complicated secret keys in
the environment variables you pass to docassemble Docker
containers. All of the EC2 instances you create in later steps will
be given the docassembleInstanceRole IAM role.
Go to VPC Console and inspect the description of the default VPC.
(If you have more than one VPC, look for the VPC where “Default
VPC” is “Yes.”) Make a note of the VPC CIDR address for the VPC,
which will be something like 172.68.0.0/16 or 10.1.0.0/16.
Go to the EC2 Console and set up a new Security Group called
docassembleSg with two rules. One rule should allow traffic of
“Type” SSH from “Source” Anywhere. The other rule should allow “All
traffic” from “Source” Custom IP, where the address is the CIDR
address you noted. This will provide the “firewall rules” for your
servers so that you can connect to them via SSH and so that they can
communicate among each other.
Go to the “Launch Configuration” section of the EC2 Console and
create a new Launch Configuration called docassembleLc. When it
asks what AMI you want to use, go to “Community AMIs,” search for
the keyword “ecs-optimized” and pick the most recent AMI that comes
up. The AMIs will not be listed in any useful order, so you have to
look carefully at the names, which contain the dates the AMIs were
created. There is also a page on Amazon’s web site that lists the
ECS-optimized AMIs by region. As of this writing, the most recent
ECS-optimzed AMI is “amzn-ami-2018.03.p-amazon-ecs-optimized.” If
you use a different AMI, make sure that you give the machine at least
30GB of storage.
In the “Choose Instance Type” section, select an instance type that has at least 2GB of RAM (e.g., t2.small).
In the “Configure details” section, set the “IAM role” of the
Launch Configuration to docassembleInstanceRole, the IAM role
you created earlier. open the “Advanced Details” and add the
following as “User data”:
Content-Type: multipart/mixed; boundary="===============BOUNDARY=="
MIME-Version: 1.0

--===============BOUNDARY==
MIME-Version: 1.0
Content-Type: text/x-shellscript; charset="us-ascii"
Content-Transfer-Encoding: 7bit
Content-Disposition: attachment; filename="standard_userdata.txt"

#!/bin/bash
sudo chkconfig sendmail off
sudo service sendmail stop

--===============BOUNDARY==
MIME-Version: 1.0
Content-Type: text/cloud-boothook; charset="us-ascii"
Content-Transfer-Encoding: 7bit
Content-Disposition: attachment; filename="boothook.txt"

#cloud-boothook
cloud-init-per once docker_options echo 'OPTIONS="${OPTIONS} --storage-opt dm.basesize=20G"' >> /etc/sysconfig/docker

--===============BOUNDARY==--
The first part of this “user data” is enable the e-mail receiving feature to work. If sendmail is running on the EC2 host, as it is by default, then a Docker container running on the host will not be able to bind to the SMTP port. The shell script stops and disables the sendmail service on the host computer. The second part expands the capacity of the Docker container’s “hard drive” from 10GB to 20GB. The default size of 10GB can be too small for some docassemble servers.
In the “Configure Security Group” section, set the security group to
docassembleSg, the Security Group you created earlier.
Then go to the “Auto Scaling Groups” section of the EC2 Console and
create a new Auto Scaling Group called docassembleAsg. Connect it
with docassembleLc, the Launch Configuration you just created.
Use a fixed number of instances without scaling policies that respond
to CloudWatch alarms. Set the desired number of instances to 3.
Once the Auto Scaling Group is saved, AWS should start running
three EC2 instances. Since you chose an ECS-optimized AMI, the
instances should automatically register with your ECS cluster.
The next step is to create an Application Load Balancer. The load balancer will accept HTTPS requests from the outside world and forward them to the application servers as HTTP requests. It will forward two types of requests: regular HTTP requests and WebSocket requests. (The live help features of docassemble use the WebSocket protocol for real time communication between operators and users.) The Application Load Balancer needs to treat WebSocket requests differently. While regular HTTP requests can be forwarded randomly to any application server, WebSocket requests for a given session need to be forwarded to the same server every time.
To set up the Application Load Balancer, first you need to create a
Security Group that will allow communication from the outside world
through HTTPS. Go to the “Security Groups” section of the
EC2 Console and create a new Security Group. Set the “Security
group name” to docassembleLbSg and set the “Description” to
“docassemble load balancer security group.” Attach it to your default
VPC. Add two “Inbound” rules to allow HTTP and HTTPS traffic from
anywhere. For the first rule, set “Type” to HTTPS and “Source” to
“Anywhere.” For the second rule, set “Type” to HTTP and “Source” to
“Anywhere.”
Then go to the “Load Balancing” -> “Target Groups” section of the
EC2 Console and create a new “Target Group.” Set the “Target group
name” to web, set the “Protocol” to HTTP, set the “Port” to 80, and
set the “VPC” to your default VPC. Under “Health check settings,”
set the “Protocol” to HTTP and the “Path” to /health_check. The
“health check” is the load balancer’s way of telling whether a web
server is healthy. The path /health_check on a docassemble web
server is a page that responds with a simple “OK.” (All the load
balancer cares about is whether the page returns an
HTTP success code or not.) Under “Advanced health check settings,”
set the “Healthy threshold” to 10, “Unhealthy threshold” to 2,
“Timeout” to 10 seconds, “Interval” to 120 seconds, and keep other
settings at their defaults. Then click “Create.”
Once that “Target Group” is created, create a second “Target Group”
called websocket with the same settings. Then, once the websocket
“Target Group” is created, do Actions -> Edit Attributes on it, and
under “Stickiness,” select “Enable load balancer generated cookie
stickiness.” Keep other settings at their defaults. The “stickiness”
duration should be 1 day or more (this should be long compared to the
typical session duration). Then click “Create.”
Finally, create a third “Target Group” called http-redirect. Set
the “Protocol” to HTTP, set the “Port” to 8081, and set the “VPC” to
your default VPC. Under “Health check settings,” set the “Protocol”
to HTTP and the “Path” to /health_check. Under “Advanced health
check settings,” change “Success codes” from 200 to 301. This is
because all requests to this target group should respond with an
HTTP redirect response, the code for which is 301. Then click
“Create.”
The purpose of the http-redirect target group is very limited: it
will forward any HTTP requests to a special port on your
docassemble web server, which will return a special “redirect”
response that causes the user’s browser to be redirected back to the
HTTPS listener on your load balancer.
Then go to the “Load Balancers” section of the EC2 Console and create a “Load Balancer.” Select “Application Load Balancer” as the type of load balancer.
On the “Configure Load Balancer” page, set the name to
docassembleLb. Keep the “Scheme” as “internet-facing” and keep the
“IP Address Type” set to “ipv4.” Under “Listeners,” keep the HTTP
listener listening to port 80 and click “Add listener” to add a second
listener. Set the “Load Balancer Protocol” to HTTPS and set the “Load
Balancer Port” to port 443.
Under “Availability Zones,” make sure your default VPC is selected. Then select all of the “available subnets” by clicking the plus buttons next to each one. (If it gives you any trouble about adding subnets, just add as many subnets as it will let you add.)
On the “Configure Security Settings” page, it will ask about SSL certificates and security policies. If you have never been here before, accept all of the defaults. This should result in Amazon creating an SSL certificate for you. If you have created certificates in the past click “Choose a certificate from ACM” and select the existing certificate you want to use, or click the link to “Request a new certificate from ACM.”
On the “Configure Security Groups” page, select the docassembleLbSg
Security Group you created earlier. Select it as the only
Security Group for the load balancer.
On the “Configure Routing” page, set “Target group” to “Existing
target group” and select http-redirect as the “Name” of the Target
Group. The “Protocol” should be HTTP and the Port should be 8081.
Skip past the “Register Targets” page. On the “Review” page, click “Create” to create the Load Balancer.
Note that load balancers, like EC2 instances, will cost you money even you are not using them. The cost is $5 per month or more. So if you are not using your load balancer, delete it. You do not need to delete the other resources you created (e.g., target groups, security groups) because they do not cost money to maintain.
Once the docassembleLb load balancer is created, you need to make a
few manual changes to it.
In the “Load Balancers” section, select the docassembleLb load
balancer, and open the “Listeners” tab. Select the “HTTP : 80”
listener and click Edit. Under “Default action(s),” make sure that
step 1 is “Forward to http-redirect.”
Once those changes (if any) are saved, select the “HTTPS : 443” listener and click Edit.
Under “Default action(s),” it will incorrectly say that requests
should be forwarded to the http-redirect target group. This is the
proper setting for HTTP (port 80), but not for HTTPS (port 443), so
you need to change it. Click the edit button (pencil icon) and change
it so that it forwards to the web target group. Then press “Update”
to save your changes.
Then go back to the list of listeners, and under “HTTPS : 443,” click
“View/edit rules.” Click the “+” button at the top of the screen to
add a new rule. Make it the first rule in the list of rules.
Construct the new rule so that it says, in effect, “if the path is
/ws/*, forward the request to the websocket target group.” Then
click “Save.” Your rules should look like this (keeping in mind that
AWS might have changed its user interface since the time this
documentation was written).
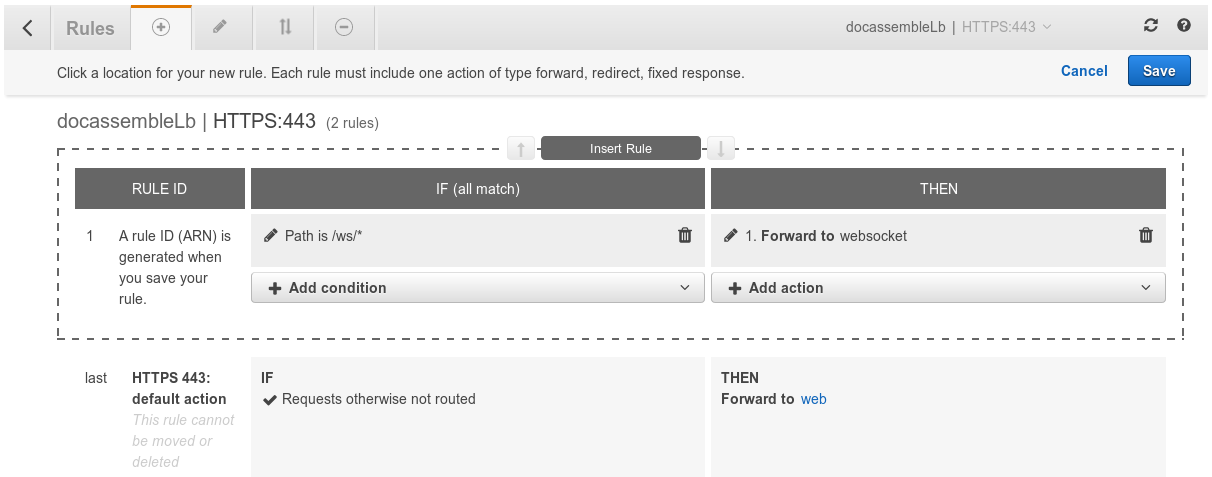
Now the docassembleLb load balancer will listen to port 443 and act
on requests according to two “Rules.” The first rule says that if the
path of the HTTPS request starts with /ws/, which is
docassemble’s path for WebSocket communication, then the request
will be forwarded using the websocket “Target Group,” which has the
“stickiness” feature enabled. The second rule says that all other
traffic will use the web “Target Group,” for which “stickiness” is
not enabled. Your docassembleLb load balancer will also listen to
port 80 and forward all those requests to port 8081 on your web
servers, which will respond by redirecting the user to port 443 of
your load balancer.
Finally, go to the “Description” tab for the docassembleLb load
balancer and make note of the “DNS name.” It will be something like
docassemblelb-174526082.us-west-1.elb.amazonaws.com.
Edit the DNS configuration of your domain and create a CNAME that
maps the DNS name that your users will use (e.g.,
docassemble.example.com) to the DNS name of the load balancer
(e.g., docassemblelb-174526082.us-west-1.elb.amazonaws.com). This
will allow your users to connect to the load balancer.
Then go to the ECS Console.
Create a Task Definition called backend using the JSON
configuration below. Edit the TIMEZONE, DAHOSTNAME, and
S3BUCKET environment variables.
{
  "family": "backend",
  "containerDefinitions": [
    {
      "name": "backend",
      "image": "jhpyle/docassemble",
      "cpu": 1,
      "memory": 1800,
      "portMappings": [
        {
          "containerPort": 8082,
          "hostPort": 8082
        },
        {
          "containerPort": 25,
          "hostPort": 25
        },
        {
          "containerPort": 5432,
          "hostPort": 5432
        },
        {
          "containerPort": 514,
          "hostPort": 514
        },
        {
          "containerPort": 6379,
          "hostPort": 6379
        },
        {
          "containerPort": 4369,
          "hostPort": 4369
        },
        {
          "containerPort": 5671,
          "hostPort": 5671
        },
        {
          "containerPort": 5672,
          "hostPort": 5672
        },
        {
          "containerPort": 25672,
          "hostPort": 25672
        },
        {
          "containerPort": 9001,
          "hostPort": 9001
        }
      ],
      "essential": true,
      "environment": [
        {
          "name": "CONTAINERROLE",
          "value": "sql:redis:rabbitmq:log:cron:mail"
        },
        {
          "name": "DAHOSTNAME",
          "value": "docassemble.example.com"
        },
        {
          "name": "EC2",
          "value": "true"
        },
        {
          "name": "BEHINDHTTPSLOADBALANCER",
          "value": "true"
        },
        {
          "name": "TIMEZONE",
          "value": "America/New_York"
        },
        {
          "name": "S3BUCKET",
          "value": "docassemble-example-com"
        }
      ],
      "mountPoints": []
    }
  ],
  "volumes": []
}
The CONTAINERROLE variable indicates that this server will serve the
functions of SQL, Redis, RabbitMQ, and log message aggregation.
The DAHOSTNAME variable indicates the hostname at which the user
will access the docassemble application. The EC2 variable
instructs docassemble that it will be running on EC2, which
means that the server needs to use a special method of obtaining its
own fully-qualified domain name.
Then, check the ECS Console and look at the default cluster.
There should be three container instances available. (If not,
something is wrong with the Auto Scaling Group you created, or
perhaps the instances are still starting up.)
Then, create a Service called backend that uses the task definition
you just created. Set the number of tasks to 1. Do not choose an
Elastic Load Balancer. This will cause the docassemble Docker
image to be installed on one of the container instances. It will
take some time for the image to download and start. In the meantime,
the ECS Console should show one “pending task.”
Next, create a Task Definition called app using the JSON
configuration below. Edit the S3BUCKET environment variable.
{
  "family": "app",
  "containerDefinitions": [
    {
      "name": "app",
      "image": "jhpyle/docassemble",
      "cpu": 1,
      "memory": 1800,
      "portMappings": [
        {
          "containerPort": 80,
          "hostPort": 80
        },
        {
          "containerPort": 8081,
          "hostPort": 8081
        },
        {
          "containerPort": 9001,
          "hostPort": 9001
        }
      ],
      "essential": true,
      "environment": [
        {
          "name": "CONTAINERROLE",
          "value": "web:celery"
        },
        {
          "name": "S3BUCKET",
          "value": "docassemble-example-com"
        }
      ],
      "mountPoints": []
    }
  ],
  "volumes": []
}
Create a Service called app that uses the task definition app.
Set the “Number of tasks” to 2. Under “Elastic load balancing,” click
the “Configure ELB” button. Set “ELB type” to “Elastic Load
Balancer.” The “IAM role for service” should be ecsServiceRole, an
IAM role that ECS creates for you automatically. Set “ELB Name”
to docassembleLb, the name of the Application Load Balancer you
created earlier. Under “Container to load balance,” select
“app:80:80” and click “Add to ELB.” Set the “Target group name” to
web, the “Target Group” you created earlier. Set the “Health check
grace period” to 1200 seconds. Then click “Save.”
Note that the app task definition is much briefer than the backend
task definition. This is because the backend service will save a
configuration file in the S3 bucket. All that the app service
needs to do is retrieve that configuration file. Note also that it is
not necessary to include any secret keys in the JSON configuration.
This is because the Launch Configuration of your virtual machines
includes the “IAM Role” of docassembleInstanceRole; the virtual
machines themselves are authorized to access the S3 bucket.
Just one more thing needs to be done to make the docassemble
server fully functional: you need to associate the websocket and
http-redirect “Target Groups” with the same EC2 instances that are
associated with the web “Target Group.” (Unfortunately, this is not
something that the ECS system can do automatically yet.) To fix
this, go to the EC2 Console, go to the “Target Groups” section,
select the web Target Group, go to the “Targets” tab, and note the
Instance IDs of the “Registered Instances.” Now de-select web,
select websocket, and click the “Edit” button within the “Targets”
tab. On the “Register and deregister instances” page that appears,
select the instances you just noted and click the “Add to registered”
button. Then do the same with http-redirect.
Shutting down
To shut down a multi-server docassemble configuration:
#. Go to the ECS Console. Go into the default cluster, and update
the “app” ECS service. Set “Number of tasks” to zero. This will
gracefully stop the Docker containers that serve in the role of
application servers.
#. Wait until the tasks have stopped.
#. Update the “backend” ECS service. Set “Number of tasks” to zero.
This will stop the Docker container that provides centralized
services.
#. Wait until the task has stopped.
#. The docassemble application is now fully shut down. However,
you are still spending money because there are EC2 instances
running. To shut down these instances, go to the EC2 Console and
edit the Auto Scaling Group you created (docassembleAsg). Set
the desired number of instances to 0. This will cause the three
instances you created to shut down.
#. Now you are no longer paying money to keep instances running, but
you are still paying to keep the load balancer alive (approximately
$5 per month). To avoid this cost, go to the “Load Balancers”
section of the EC2 Console and delete the docassembleLb load
balancer.
#. If you do not care about retaining the database or configuration of
the docassemble application you just shut down, go to the
S3 Console and delete the bucket you created. Note that the cost
of maintaining data in S3 is minimal as long as the volume of
data is low. The data that docassemble stores in S3 will
only be significant if you have a lot of uploaded files or a lot of
static files in your Playground.
After you have shut down these resources, many other AWS resources that you created will still exist, but you do not need to delete them to avoid incurring costs. “Target groups” and “Launch Configurations,” for example, are just configuration data; AWS does not need to reserve computing power or IP addresses to maintain them in your account.
Controlling AWS from the command line
In the docassemble GitHub repository, there is a command-line
utility called da-cli (which is short for “docassemble command
line interface”) that you can use to manage your multi-server
configuration on AWS.
It depends on the boto3 library, so you may need to run sudo pip
install boto3 in order for it to work. You need to initialize
boto3 by running aws configure.
Here are some ways that the command-line application can be used:
./da-cli start_up 2- bring up twoappservices and onebackendservice after bringing up three EC2 instances with thedocassembleAsgAuto Scaling Group. It also registers the appropriate instances for thewebsocketTarget Group../da-cli shut_down- bring the count of theappandbackendservices down to zero, then bring thedocassembleAsgAuto Scaling Group count down to zero../da-cli shutdown_unused_ec2_instances- finds EC2 instances in thedocassembleAsgAuto Scaling Group that are not being used to host a service, and terminates them../da-cli update_ec2_instances 4- increases thedocassembleAsgAuto Scaling Group count to 4 and waits for the instances to become available../da-cli connect_string app- prints a command that you can use to SSH to each EC2 instance running the serviceapp../da-cli fix_web_sockets- registers target instances for thewebsocketTarget Group../da-cli update_desired_count app 4- increases the desired count for theappservice to 4.
If your AWS resources go by names different from those in the above
setup instructions, you can easily edit the da-cli script, which is
a simple Python module. You might also want to extend the
functionality of the script; anything that can be done in the AWS
web interface can be done using the boto3 library.
Single-server configuration on EC2 Container Service
If you want, you can use EC2 to run docassemble in a single-server arrangement. (It is not particularly “scalable” to do so, but you might find it convenient.)
To do so, follow the instructions above for the multi-server configuration, but skip the creation of the S3 bucket, IAM role, Application Load Balancer, Target Groups, Auto Scaling Group, Task Definitions, and the ECS services.
Instead, just start an EC2 instance using an ECS-optimized AMI with a
Security Group that allows incoming connections over HTTP (port
80). Then go to the ECS Console and set up a “service” called
docassemble (or whatever name you want to give it) that runs a
single “task” with a Task Definition like the following.
{
  "family": "docassemble-all",
  "containerDefinitions": [
    {
      "name": "docassemble-all",
      "image": "jhpyle/docassemble",
      "memory": 900,
      "cpu": 1,
      "portMappings": [
        {
          "containerPort": 80,
          "hostPort": 80
        }
      ],
      "essential": true,
      "environment": [
        {
          "name": "EC2",
          "value": "true"
        }
      ]
    }
  ]
}
To start up the server, you would configure the ECS service to start one task. To shut down the server, you would reduce the number of tasks to 0.
A more complicated example of a configuration is the following, which assumes that you have a domain name that is mapped to your EC2 instance, that you want to use HTTPS, and you have set up the S3 bucket and IAM role so that your server can use S3 persistent storage.
{
  "family": "docassemble-all",
  "containerDefinitions": [
    {
      "name": "docassemble-all",
      "image": "jhpyle/docassemble",
      "memory": 900,
      "cpu": 1,
      "portMappings": [
        {
          "containerPort": 80,
          "hostPort": 80
        },
        {
          "containerPort": 443,
          "hostPort": 443
        }
      ],
      "essential": true,
      "environment": [
        {
          "name": "DAHOSTNAME",
          "value": "docassemble.example.com"
        },
        {
          "name": "EC2",
          "value": "true"
        },
        {
          "name": "USEHTTPS",
          "value": "true"
        },
        {
          "name": "USELETSENCRYPT",
          "value": "true"
        },
        {
          "name": "LETSENCRYPTEMAIL",
          "value": "[email protected]"
        },
        {
          "name": "S3BUCKET",
          "value": "docassemble-example-com"
        }
      ]
    }
  ]
}
In this example, you would need to edit
DAHOSTNAME, LETSENCRYPTEMAIL, and S3BUCKET. Note that
CONTAINERROLE is not specified; it will default to all.
For more information about configuring your server, see the section on Docker.
How it works
Each docassemble application server reads its configuration from
/usr/share/docassemble/config/config.yml. The default configuration for
connecting to the central SQL database is:
db:
  prefix: postgresql+psycopg2://
  name: docassemble
  user: docassemble
  password: abc123
  host: localhost
This will cause docassemble to connect to PostgreSQL on the
local machine as the user “docassemble” and open the database
“docassemble.” This configuration can be modified to connect to a
remote server. If you use a remote SQL server that is not a Docker
container running the CONTAINERROLE sql, then you need to make
sure that you create the user and database first, and give permission
to the user to create tables in the database.
By default, the Redis server is assumed to be found at
redis://localhost and the RabbitMQ server at
pyamqp://[email protected]//, where your.hostname.local is
the value of socket.gethostname(). However, you can modify the
locations of the Redis server and RabbitMQ server in the
configuration using the redis and rabbitmq directives:
redis: redis://redis.example.local
rabbitmq: pyamqp://[email protected]//'
Log file aggregation
In a multi-server configuration, log files can be centralized and
aggregated by using Syslog-ng on the application servers to forward
local log files to port 514 on a central server, which in turn runs
Syslog-ng to listen to port 514 and write what it hears to files in
/usr/share/docassemble/log. The hostname of this central server is
set using the log server directive in the configuration:
log server: log.example.localIf this directive is set, docassemble will write its own log
messages to port 514 on the central server rather than appending to
/usr/share/docassemble/log/docassemble.log.
When log server is set, the “Logs” page of the web interface will
call http://log.example.local:8082/ to get a list of available log
files, and will retrieve the content of files by accessing URLs like
http://log.example.local:8082/docassemble.log.
The following files make this possible:
Docker/config/nginx-log.dist- template for an [NGINX] site configuration file that listens to port 8082.Docker/docassemble-syslog-ng.conf- on application servers, this is copied into/etc/syslog-ng/conf.d/docassemble. It depends on an environment variableLOGSERVERwhich should be set to the hostname of the central log server (e.g.,log.example.local). It causes log messages to be forwarded to port 514 on the central log server. Note that Syslog-ng needs to run in an environment where theLOGSERVERenvironment variable is defined, or the file needs to be edited to include the hostname explicitly.Docker/syslog-ng.conf- on the central log server, this is copied to/etc/syslog-ng/syslog-ng.conf. It causes Syslog-ng to listen to port 514 and copy messages to files in/usr/share/docassemble/log/.
Auto-discovery of services
If you use S3/Azure blob storage, you can can use docassemble in a multi-server configuration without manually specifying the hostnames of central services in the configuration file.
If any of the following configuration directives are null or
undefined, and S3/Azure blob storage is enabled, then a
docassemble application server will try to “autodiscover” the
hostname of the service.
hostin thedbsectionredisrabbitmqlog server
docassemble will look for keys in the S3 bucket or Azure blob storage container called:
hostname-sqlhostname-redishostname-rabbitmqhostname-log
If a key is defined, docassemble will assume that the value is a
hostname, and will set the corresponding configuration variable
appropriately (e.g., by adding a redis:// prefix to the Redis
hostname).
The Docker initialization script runs the
docassemble.webapp.cloud_register module, which writes the
hostname to the appropriate S3 keys/Azure blob storage objects
depending on the value of the environment variable CONTAINERROLE.
File sharing
Configuring a cluster of docassemble servers requires centralizing
the location of uploaded files, by using an Amazon S3 bucket (the
s3 configuration setting), using an Azure blob storage container
(the azure configuration setting), or by making the uploaded file
directory a network drive mount (the uploads configuration
setting).
For more information about using S3 and Azure blob storage for file sharing, see the file sharing and data storage sections of the Docker page.
The default location of uploaded user files is defined by the
uploads configuration setting:
uploads: /usr/share/docassemble/filesHowever, docassemble will use Amazon S3 instead of this folder if S3 is enabled as follows:
s3:
  enable: True
  access_key_id: FWIEJFIJIDGISEJFWOEF
  secret_access_key: RGERG34eeeg3agwetTR0+wewWAWEFererNRERERG
  bucket: yourbucketname
When developers install new Python packages, the packages are unpacked
in /usr/share/docassemble/local (controlled by configuration
variable packages).
The web server will restart, and re-read its Python source code, if
the modification time on the WSGI file,
/usr/share/docassemble/webapp/docassemble.wsgi, is changed. The
path of the WSGI file is defined in the docassemble configuration
file:
webapp: /usr/share/docassemble/docassemble.wsgiEC2 hostname discovery
If you are using Amazon EC2, set the following in the configuration:
ec2: TrueThis can also be set with the EC2 environment variable if
using Docker.
This setting is necessary so that the server can correctly identify its own hostname.
SQL server
To start a postgresql server in an Amazon Linux instance:
sudo yum install postgresql-server
sudo service postgresql initdb
sudo service postgresql start
sudo -u postgres createuser --login --pwprompt docassemble
sudo -u postgres createdb --owner=docassemble docassemble
The “createuser” line will ask for a password; enter something like abc123.
Now that the server is running, you can set up web servers to communicate with the server by setting something like the following in the configuration:
db:
  prefix: postgresql+psycopg2://
  name: docassemble
  user: docassemble
  password: abc123
  host: 192.168.0.56
  port: Null
  table_prefix: Null
If you installed the web servers before installing the SQL server,
note that the create_tables module will need to be run in order to
create the database tables that docassemble expects.
E-mail sending
If you are launching docassemble within EC2, note that Amazon does not allow e-mail to be sent directly from SMTP servers operating within an EC2 instance unless you obtain special permission. Therefore, you may wish to use an SMTP server on the internet with which you can connect through SMTP Authentication.
For more information on setting up e-mail sending, see the installation section.
Using S3 without passing access keys in the configuration
If you are running docassemble on an EC2 instance, or on a
Docker container within an EC2 instance, you can set up the
instance with an IAM role that allows access S3 without supplying
credentials. In this case, the configuration in docassemble does
not include an access_key_id or a secret_access_key.
s3:
  enable: True
  bucket: yourbucketname
Instructions on how to set this up are available above.
Performance
With one central server and two application servers, all three of which are t2.small instances running on Amazon Web Services, docassemble can handle 100 concurrent requests without errors or significant slowdown:
Server Software:        Apache/2.4.10
Server Hostname:        test.docassemble.org
Server Port:            443
SSL/TLS Protocol:       TLSv1.2,ECDHE-RSA-AES128-GCM-SHA256,2048,128

Document Path:          /
Document Length:        44602 bytes

Concurrency Level:      100
Time taken for tests:   14.606 seconds
Complete requests:      1000
Failed requests:        0
Total transferred:      44932939 bytes
HTML transferred:       44602000 bytes
Requests per second:    68.47 [#/sec] (mean)
Time per request:       1460.582 [ms] (mean)
Time per request:       14.606 [ms] (mean, across all concurrent requests)
Transfer rate:          3004.27 [Kbytes/sec] received

Connection Times (ms)
              min  mean[+/-sd] median   max
Connect:      231  257  29.4    245     402
Processing:   408 1109 149.4   1109    1671
Waiting:      255 1017 150.1   1018    1574
Total:        650 1366 160.6   1361    2073

Percentage of the requests served within a certain time (ms)
  50%   1361
  66%   1396
  75%   1425
  80%   1449
  90%   1513
  95%   1640
  98%   1806
  99%   1928
 100%   2073 (longest request)
PostgreSQL concurrency
You can expect each application server to maintain 11 concurrent connections to PostgreSQL:
- 5 connections for the web server
- 5 connections for the WebSocket server
- 1 connnection for the Celery server
This assumes that the server has one CPU. The Celery server will start one process per CPU. So if the server has two CPUs, the total number of PostgreSQL connections will be 12.