Overview of document creation methods
There are several ways to make downloadable documents using the
attachment block. Each has its own features and limitations.
Method 1: generating documents from scratch using Markdown
First, you can generate attachments from Markdown. In the same way that you format the text of questions, you can format the text of attachments. Suppose you write this in the document source:
Hello, ${ user }.  This text is in **bold face**.

% if user.age_in_years() > 30:
You cannot be trusted!
% endif
This become the following in the resulting document:
Hello, John Doe. This text is in bold face.
You cannot be trusted!
In this way, you can produce documents in PDF, RTF, and DOCX format.
In addition to using Markdown, you can use docassemble-specific markup codes to do things like center text, insert a page break, or insert a case caption.
Method 2: generating documents from DOCX templates
The second method of assembling documents is to prepare a document template in DOCX format and use the Jinja2 template language to plug in variables from your interview.
For example, suppose you write this in the DOCX template file:
Hello, {{ user }}. This text is in bold face.
{%p if user.age_in_years() > 30 %}
You cannot be trusted!
{%p endif %}
The document content would look like this:
Hello, John Doe. This text is in bold face.
You cannot be trusted!
From the DOCX template, you can generate PDF or DOCX output.
Method 3: filling in fields in a PDF
The third way to assemble documents is to generate PDF files using templates that you prepare in Adobe Acrobat Pro or
other software that can edit PDF form fields. You put the template
file in the data/templates folder of a package (or the
“Templates” folder in the Playground). The attachment block
will take the template and “fill in the blanks”
using values from interview variables, providing the user with a
filled-in version of the template.
Comparison of the methods
Each method has benefits.
The advantage of the DOCX and PDF methods is that you have more direct, WYSIWYG control over document formatting.
The advantage of the Markdown method is that you can concentrate on the content and let docassemble handle the formatting. For example, there are automatic methods for generating case captions in legal documents created from Markdown, whereas if you create your legal document in DOCX format, you will need to construct your caption in the .docx template file and make sure that it gets filled in correctly. The Markdown method allows for more flexible formatting of the if/then/else statements within paragraphs. In the .docx template method, you have to write:
I {% if employed %}have a job.{% else %}am unemployed.{% endif %}
By contrast, Markdown treats single line breaks as spaces, so you can write:
I
% if employed:
have a job.
% else:
am unemployed.
% endif
You may find it easier to read your if/then/else statements when you can arrange them vertically in this fashion – particularly when you have nested if/else statements.
If you use the PDF fill-in field method to populate fields in a PDF file, you will have total control over pagination, but you will need to worry about whether the user’s content will fit into the provided fields. Also, the PDF fill-in field method requires that you write an itemized list of fields in your document and the values you want those fields to have. Markdown documents and DOCX fill-in forms are more flexible because they do not require this itemization of fields.
All three of these methods make use of the attachment specifier to
indicate how a document should be made.
Creating files from Markdown
Creating PDF and RTF files from Markdown
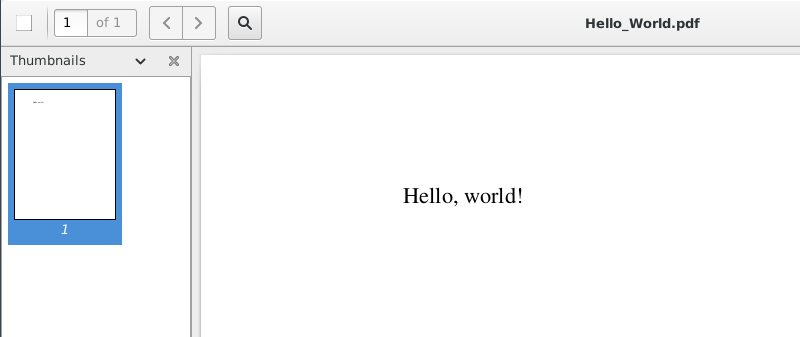
The following attachment block offers the user a PDF file and an RTF
file containing the phrase “Hello, world!”
mandatory: True
question: Your document is ready.
attachment:
  - name: A hello world document
    filename: Hello_World
    description: |
      A document with a classic message
    content: |
      Hello, world!
The content item can contain Mako and Markdown. Pandoc
converts the content into PDF, RTF, and HTML (the HTML is just for
previewing the document in the browser).
The PDF file will be called Hello_World.pdf and will look
like this in a PDF viewer (depending on the user’s software):
The RTF file will be called Hello_World.rtf and will look
like this in a word processor (depending on the user’s software):

If the user clicks the “Preview” tab, an HTML version of the document will be visible:

Creating DOCX files from Markdown
docassemble can use Pandoc to convert Markdown into a
Microsoft Word .docx file. These .docx files are not created by
default because they do not support all of the features that are
supported by RTF and PDF formats. To generate .docx
files, specify docx as one of the valid formats:
question: Here is your document.
attachments:
  - name: Summary of Benefits
    filename: benefits_summary
    valid formats:
      - docx
      - pdf
    content: |
      [BOLDCENTER] Summary of Benefits

      ${ client } is entitled to
      benefits plan ${ benefits }.
mandatory: True
To customize document styles, headers, and footers in your .docx file,
see the docx reference file setting, discussed below.
There are some formatting features that Pandoc supports when
converting to .rtf that are not available when converting to .docx, so
you might want to use .rtf conversion for that reason. However, the
.rtf format can be user-unfriendly, and in some circumstances it would
be better to have a .docx version. Luckily, LibreOffice can convert
.rtf files to .docx format. If you include rtf to docx as one of
the valid formats, docassemble will convert Markdown to RTF
format and then use LibreOffice to convert the RTF file to .docx
format. The result is that you get a .docx file instead of an .rtf
file.
question: Here is your document.
attachments:
  - name: Summary of Benefits
    filename: benefits_summary
    valid formats:
      - rtf to docx
      - pdf
    content: |
      [BOLDCENTER] Summary of Benefits

      ${ client } is entitled to
      benefits plan ${ benefits }.
mandatory: True
Note that you can also assemble .docx files from templates that you
compose in Microsoft Word. See the docx template file feature,
which is described below.
Creating Markdown files from Markdown
If you want to download the assembled Markdown source, include md as
one of the valid formats:
question: Here is your document.
attachments:
  - name: Summary of Benefits
    filename: benefits_summary
    valid formats:
      - md
    content: |
      [BOLDCENTER] Summary of Benefits

      ${ client } is entitled to
      benefits plan ${ benefits }.
mandatory: True
Reading Markdown content from separate files
If the content of your document is lengthy and you would rather not
type it into the interview YAML file as a content specifier within
an attachment block, you can import the content from a separate
file using content file:
question: Your document is ready.
attachment:
  - name: A *hello world* document
    filename: Hello_World_Document
    content file: hello.md
mandatory: True
The content of the Markdown file, hello.md, is:
Hello, world!Files referenced with content file are assumed to reside in the
data/templates directory within the package in which the interview
YAML file is located. You can specify filenames in other locations
by specifying a package name and path. For example:
content file: docassemble.demo:data/templates/complaint.mdThe content file can also refer to a list of file names:
content file:
  - introduction.md
  - jurisdiction.md
  - discussion.md
In this case, the content of multiple content file files will be
concatenated.
If content file refers to a dictionary in which the only key is
code, the code will be evaluated as Python code, and the result
will be used as the file.
code: |
  template_file_to_use = 'hello.md'
---
question: Your document is ready.
attachment:
  - name: A *hello world* document
    filename: Hello_World_Document
    content file:
      code: template_file_to_use
mandatory: True
In this example, the code evaluated to the name of a file in the
templates folder. The code may also evaluate to a URL, DAFile,
DAFileList, DAFileCollection, or DAStaticFile.
Formatting documents with special markup tags
In addition to using Markdown syntax, you can use docassemble-specific markup tags to control the appearance of documents.
[START_INDENTATION]- From now on, indent the first line of every paragraph.[STOP_INDENTATION]- From now on, do not indent the first line of every paragraph.[BEGIN_TWOCOL] First column text [BREAK] Second column text [END_TWOCOL]- Puts text into two columns.[FLUSHLEFT]- Used at the beginning of a paragraph to indicate that the paragraph should be flushed left and not indented.[FLUSHRIGHT]- Used at the beginning of a paragraph to indicate that the paragraph should be flushed right and not indented.[CENTER]- Used at the beginning of a paragraph to indicate that the paragraph should be centered.[BOLDCENTER]- Like[CENTER]except that text is bolded.[NOINDENT]- Used at the beginning of a paragraph to indicate that the first line of the paragraph should not be indented.[INDENTBY 1in]- Used at the beginning of a paragraph to indicate that all the lines of the paragraph should be indented on the left. In this example, the amount of indentation is one inch. You can express lengths using units ofinfor inches,ptfor points, orcmfor centimeters.[INDENTBY 1in 0.5in]- This is like the previous tag, except it indents both on the left and on the right. In this example, the amount of left indentation is one inch and the amount of right indentation is half an inch.[BORDER]- Used at the beginning of a paragraph to indicate that the paragraph should have a box drawn around it. (The border will only go around one paragraph; that is, the effect of[BORDER]lasts until the next empty line. You can use[NEWPAR]in place of an empty line to extend the effect of the[BORDER]tag to another paragraph.)[SINGLESPACING]- From now on, paragraphs should be single-spaced without indentation the first lines.[ONEANDAHALFSPACING]- From now on, paragraphs should be one-and-a-half-spaced, with indentation of first lines.[DOUBLESPACING]- From now on, paragraphs should be double-spaced, with indentation of first lines.[TRIPLESPACING]- From now on, paragraphs should be triple-spaced, with indentation of first lines.[TIGHTSPACING]- This is like[SINGLESPACING]except there is no spacing between paragraphs.[NBSP]- Insert a non-breaking space.[ENDASH]- Normally,--produces an en-dash, but if you want to be explicit,[ENDASH]will do the same thing.[EMDASH]- Normally,---produces an em-dash, but if you want to be explicit,[EMDASH]will do the same thing.[HYPHEN]- Insert a hyphen. Normally,-produces a hyphen, but if you want to be explicit,[HYPHEN]will do the same thing.[BLANK]- Insert___________________.[BLANKFILL]- Insert a wider version of__________________. In some output formats, this will fill the width of the area.[PAGEBREAK]- Insert a manual page break.[PAGENUM]- Insert the current page number.[SECTIONNUM]- Insert the current section number.[NEWPAR]- Insert a paragraph break. (Cannot be used within[FLUSHLEFT],[FLUSHRIGHT],[CENTER], or[BOLDCENTER]environments.)[SKIPLINE]- Skip a line (insert vertical space). This is different from[NEWPAR]because[NEWPAR]breaks a paragraph but multiple calls to[NEWPAR]will not insert additional vertical space. (Cannot be used within[FLUSHLEFT],[FLUSHRIGHT],[CENTER], or[BOLDCENTER]environments.)[BR]- Insert a line break.[BR]is useful to use with environments like[FLUSHLEFT],[FLUSHRIGHT],[CENTER], and[BOLDCENTER]that only apply to a single paragraph. Within the[BEGIN_TWOCOL]environment, a standard Markdown paragraph break (pressing enter twice, i.e., leaving one blank line) has the same effect.[TAB]- Insert a tab (horizontal space), e.g., to indent the first line of a paragraph when it otherwise would not be indented.
This interview demonstrates these features:
mandatory: True
question: Here is your document.
attachment:
  name: A demonstration
  filename: demo_document
  description: |
    This document demonstrates the
    markup codes you can insert into
    document text.
  valid formats:
    - pdf
    - tex
  metadata:
    FirstFooterLeft: |
      First of [TOTALPAGES] pages
    HeaderLeft: |
      Page [PAGENUM] of [TOTALPAGES]
  content: |
    [BOLDCENTER] Lorem Ipsum Dolor Sit
    Amet

    [BEGIN_CAPTION]
    Consectetur adipiscing elit.

    Integer nec ${ client_name } odio.

    Praesent libero.

    [VERTICAL_LINE]

    Sed cursus ante dapibus diam.

    Sed nisi.
    [END_CAPTION]

    [CENTER] Nulla quis sem at
    nibh elementum imperdiet.

    Duis sagittis ipsum. Praesent
    mauris. Fusce nec tellus sed
    augue semper porta. Mauris massa.
    Proin ut ligula vel nunc egestas
    porttitor.

    Vestibulum lacinia arcu eget nulla.
    Class aptent taciti sociosqu ad
    litora torquent per conubia nostra,
    per inceptos himenaeos.

    Curabitur sodales
    ligula in libero. Praesent
    mauris. Fusce nec tellus sed
    augue semper porta. Mauris massa.
    Proin ut ligula vel nunc egestas
    porttitor.

    [FLUSHLEFT] Sed dignissim. [NEWLINE]
    Lacinia nunc. [NEWLINE]
    Curabitur tortor. [NEWLINE]
    These lines are [NEWLINE]
    flushed left.

    Pellentesque nibh.

    [NOINDENT] Primis tacimates eos
    in. Vel affert vituperata te, eos
    te melius legimus temporibus. At
    quaeque aliquando contentiones
    his. First-line indentation is
    suppressed in this paragraph.

    [FILE stareps.eps]

    Unless a width is specified, images
    will be displayed four inches wide.
    Maecenas mattis. Sed convallis
    tristique sem.

    [FLUSHRIGHT] Proin ut ligula
    vel nunc egestas porttitor.
    [NEWLINE]
    Quisque volutpat condimentum
    velit. [NEWLINE]
    We are flushed right.

    Morbi lectus risus, iaculis vel,
    suscipit quis, luctus non, massa.
    Time for a page break.

    [PAGEBREAK]

    Nulla facilisi. Ut fringilla.
    Suspendisse potenti.

    [INDENTBY 3in] Curabitur tortor.
    Pellentesque nibh. Aenean quam.
    In scelerisque sem at dolor.
    Maecenas mattis. Sed convallis
    tristique sem. Proin ut ligula
    vel nunc egestas porttitor. I
    am indented by three inches.

    [INDENTBY 1in 1in] Morbi lectus
    risus, iaculis vel, suscipit quis,
    luctus non, massa.  Fusce ac
    turpis quis ligula lacinia
    aliquet. Sed convallis tristique
    sem. I am indented by one inch
    on each side.

    Now, let's put text in two columns
    side by side.

    [BEGIN_TWOCOL]

    This is the first column.

    Nulla facilisi.

    Let's insert some vertical space.

    [SKIPLINE]
    Cras metus.

    [BREAK]

    This is the second column.

    Cras metus. Let's have some
    vertical space again.

    [SKIPLINE]

    Integer id quam.

    Morbi mi.

    [END_TWOCOL]


    Quisque nisl felis, venenatis
    tristique, dignissim in,
    ultrices sit amet, augue.

    [FLUSHLEFT] [FILE bluediamond.png, 0.5in]

    Maecenas mattis. Sed convallis
    tristique sem.

    [BORDER] Vestibulum ante ipsum
    primis in faucibus orci luctus et
    ultrices posuere cubilia
    Curae; [FILE bluediamond.png, 10pt]
    Morbi lacinia molestie dui.

    Here we see various types of dashes.
    Praesent[HYPHEN]mauris.  Nulla
    quis [ENDASH] sem at nibh
    elementum imperdiet.  Duis
    sagittis[EMDASH]ipsum.

    [BORDER] Class aptent
    taciti sociosqu ad litora torquent
    per conubia nostra, per inceptos
    himenaeos.
    [NEWPAR]
    Curabitur sodales ligula in libero.
    Sed dignissim lacinia nunc.
    [NEWPAR]
    You can include paragraph breaks
    inside of a border.

    Aenean quam. In scelerisque sem at
    dolor. Maecenas mattis. Sed
    convallis tristique sem.  Let us
    now stop indenting the first line
    of each paragraph.

    [STOP_INDENTATION]

    Duis sagittis ipsum. Praesent
    mauris. Fusce nec tellus sed
    augue semper porta. Mauris massa.
    Proin ut ligula vel nunc egestas
    porttitor.

    Praesent mauris. Fusce nec tellus sed
    augue semper porta.

    [TAB] Even though we are no longer
    indenting the first line of each
    paragraph automatically, we can
    still indent manually.

    Vestibulum lacinia arcu eget nulla.
    Class aptent taciti sociosqu ad
    litora torquent per conubia nostra,
    per inceptos himenaeos.  Let us go
    back to indenting the first line
    of each paragraph.

    [START_INDENTATION]

    Duis sagittis ipsum. Praesent mauris.
    Fusce nec tellus sed augue semper
    porta. Mauris massa.  Proin ut
    ligula vel nunc egestas porttitor.

    Vestibulum lacinia arcu eget nulla.
    Class aptent taciti sociosqu ad
    litora torquent per conubia nostra,
    per inceptos himenaeos.  Let's try
    single spacing now.

    [SINGLESPACING]

    Ullum primis scripserit ne vis, ad eam
    quem dictas dissentias. Alia
    scripserit vel cu, choro delicata
    dissentiunt mel no, reque persequeris
    mei an. Paulo graeci ex eos, no usu
    dicit inimicus. In putant ornatus
    forensibus cum, percipit mediocrem
    in vel.

    Alii timeam eos ut, habeo oblique
    ocurreret ei sea. Quis utroque
    definiebas et per, ad sumo
    repudiandae eam, pro no sale
    adolescens. Habeo splendide
    evertitur has eu, in has vocent
    signiferumque. Ex qui homero graeci
    quaerendum, nulla veniam blandit
    ei mea. Sea at idque referrentur.
    Sit autem liberavisse te.  Let's
    go back to double spacing now.

    [DOUBLESPACING]

    Sea ad tacimates elaboraret,
    vel simul urbanitas efficiantur id.
    Id mel option denique. Ludus essent
    eu ius, natum option appareat cu mea,
    in saepe deterruisset pri. Mei et vero
    admodum. At quas pertinax sed, et mel
    modo probo iriure. Per te sententiae
    elaboraret. Cum tritani delectus
    definitionem ne.
Formatting documents with Pandoc templates and metadata
You can also control global formatting options by setting metadata
for the document. These options are passed through to Pandoc, where
they are applied to document templates.
---
question: Your document is ready.
sets: provide_user_with_document
attachment:
  - name: A *hello world* document
    filename: Hello_World_Document
    metadata:
      SingleSpacing: True
      fontsize: 10pt
    description: A document with a **classic** message
    content: |
      Hello, world!  Quisque ut tempus enim. Aliquam tristique
      placerat metus sollicitudin imperdiet. Donec eget dignissim
      libero, eu elementum justo.

      Maecenas iaculis mollis aliquam. Nullam vestibulum erat in
      sapien ultrices dignissim eu et turpis. Vivamus vestibulum felis
      eu sodales ornare. Nunc auctor sapien et porttitor posuere.
---
Metadata values can contain Mako template commands.
To set interview-wide default values for the metadata, you can use
attachment options.
Metadata applicable to RTF and PDF files
- If you wish to use a standard document title, set the following:
titleauthor- a listdate
toc- default is not defined. If defined, a table of contents is included.SingleSpacing- set this toTruefor single spacing and no indentation of first lines of paragraphs.OneAndAHalfSpacing- set toTruefor 1.5 spacing, with indentation of first lines.DoubleSpacing- set this toTruefor double spacing with indentation of first lines. This is the default.TripleSpacing- set this toTruefor triple spacing with indentation of first lines.fontsize- default is12pt. Must be one of10pt,11pt, and12pt.Indentation- not defined by default. InSingleSpacingmode, which by default has no indentation of the first line of each paragraph,Indentationcan be set toTrueto force the indentation of the first line of each paragraph. The amount of indentation is 0.5 inches but this can be customized withIndentationAmount. InDoubleSpacingmode, first-line indentation is enabled by default and can be turned off by settingIndentationAmountto0pt.IndentationAmount- not defined by default. When double spacing is used, the default is 0.5 inches of first-line indentation in each paragraph.- To set the text of headers and footers (which can contain Mako and
Markdown), define one or more of the following:
FirstFooterLeftFirstFooterCenterFirstFooterRightFirstHeaderLeftFirstHeaderCenterFirstHeaderRightFooterLeftFooterCenterFooterRightHeaderLeftHeaderCenterHeaderRight
Metadata applicable to generated PDFs only
The following metadata tags only apply to PDF file generation. To change analogous formatting in RTF files, you will need to create your own RTF document template (for more information on how to do that, see the next section).
HangingIndent- set this toTrueif you want text in lists to using hanging indentation.fontfamily- default isTimes New Roman, but if you installed your system before version 0.4.13, the default ismathptmx, which is a variant of Times Roman.langandmainlang- not defined by default. If defined, polyglossia (for XeTeX) or babel is loaded and the language is set tomainlangif polyglossia is loaded andlangif babel is loaded.papersize- default isletterpaper.documentclass- default isarticle.numbersections- default isTrue. If true, sections are numbered; if false, they are not. (In LaTeX,secnumdepthis set to 5, otherwise 0.)geometry- default isleft=1in,right=1in,top=1in,bottom=1in,heightrounded. These are options for the the geometry package that set the page margins.TopMargin- default is1in. If you changed the top margin ingeometry, change it here as well.BottomMargin- default is1in. If you changed the bottom margin ingeometry, change it here as well.FooterSkip- default is not defined. If defined, will set thefootskipoption of the geometry package to control spacing between the footer and the text.author-meta- default is not defined. Sets author item of PDF metadata using thepdfauthoroption of hyperref.title-meta- default is not defined. Sets title item of PDF metadata using thepdftitleoption of hyperref.citecolor- default is not defined. Sets thecitecoloroption of hyperref, which will default toblueif this is not defined.urlcolor- default is not defined. Sets theurlcoloroption of hyperref, which will default toblueif this is not defined.linkcolor- default is not defined. Sets thelinkcoloroption of hyperref, which will default tomagentaif this is not defined.abstract- default is not defined. If defined, it will include an article abstract in the standard LaTeX format.header-includes- you can set this to a list of lines that will be included in the header of the LaTeX file. You can use this if you want to load a custom package, for example.
Additional customization of document formatting
You can exercise greater control over document formatting by creating
your own template files for Pandoc. The default template files are
located in the docassemble.base package in the
docassemble/base/data/templates directory. The files include:
Legal-Template.tex- this is the LaTeX template that Pandoc uses to generate PDF files.Legal-Template.yml- default Pandoc metadata for theLegal-Template.textemplate, in YAML format. Options passed throughmetadataitems within anattachmentwill append or overwrite these default options.Legal-Template.rtf- this is the template that Pandoc uses to generate RTF files.Legal-Template.docx- this is the reference file that Pandoc uses to generate DOCX files. You can edit this file to change default styles, headers, and footers.
To use your own template files, specify them using the following
options to attachment:
initial yaml: one or more YAML files from which Pandoc metadata options should be gathered. If specified, the default fileLegal-Template.ymlis not loaded, so you can use this as a way to substitute a different set of metadata in place ofLegal-Template.ymlwhile still using the standardtemplate fileLegal-Template.tex. If specifying more than one file, use YAML list syntax.additional yaml: one or more YAML files from which Pandoc metadata options should be gathered, in addition to whatever options are loaded throughinitial_yaml. This can be used to load the metadata inLegal-Template.ymlbut to overwrite particular values. If specifying more than one file, use YAML list syntax.template file: a single.texfile to be used as the Pandoc template for converting Markdown to PDF.rtf template file: a single.rtffile to be used as the Pandoc template for converting Markdown to RTF.docx reference file: a single.docxfile to be used as the Pandoc docx reference file for converting Markdown to DOCX.
Filenames are assumed to reside in the data/templates directory
within the package in which the interview YAML file is located. You
can specify filenames in other packages by including a reference to a
package and directory. For example:
template file: docassemble.demo:data/templates/MyTemplate.texHere is an example:
---
question: Your document is ready.
sets: provide_user_with_document
attachment:
  - name: Response to Motion for Summary Judgment
    filename: Summary_Judgment_Response
    additional yaml:
      - docassemble.pennsylvania:data/templates/legal_format.yml
      - docassemble.pennsylvania:data/templates/pleading_format.yml
    template file: summary_judgment_template.tex
    rtf template file: summary_judgment_template.rtf
    content: |
      The court should decide in my favor.
---
If this question appears within a YAML file located in the package
docassemble.pa_family_law, the assumption is that the files
summary_judgment_template.tex and summary_judgment_template.rtf
will exist in the directory docassemble/pa_family_law/data/templates
within that package.
If you want to use a custom template for all the attachments in a given interview, you do not have to specify the same values for every attachment. Instead, you can set attachment template options that will be applied to all attachments in the interview:
---
attachment options:
  additional yaml:
    - docassemble.pennsylvania:data/templates/legal_format.yml
    - docassemble.pennsylvania:data/templates/pleading_format.yml
  template file: summary_judgment_template.tex
  rtf template file: summary_judgment_template.rtf
  metadata:
    SingleSpacing: True
    fontsize: 10pt
---
If you use an interview-wide attachment options block to set
defaults, you can override those defaults for a particular attachment
by providing specific options within the question block. If you
specify metadata in both the attachment options and the
attachment block, the metadata in the attachment block will
merge with the metadata in the attachment options block.
If the interview YAML has more than one attachment options block,
the settings in later blocks will override the settings in earlier
blocks.
Assembling DOCX templates
You can assemble documents from DOCX template files by referring to a
docx template file.
question: |
  Here is your document.
subquestion: |
  Does it meet your approval?
yesno: user_approves
attachment:
  name: Your letter
  filename: letter
  docx template file: letter_template.docx
  valid formats:
    - pdf
    - docx
This allows you to use Microsoft Word to design your document and
apply formatting. docassemble will simply “fill in the blanks.”
(This is in contrast to the method of
using docx as one of the valid formats, described
above. When you use that method, you assemble a document
from scratch by writing Markdown text that is then converted to
DOCX format.)
The file referenced with docx template file is assumed to reside in
the data/templates directory of your package, unless a specific
package name is specified. For example, you could refer to a DOCX
file in another package by writing:
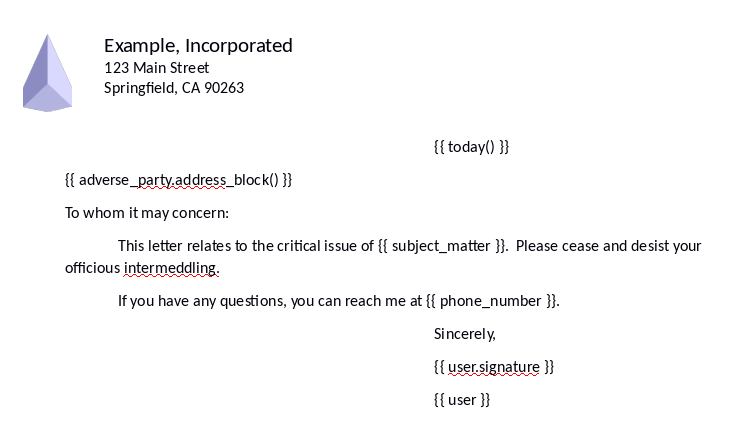
docx template file: docassemble.missouri-family-law:data/templates/form.docxIn the example above, the letter_template.docx file contains the following text:
If you give docx template file a YAML list of files, the files
will be concatenated and then assembled. (Note that some DOCX
features can be lost in the process of concatenation.)
The docx template file feature relies heavily on the Python
package known as python-docx-template. This package uses the
Jinja2 templating system to indicate fields in the DOCX file and
logic based on Python expressions. Jinja2 is different from the
Mako templating system, which docassemble primarily uses, but it
serves the same general purpose.
When you work on DOCX templates, be careful not to confuse the rules
of Mako and Jinja2. The biggest difference between the formats is
that Mako uses the syntax ${ variable_name }, while Jinja2 uses
the syntax {{ variable_name }}.
In Mako, you would write an if/else statement like this:
You may wish to distribute your property to your
% if user.child.number() > 0:
heirs.
% else:
friends.
% endif
In Jinja2, you would write:
You may wish to distribute your property to your
{% if user.child.number() > 0 %}heirs.{% else %}friends.{% endif %}
Another big difference is that Jinja2 does not allow you to use
Python built-in functions like max() and any(), or built-in
Python names like None. Instead, it provides you with a variety of
filters and tests. For example, instead of writing
You have {{ len(favorite_fruits) }} favorite fruits, you
would write
You have {{ favorite_fruits | length }} favorite fruits.
Instead of writing
{% if result_of_api_call is None %}N/A{% endif %}
you would write
{% if none(result_of_api_call) %}N/A{% endif %}
Also, the python-docx-template package uses a slightly modified
version of the Jinja2 syntax to account for the fact that it is
being used inside of a DOCX file. The standard Jinja2 way of
writing a “for loop” is:
{% for item in fruit_list %}
{{ item }} is a type of fruit.
{% endfor %}
In a DOCX template, however, this will result in extraneous line breaks. You can avoid this by writing:
{%p for item in fruit_list %}
{{ item }} is a type of fruit.
{%p endfor %}
The p modifier indicates that the paragraph containing the {%p ... %} statement should be removed from the
document. When you edit the spacing of paragraphs in your DOCX
template file, you need to edit the paragraph spacing of paragraphs
that do not contain {%p ... %} statements.
You may need to change both the spacing after a paragraph and the
spacing before a paragraph in order to get the results you want.
Other modifiers besides p include tr for table rows, tc for
table columns, and r for “rich text.”
If you have a bulleted or numbered list in a DOCX template and you want
to display an item in the list conditionally (using an if .. endif statement),
you should use the {%p if ... %} syntax. Place
the {%p if ... %} and
the {%p endif %} statements on their own lines in the list.
If you place the {%p endif %} on the same line
as the {%p if... %} line, you may get an error about
a missing endif statement, since the p modifier could cause the
endif statement to be deleted before it is processed.
The following code in a DOCX template:
- {% if my_var == ‘A’ %}The variable is A.{% endif %}
- item2
- item3
will result in the following output if my_var is not equal to 'A':
- item2
- item3
Instead, if you write:
- {%p if my_var == ‘A’ %}
- The variable is A.
- {%p endif %}
- item2
- item3
The output will be:
- item2
- item3
The p prefix in {%p ... %} means “process the
Jinja2 in this paragraph, but don’t actually include this paragraph in
the assembled document.”
You will need to do something similar when using tables in your DOCX file. For example, when using a “for” loop over the rows of a table, you would include two extra rows:
| Name | Age |
|---|---|
| {%tr for child in children %} | |
| {{ child }} | {{ child.age_in_years() }} |
| {%tr endfor %} |
The tr prefix in {%tr ... %} means “process
the Jinja2 in this row, but don’t actually include this row in the
assembed document.”
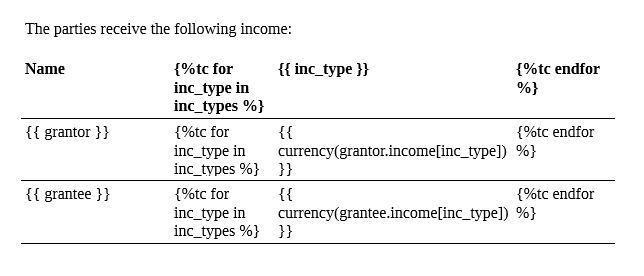
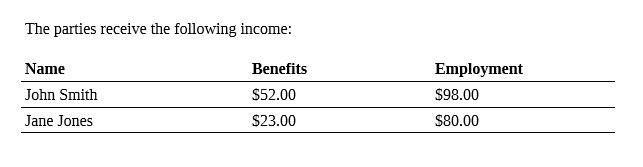
When using a “for” loop over the columns of a table, you would include extra columns:
| Name | {%tc for inc_type in inc_types %} | {{ inc_type }} | {%tc endfor %} |
|---|---|---|---|
| {{ grantor }} | {%tc for inc_type in inc_types %} | {{ currency(grantor.income[inc_type]) }} | {%tc endfor %} |
| {{ grantee }} | {%tc for inc_type in inc_types %} | {{ currency(grantee.income[inc_type]) }} | {%tc endfor %} |
The tc prefix in {%tc ... %} means “process
the Jinja2 in this table cell, but don’t actually include this table
cell in the row.”
For more information about tables in DOCX files, see the subsection on tables below.
Images can be inserted into DOCX files.
This is illustrated in the example above: the variable
user.signature is a graphics image (an image of the user’s signature
created with the signature block). You can insert DAFile,
DAFileList, and DAStaticFile objects into DOCX files in a
similar way. (See include_docx_template() below for instructions
on inserting other DOCX files inside a DOCX file.) If you insert a
PDF file, it will be converted into a series of page images. If you
insert a text file, the raw text will be included. When using the
markdown filter, you can also use the [FILE ...] markup syntax to
insert an image. Do not mix image references with other text inside
of a single field (e.g., by writing {{ "Here is my dog: " +
a_file }}. Image references need to be by themselves
inside of {{ }} brackets. To change the width
of an image, use the .show() method with a width parameter. E.g.,
{{ my_image.show(width="2in") }}
Note that the paragraph spacing of the paragraph into which you insert an image may affect the appearance of the image. For example, if the line spacing of the paragraph is fixed, the image that you insert will be cropped if it is taller than the line spacing. To prevent the image from being cropped, select a flexible line spacing like “single” or “double.”
When you insert text into a DOCX file using {{ }} brackets, any newlines in the text you are inserting will be
treated as spaces, and any Markdown formatting codes will be passed
through literally. If you want your newlines and Markdown
formatting codes to translate into DOCX formatting, see the section
below on inserting multi-line or formatted text into a single field
in a DOCX file.
When you use docx template file, the user is provided with both a
PDF file and a DOCX file. The PDF file is generated by converting
the DOCX file to PDF format using LibreOffice. To suppress the
creation of the PDF version, you can add a valid formats
specifier.
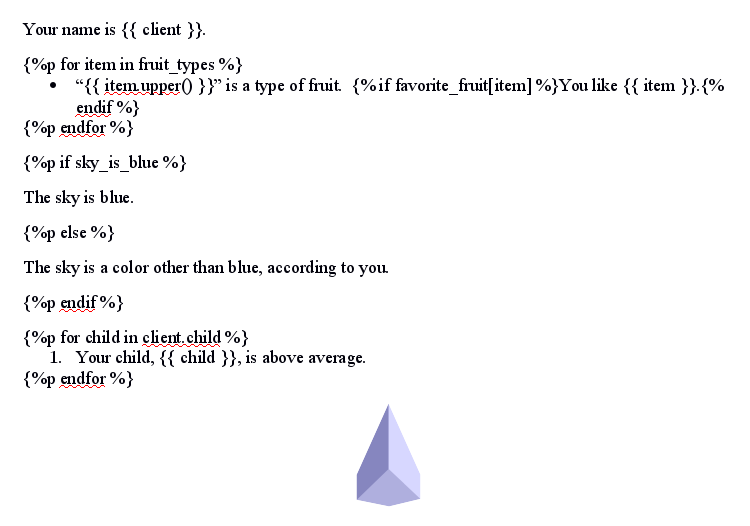
Here is an example that demonstrates how to use DAList and DADict in a DOCX template and using Jinja2 templating code.
event: document_shown
question: |
  Here is the document.
attachment:
  docx template file: docx-jinja2-demo.docx
The docx-jinja2-demo.docx file looks like this:
For more information on using Jinja2 in DOCX templates, see the
documentation of python-docx-template.
The section below on using code to find a template file explains how
you can use code to determine what template file to use with docx
template file.
Inserting other DOCX files into DOCX templates
You can include the paragraphs of a DOCX file inside of your DOCX template.
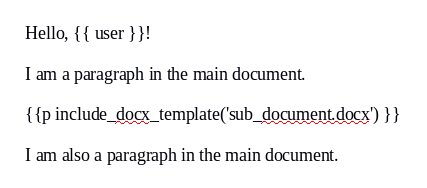
See the documentation for the include_docx_template() function for
more information. Note that it is important to use the p form of
Jinja2 markup, by itself on a line in the document:
{{p include_docx_template(‘sub_document.docx’) }}
If you have a DOCX file in the form of a DAFile or DAFileList
object, then you can do:
{{p include_docx_template(the_file) }}
or just
{{p the_file }}
Inserting tables into DOCX templates
You can assemble tables in a DOCX template using a Jinja2 “for loop.”
Here is an example. The DOCX template looks like this:
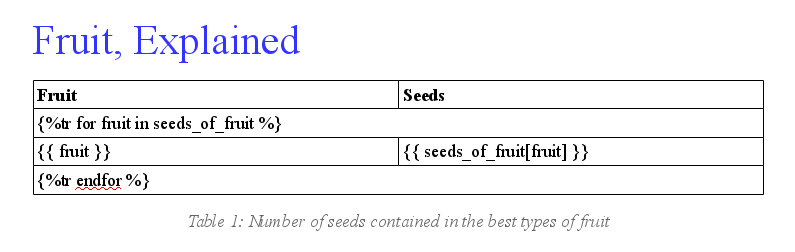
Note that the row that should be repeated is sandwiched between two
rows containing for and endfor Jinja2 statements. Both of these
statements use the tr prefix. These two rows, which span the width
of the table, will not appear in the final output. The final output
will look something like this:
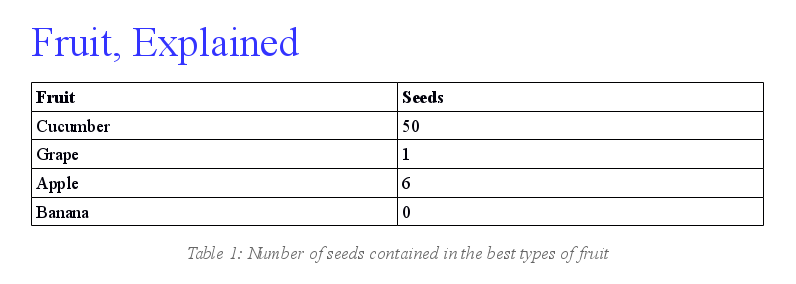
In this example, each row corresponds to an item in a Python dict
called seeds_of_fruit. Here is an example of an interview that
gathers items into a DADict called seeds_of_fruit and provides
the DOCX file.
objects:
seeds_of_fruit: DADict
---
mandatory: true
code: |
seeds_of_fruit.there_are_any = True
introduction_shown
---
question: |
Tell me about a fruit.
fields:
- Name: seeds_of_fruit.new_item_name
- Seeds: seeds_of_fruit.new_item_value
datatype: integer
min: 0
---
question: |
Are there any other fruits you would
like to describe?
yesno: seeds_of_fruit.there_is_another
---
mandatory: True
question: |
Here is your document.
attachment:
docx template file: table_template.docx
For more information about gathering items into a DADict object,
see the Dictionary subsection of the Groups section of the
documentation.
Your DOCX tables can also loop over the columns of a table.
The following interview, which uses the template docx-table-columns.docx, illustrates this.
generic object: Individual
question: |
  How much does ${ x } receive from ${ i }?
fields:
  - Income: x.income[i]
    datatype: currency
Passing values for particular fields
By default, all of the variables in your interview will be available
in the DOCX template. If your DOCX template uses different variable
names than are present in your interview, you can use the fields or
field code specifiers to indicate a mapping between variable names
in the DOCX template and the values that you want to be filled in.
This operates much like the PDF fill-in fields
feature. If a variable in the DOCX file is not explicitly
defined in the fields or field code list, definitions will be
sought in the interview answers.
The content of fields is converted into a data structure, which is
passed to the render() method of python-docx-template. The data
structure needs to be a Python dict, but it can contain other data
types. For example, in this interview, fields contains a list of
ingredients:
mandatory: True
question: |
  Here is your recipe.  Enjoy!
attachment:
  name: Your recipe
  filename: recipe
  docx template file: recipe_template.docx
  fields:
    - title: Mandelbrot cookies
    - oven_temperature: ${ oven_degrees } degrees
    - ingredients:
        - apple sauce
        - ${ special_ingredient }
        - flour
        - sugar
    - preparation_time: 48 hours
In your DOCX file, you will need to use appropriate Jinja2 syntax in order to process the list of ingredients. Here is an example of a DOCX file that uses the above data structure:

Turning off automatic conversion of DOCX variables
Normally, all values that you transfer to a DOCX template using
fields, field variables, and field code are converted so that
they display appropriately in your DOCX file. For example, if the
value is a DAFile graphics image, it will be converted so that it
displays in the DOCX file as an image. Or, if the value contains
document markup codes that indicate line breaks, these will display
as actual line breaks in the DOCX file, rather than as codes like
[BR].
However, if your DOCX file uses Jinja2 templating to do complicated things like for loops, this conversion might cause problems.
For example, suppose you have a variable vegetable_list that is
defined as a DAList with items ['potatoes', 'beets'], and you
pass it to a DOCX template as follows.
event: document_shown
question: |
  Here are your instructions.
attachment:
  docx template file: instruction_template.docx
  field variables:
    - vegetable_list
This will work as intended if your template uses vegetable_list in a
context like:
make sure to bring {{ vegetable_list }} to the partyThis will result in:
make sure to bring potatoes and beets to the party
When the DAList is converted, the .comma_and_list() method is
automatically applied to make the data structure “presentable.”
However, suppose you wanted to write:
{%p for vegetable in vegetable_list: %}
Don't forget to bring {{ vegetable }}!
{%p endfor %}
In this case, since the variable vegetable_list has been converted
into a literal piece of text, potatoes and beets, the for loop
will loop over each character, not over each vegetable. You will get:
Don’t forget to bring p!
Don’t forget to bring o!
Don’t forget to bring t!
Don’t forget to bring a!
Don’t forget to bring t!
and so on.
You can prevent the conversion of vegetable_list into text by using raw
field variables instead of field variables. For example:
event: document_shown
question: |
Here are your instructions.
attachment:
docx template file: instruction_template.docx
raw field variables:
- vegetable_listNow, the vegetable_list variable in the DOCX template will be a
real list that Jinja2 can process. The output will be what you expected:
Don’t forget to bring potatoes! Don’t forget to bring beets!
The conversion to text is also done if you use field code or code
to pass variables to a DOCX template. In order to pass variables in
“raw” form using field code or code, you can wrap the code in the
raw() function. For more information, see the
documentation for the raw() function.
Inserting multi-line or formatted text into a single field in a DOCX file
If you insert text into a docx template file using {{
the_variable }}, and the the text you are inserting
contains newlines, the newlines will show up as spaces in the DOCX
file. Also, if the text contains Markdown formatting, it will be
inserted into the DOCX file literally.
If the text that you want to insert contains newlines, and you want
the newlines to be reflected in the DOCX file as manual line breaks,
write {{ the_variable | manual_line_breaks }}
instead.
If the text that you want to insert contains Markdown formatting,
and you want that formatting to be translated into DOCX formatting,
insert it using markdown Jinja2 filter or the inline_markdown
Jinja2 filter.
If some_variable contains Markdown formatting that includes
paragraph breaks, lists, or other paragraph-level formatting, write:
{{p some_variable | markdown }}
If some_variable contains Markdown indicating bold, italics, or
other character-level formatting, but no paragraph breaks, lists, or
other paragraph-level formatting, write:
I went to {{r some_variable | inline_markdown }} for lunch.
It is important that you understand the difference between character-level content and paragraph-level content. You see this distinction in Microsoft Word when you use “Styles.” Some Styles are character-level or “inline” because they only affect things like bold, italics, underline, and color. Other Styles are paragraph-level because they affect things like paragraph indentation, bullets, or numbering. A paragraph break is a paragraph-level concept, whereas a manual line break is a character-level concept.
Under the rules of python-docx-template, you need to use the
prefix {{r when the contents contain
character-level DOCX formatting (which is what the inline_markdown
filter produces), and you need to use {{p when
the contents return paragraph-level DOCX formatting (which is what the
markdown filter and the the insert_docx_template() function
produce). It is very important that you get this right, because the
symptoms of a mistake are confusing: the contents may simply
disappear, or the DOCX file may get corrupted because you are
inserting bad XML.
When using the markdown filter to insert multiple paragraphs into a
DOCX file, note that according to the Markdown standard, a single
newline does not break a paragraph; you need two newlines to break a
paragraph. If you want to convert single newlines into paragraphs
breaks, there is another Jinja2 filter that can help. Instead of
writing
{{p the_text | markdown }}, write
{{p the_text | paragraphs | markdown }}.
The paragraphs filter runs the text through the
single_to_double_newlines() function.
If you insert Markdown hyperlinks into the DOCX file, it is important that you prepare your DOCX template file so that it can use hyperlinks properly. To do this, use Word or LibreOffice to edit your DOCX template, type some text, highlight the text, and convert the text into a hyperlink. You can then delete the hyperlink. This will have a side effect on the DOCX file that will prepare it to accept hyperlinks. See character style of hyperlinks in DOCX files for more information about how hyperlinks appear in DOCX files. If you do not do this, hyperlinks will not work properly in documents converted from DOCX to PDF.
Since 2020, there have been changes to the way the markdown filter
works. If you installed docassemble before these changes went into
effect, you will not see these changes unless you update your
Configuration. The changes were implemented in this way so as not to
break backwards-compatibility.
The following Configuration directives enable the modern (superior) functionality:
new markdown to docx: True
new template markdown behavior: True
If you created your Configuration (i.e. did docker run for the first
time) since version 1.3.29, your configuration will already contain
these directives.
If you created your Configuration before 1.3.29, you should edit your Configuration so that it contains these lines, and then you will have the modern functionality. Keep in mind, though, that you may need to edit your existing templates if they rely on the legacy behavior.
One legacy behavior was that the markdown filter was applied
automatically to any template inserted into a docx template
file. You could get around this by inserting the template with
my_template.show_as_markdown(), which would not apply the
filter. The new template markdown behavior: True Configuration
directive, which is available as of version 1.3.29, enables better
functionality, which is not to apply the markdown filter
automatically. If my_template is a template, you need to insert
it using {{p my_template | markdown }} or {{r my_template | inline_markdown }}, depending
on whether the template should be treated as paragraph-level or inline.
Another legacy behavior is that the markdown filter only worked with
character-level Markdown formatting, and had to be included in DOCX
files using {{r some_variable | markdown }}.
The new markdown to docx: True Configuration directive, which is
available as of version 1.1.2, enables better functionality, which is
that the markdown filter inserts paragraph-level DOCX formatting,
and is used with the p prefix ({{p some_variable |
markdown }}) while the inline_markdown filter inserts
inline DOCX formatting, and is used with the r prefix ({{r
some_variable | inline_markdown }}).
Another way to insert formatted text using Jinja2 is to use the
“rich text” feature of python-docx-template. The RichText
Jinja2 filter allows you to include line breaks inside of variable
text:
The swift brown {{r animal | RichText }} jumped over the lazy dog.
Using this filter, any newline (\n) in animal will be converted
into a manual line break and any \a character will be converted into
a paragraph break. When using RichText, you must always use the r
prefix, {{r ... }}.
Jinja2 filters
Jinja2 does not allow you to write every kind Python expression, the
way that Mako does; there are limitations, such as not being able to
refer to certain built-in names like None. Jinja2 allows you to
do sophisticated things, however, but it encourages the use of
“filters” rather than the writing of Python code. There are a
number of built-in filters in Jinja2 that you can use. In
addition, there are some docassemble-specific filters, which are
either discussed above or are the names of functions.
RichTextadd_separatorsalphaallanycapitalizechaincomma_and_listcomma_listcountry_namecurrencyfix_punctuationinline_markdownmanual_line_breaksmarkdownnice_numberordinal_numberordinalparagraphsphone_number_formattedphone_number_in_e164redactromansalutationsingle_paragraphtitle_caseverbatimword
You can also write your own
filters. To do so, you need to write a module file. For example, here
is a module file that creates a filter called no_ssn for removing
Social Security Numbers.
# pre-load
import re
from docassemble.base.util import register_jinja_filter
def remove_ssn(text):
return re.sub(r'[0-9][0-9][0-9]-[0-9][0-9]-[0-9][0-9][0-9][0-9]', 'XXX-XX-XXXX', text)
register_jinja_filter('no_ssn', remove_ssn)For this to work, the module file has to be installed on the server or present in the Modules folder of a user’s Playground.
The register_jinja_filter() function is similar to
update_language_function() in that it needs to run when the server
starts and the server loads modules. That is why the line #
pre-load is at the top. Also note that register_jinja_filter is
not exported when you do from docassemble.base.util import *.
If you have a filter that you want to apply to all Jinja2 variable
interpolations, see auto jinja filter.
Inserting blocks of text more than once in a document
Jinja2 supports the use of “macros,” which are like Python commands except that instead of running Python code, they insert content into the document.
Here is an example of a document in which a paragraph following a
particular template needs to be inserted multiple times. The docx
template file is a file called team.docx, which contains the
following content:
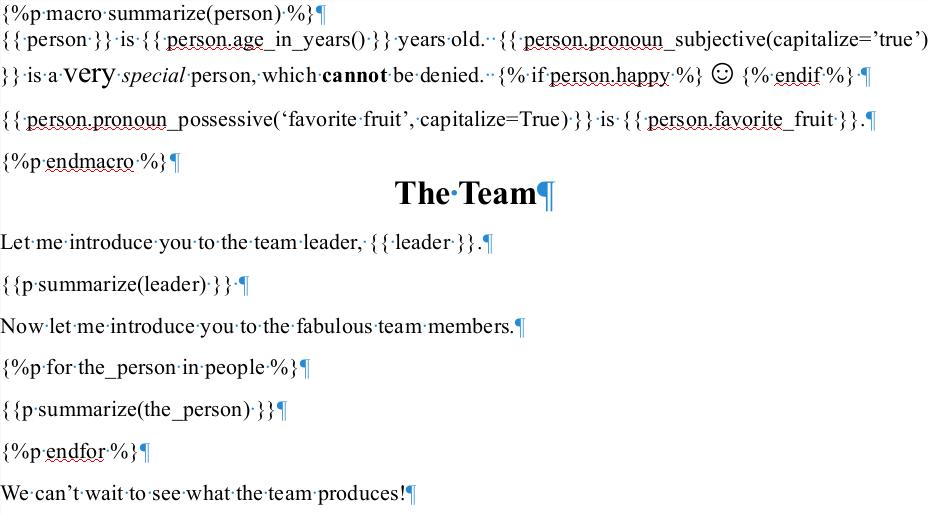
Note the use of {%p macro ... %} and
{%p endmacro ... %}.
The macro in this document contains two paragraphs with Jinja2 statements. The DOCX formatting defined in the macro will be reproduced wherever the macro is inserted.
Here is an interview that assembles a document from team.docx:
event: final_screen
question: |
Here is a description of the team.
attachment:
name: Team
filename: team_summary
docx template file: team.docx
You can also define a macro that includes character-level text.
{% macro say_hello(friend) %}Hello, {{ friend }}!{% endmacro %}
Then you can use the macro by calling it inside brackets:
{{ say_hello(plaintiff) }} How are you today?
The difference from the previous example is that the p prefix is not
used.
When you need to insert text programmatically into different parts of
a DOCX document, using a macro in Jinja2 is generally preferable
to inserting a template or Markdown-formatted text. It is a
good general practice to use the DOCX file to control anything
relating to document formatting. Keep in mind that Markdown was not
designed for typesetting; it was designed for indicating the general
meaning of parts of text in a form-independent manner.
Using tables of contents and other references in DOCX files
If you are using docx template file and your template file uses a
table of contents or other page references that will change depending
on how the document is assembled, set update references to True.
mandatory: True
question: Here is your document
attachment:
name: Brief
filename: brief
update references: True
docx template file: doc-with-toc.docx
This will cause LibreOffice to update all of the references in the document before saving it and converting it to PDF.
You can also set update references to a Python expression. If the
expression evaluates to a True value, the references will be updated.
If update references is not specified, the default behavior is not
to update the references.
Filling PDF templates
If you have a PDF file that contains fillable fields (e.g. fields
added using Adobe Acrobat Pro or a similar application),
docassemble can fill in the fields of the PDF file using
information from an interview and provide the user with a copy of that
PDF file with the fields filled in. To do this, use the
attachment specifier as above, but instead of providing content
or content file, provide a pdf template file and a dictionary of
fields.
For example, here is an interview that populates fields in a file called sample-form.pdf:
question: |
  Here is your PDF form
attachment:
  name: A filled-in form
  filename: filled-form
  pdf template file: sample-form.pdf
  fields:
    - Your Name: |
        ${ user }
    - Your Organization: |
        ${ user.organization }
    - Apple Checkbox: |
        ${ likes_apples }
    - Orange Checkbox: |
        ${ likes_oranges }
    - Pear Checkbox: |
        ${ likes_pears }
    - Toast Checkbox: |
        ${ likes_toast }
mandatory: True
The pdf template file is assumed to reside in the data/templates
directory of your package, unless a specific package name is
specified. For example, you could refer to a file in another package
by writing:
pdf template file: docassemble.missouri-family-law:data/templates/form.pdfIn Adobe Acrobat Pro’s “Add or Edit Fields” mode, the PDF file looks like this:
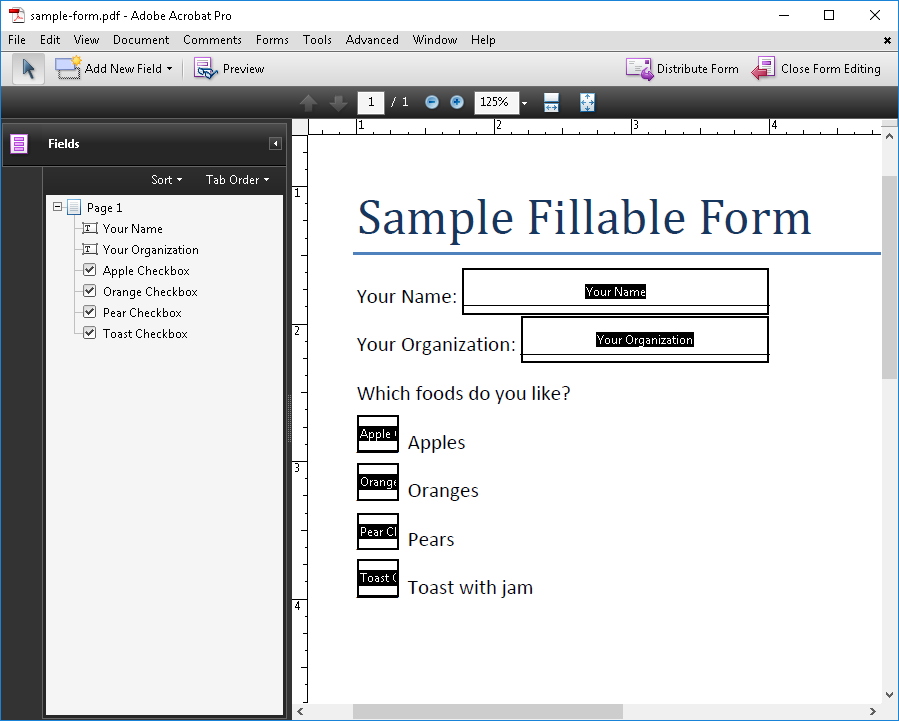
The fields must be in the form of a YAML list of dictionaries, or
a single dictionary. The names of the fields listed in fields must
correspond exactly with the names of the fields in the PDF file.
Luckiliy, there is a tool that will help you extract the literal
field names from a PDF file.
If your PDF document has many fields, it is strongly recommended that
you use Adobe Acrobat Pro to give each field a concise, meaningful,
and accurate field name (as well as a helpful tooltip). Adobe
Acrobat Pro has a feature for automatically assigning names to
fields, but this tool often assigns incorrect names. You should go
through this process before you generate the attachment
specifier for filling fields in the PDF file.
While it is legal for a PDF file to contain more than one field with the same name, please note that docassemble is unable to populate such fields. You must give each field in your PDF file a unique name.
When writing the values of the fields, you can use Mako, but not Markdown. If you use Markdown, it will be interpreted literally.
The section below on passing values using code explains alternative ways that you can populate the values of fields in a PDF file.
You have a choice whether to list fields as a single dictionary or a list of dictionary items. Providing the fields in the form of a list is usually preferable because it provides an order in which the fields should be evaluated; if you only provide a single dictionary, the items will be evaluated in a random order.
The section below on using code to find a template file explains how
you can use code to determine what template file to use with pdf
template file.
Making PDF files non-editable
By default, the PDF files created by filling in
forms in a pdf template file can be edited by the user; the fill-in
form boxes will still exist in the resulting document.
If you want to prevent users from editing the forms created through
pdf template file, set the editable specifier to False (or a
Python expression that evaluates to False). For example:
question: |
  Here is your PDF form
attachment:
  name: A filled-in form
  filename: filled-form
  pdf template file: sample-form.pdf
  editable: False
  fields:
    Your Name: |
      ${ user }
    Your Organization: |
      ${ user.organization }
    Apple Checkbox: |
      ${ likes_apples }
    Orange Checkbox: |
      ${ likes_oranges }
    Pear Checkbox: |
      ${ likes_pears }
    Toast Checkbox: |
      ${ likes_toast }
mandatory: True
Using pdftk to fill the fields
By default, docassemble uses pikepdf to fill in fields. If you
want docassemble to use pdftk to fill in the fields, use pdftk:
True.
question: |
Here is your PDF form
attachment:
name: A filled-in form
filename: filled-form
pdf template file: sample-form.pdf
pdftk:
True
fields:
Your Name: |
${ user }
Your Organization: |
${ user.organization }
Apple Checkbox: |
${ likes_apples }
Orange Checkbox: |
${ likes_oranges }
Pear Checkbox: |
${ likes_pears }
Toast Checkbox: |
${ likes_toast }If pdftk is not specified, the default behavior is determined by the
interview’s pdftk features setting. If there is no such feature,
the default is not to use pdftk.
Although pdftk is slower than pikepdf, it can render more accurate appearance streams.
Changing the font used when rendering fields as text
If you use editable: false or pdf/a: True, form fields will be
rendered to text in the PDF file. pdftk performs this task using the
Arial font to render the text. You can indicate that a different font
should be used instead:
question: |
  Here is your PDF form
attachment:
  name: A filled-in form
  filename: filled-form
  pdf template file: sample-form.pdf
  editable: False
  rendering font: "/usr/share/fonts/truetype/noto/NotoSans-Regular.ttf"
  fields:
    Your Name: |
      ${ user }
    Your Organization: |
      ${ user.organization }
    Apple Checkbox: |
      ${ likes_apples }
    Orange Checkbox: |
      ${ likes_oranges }
    Pear Checkbox: |
      ${ likes_pears }
    Toast Checkbox: |
      ${ likes_toast }
For best results, set rendering font to the path of a font on the
server. If you set rendering font to the name of a font, it will
work, but pdftk will use 100% CPU for several seconds as it searches
the fonts on the system, trying to retrieve the filename of the font.
To see a list of font files available on the server, you can use the font list tool.
When specifying a rendering font, you can use Mako templating.
How to insert signatures or other images into fillable PDF files
To add a signature or other image to a fillable PDF file, use Adobe Acrobat Pro to insert a “Digital Signature” into the document where you want the signature to appear. Give it the height and width you want the image to have. Give the field a unique name.
Then, the image will be a field, just like a checkbox or a text box is
a fill-in field. In your pdf template file, set the field to ${
user.signature } or another reference to an image. docassemble
will trim whitespace from the edges of the image and fit the image
into the “Digital Signature” box.
For example, here is an interview that populates text fields and inserts a signature into the template Transfer-of-Ownership.pdf:
question: |
  Please sign your name below.
signature: user.signature
under: |
  ${ user }
---
sets: final_screen
question: Congratulations!
subquestion: |
  You have now transferred everything
  you own to ${ friend }.
attachment:
  - name: Transfer of Ownership
    filename: Transfer-of-Ownership
    pdf template file: |
      Transfer-of-Ownership.pdf
    fields:
      - "grantor": ${ user }
      - "grantee": ${ friend }
      - "collection": ${ prized_collection }
      - "signature": ${ user.signature }
It is important that each “Digital Signature” field have a unique name. If there is more than one field in the PDF template with the same name, docassemble will not be able to locate it. If you want to insert the same signature in more than one spot in a document, you can do so as long as each “Digital Signature” field has a different name. For example:
    fields:
      - first signature: ${ user.signature }
      - second signature: ${ user.signature }
      - third signature: ${ user.signature }
Passing values using code
When you use the fields specifier with pdf template file, you
have to use Mako in order to pass the values of interview variables
to the template. For example, suppose you have a PDF file with these
fields:
You can use an interview like this to populate the fields:
mandatory: True
question: Here is your document.
attachment:
  pdf template file: fruit_template.pdf
  fields:
    - favorite_fruit: ${ favorite_fruit }
    - favorite_veggie: ${ favorite_veggie }
    - favorite_legume: ${ favorite_legume }
    - favorite_fungus: ${ favorite_fungus }
However, this is a bit punctuation-heavy and repetitive. As an
alternative, you can use the field variables specifier to list the
variables you want to pass:
mandatory: True
question: Here is your document.
attachment:
  pdf template file: fruit_template.pdf
  field variables:
    - favorite_fruit
    - favorite_veggie
    - favorite_legume
    - favorite_fungus
This will have the same effect.
The field variables specifier only works when your variable in the
template has the same name as the variable in your interview, and when
you do not need to perform any transformations on the variable before
passing it to the template.
The field variables specifier, and other specifiers described in
this subsection, work both with pdf template file and
docx template file. But note that since the
.docx assembly process by default accesses all
of your interview variables, you will normally only need to use field
variables with PDF templates.
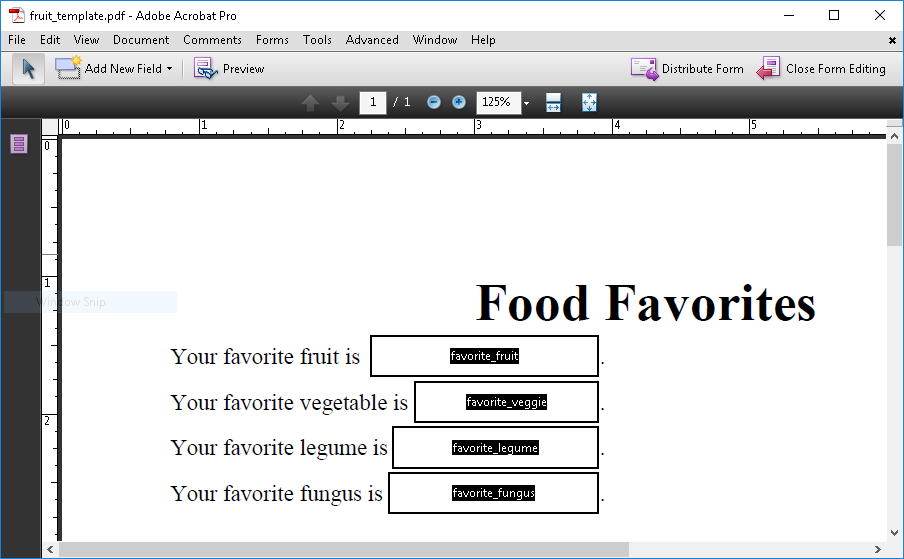
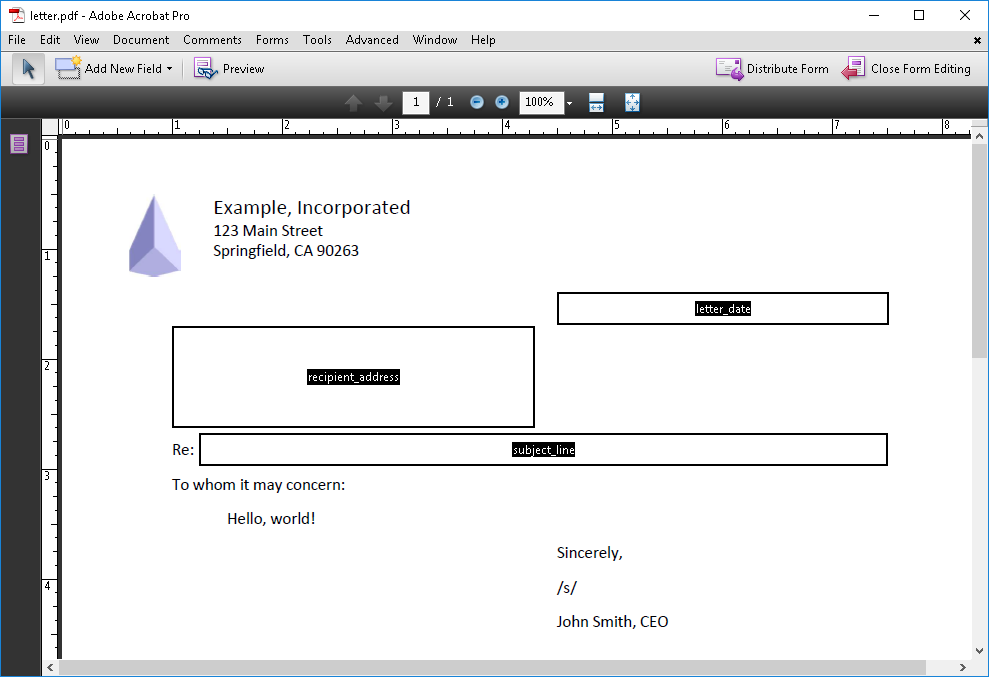
Suppose you want to pass the results of functions or methods to a template that looks like this:
One way to pass the results of functions or methods it is to use
fields, where every value is a Mako variable reference containing
code:
mandatory: True
question: Here is your document.
attachment:
pdf template file: letter.pdf
fields:
- letter_date: ${ today() }
- subject_line: ${ subject_of_letter }
- recipient_address: ${ recipient.address_block() }
You can achieve the same result with less punctuation by using the
field code specifier:
mandatory: True
question: Here is your document.
attachment:
pdf template file: letter.pdf
field code:
- letter_date: today()
- subject_line: subject_of_letter
- recipient_address: recipient.address_block()
There is still another way of passing values to a template: you can
include a code specifier that contains Python code that evaluates
to a Python dict in which the keys are the names of variables in the
template, and the values are the values you want those variables to
have. For example:
mandatory: True
question: Here is your document.
attachment:
pdf template file: letter.pdf
code: |
{'letter_date': today(),
'subject_line': subject_of_letter,
'recipient_address': recipient.address_block()}
Note that the code must be a single Python expression, not a list
of statements. It can be difficult to cram a lot of logic into a
Python expression, so you may want to create a variable to hold the
values. For example:
mandatory: True
question: Here is your document.
attachment:
pdf template file: letter.pdf
code: letter_variables
---
code: |
letter_variables = {}
letter_variables['letter_date'] = today()
if letter_type == 'threat':
letter_variables['subject_line'] = "Litigation hold"
else:
letter_variables['subject_line'] = "Matter we discussed"
letter_variables['recipient_address'] = recipient.address_block()
reconsider: True
Note that the use of the reconsider modifier is important here.
Remember that docassemble will only ask a question or run code
when it encounters an undefined variable. If the recipient’s address
is undefined when docassemble tries to run the code above,
docassemble will ask a question to gather it, but once that
question is answered, docassemble will have no reason to run the
above code again because letter_variables will already be defined –
albeit in an incomplete state, with a letter_date item and a
subject_line item but without a recipient_address item. Setting
reconsider to True ensures that whenever a screen in the interview
needs to know the value of letter_variables, that value will be
“reconsidered”—treated as undefined—and the code above will be
re-run in order to obtain a fresh definition of letter_variables.
The fields, field variables, and field code specifiers are not
mutually exclusive. When they are used together, they supplement each
other. (In DOCX templates, however, the fields do not supplement the
values of variables in the interview dictionary; if you use fields,
field variables, and field code, docassemble will not use the
interview dictionary as a whole.)
Here is a variation on the original PDF fill-in example above that uses code to supplement the values of fields:
question: |
  Here is your PDF form
attachments:
  - name: A filled-in form
    filename: filled-form
    pdf template file: sample-form.pdf
    fields:
      Your Name: |
        ${ user }
      Your Organization: |
        ${ user.organization }
      Apple Checkbox: |
        ${ likes_apples }
      Pear Checkbox: |
        ${ likes_pears }
    code: |
      {"Orange Checkbox": likes_oranges,
       "Toast Checkbox": likes_toast}
mandatory: True
Like the Mako tag ${ ... }, the fields, field variables, and
field code specifiers will convert the values of your variables to a
format suitable for printing. If you are using the DOCX template
format and you only use the {{ ... }} syntax in
your template, this will always be appropriate. But if you want to
use “for loops” and other features of Jinja2 when passing variables
using fields, field variables, or field code, you should read
the next section, which explains how to pass variables in “raw” format
to the template.
When using field code, code, or
field variables to define your fields, there is a shortcut for
formatting decimal numbers: set the option decimal places to the
number of decimal places you want to use.
---
attachment:
  name: My Document
  filename: my_document
  pdf template file: letter_template.pdf
  variable name: the_document
  decimal places: 2
---
By default, when decimal places is not used, numbers are converted
to text using the standard Python method, which uses at least one
decimal place.
Note that decimal places does nothing for variables passed to your
template with a method other than field code, code, or field
variables. In other cases, you will need to manually format your
numbers, for example by writing something like ${ '%.3f' %
ounces_of_gold }.
If you want to assemble a document with
pdf template
file
or docx template file and produce a file even if
some of the variables needed for the fields are undefined, set skip
undefined to True. If skip undefined is true, then blanks will
be substituted for any fields for which a value cannot be determined
due to a variable being undefined. You can also set skip undefined
to a Python expression that evaluates to a true or false value.
If your template contains computations, using skip undefined: True
may lead to bugs that are difficult to track down, since variables
that should have certain data types will be Undefined and you will
get strange error messages.
The skip undefined setting should only be used if the document does
not need to be robust. For example, it could be used to show the user
an intermediate draft of a PDF document. It should not be used as a
crutch for allowing users to generate documents even though there are
bugs in the interview logic. Whether a variable happens to be defined
at the time a document is produced is not a good rationale for
omitting information from a document. The real question is whether
the substantive logic requires it to be defined; if the variable
should be defined, its definition should be obtained. The default
behavior of skip undefined: False imposes rigor to your interview
logic, ensuring that errors will surface.
In general, you should never rely upon defined-ness to control
anything important. Especially when your users can edit their answers
with review screens, a variable may be defined but may be
inapplicable because of another variable. For example, if you ask “Do
you want to include your cell phone number?” and then you ask “What is
your cell phone number,” the user’s cell phone number will be defined.
If the user then changes the answer to the “Do you want to include
your cell phone number?” question, then you will have a situation
where the user’s cell phone number is defined but it should not be
used. If you relied on skip undefined: True to omit the user’s cell
phone from the document, this would only work in situations when the
user did not change their mind. If the user initially said “no” to
the “Do you want to include your cell phone number?” question but then
later changed their mind and changed the answer to “yes,” then skip
undefined: True might result in the cell phone number not being
included in the document even though it should be included.
Defined-ness is an unreliable indicator of whether information is
relevant. Your logic should always be based on substantive facts, not
defined-ness.
How to get a list of field names in a PDF file
When logged in to your server as a developer, you can go to
“Utilities” from the menu and, under “Get list of fields from PDF/DOCX
template,” you can upload a PDF or DOCX file that has fillable fields in it. docassemble
will scan the file, identify its fields, and present you with the
YAML text of a question that uses that file as a pdf template
file or a docx template file with a list of fields.
The following example output is from the sample-form.pdf template referenced earlier:
---
question: Here is your document.
event: some_event
attachment:
  - name: sample-form
    filename: sample-form
    pdf template file: sample-form.pdf
    fields:
      - "Your Name": something
      - "Your Organization": something
      - "Apple Checkbox": No
      - "Orange Checkbox": No
      - "Pear Checkbox": No
      - "Toast Checkbox": No
---
The attachment specifier
The attachment specifier (which can also be written attachments)
creates documents that users can download and/or e-mail.
It can be used within a question or outside of a question (standalone).
mandatory: True
question: Your document is ready.
attachment:
  - name: A hello world document
    filename: Hello_World
    description: |
      A document with a classic message
    content: |
Hello, world!The name, filename, and description items can contain Mako
templates. The name and description filenames can also contain
Markdown. (The filename cannot contain Markdown, since it’s a
filename, after all.)
Saving documents as variables
Including an attachment section in a question block will offer
the user a chance to download an assembled document and e-mail it to
themselves.
Sometimes, you might want to do other things with the document, like e-mail it somewhere (behind the scenes), or post it to a web site.
You can save an assembled document to a variable by adding
a variable name key to an attachment. For example:
mandatory: True
question: Ok, all done.
subquestion: |
  % if submit_to_authority:
    % if sent_ok:
  Your document was sent.
    % else:
  For some reason, I was not able to
  send your document.
    % endif
  % else:
  Ok, I will not send your document to
  The Man.
  % endif
---
question: Your document is ready.
subquestion: |
  Would you like to submit the document
  below to the authorities?
yesno: submit_to_authority
attachment:
  - name: A *hello world* document
    filename: Hello_World_Document
    variable name: hello_file
    content: |
      Hello, world!
---
code: |
  sent_ok = send_email(to=[authority],
                       template=my_email,
                       attachments=[hello_file])
You can also assemble a document and save it to a variable without
presenting it to the user. You do not need to use attachment
with a question; it can stand on its own, and it will be evaluated
when docassemble needs the definition of the variable indicated by
a variable name within the attachment block.
The following example creates a PDF file and an RTF file containing the message “Hello, world!” and offers the files as hyperlinks.
attachment:
  filename: Hello_World
  variable name: my_file
  content: |
    Hello, world!
---
mandatory: True
question: |
  All done.
subquestion: |
  You can download your document in
  [PDF](${ my_file.pdf.url_for() })
  or
  [RTF](${ my_file.rtf.url_for() })
  format.
The variable indicated by variable name will be defined as an object
of class DAFileCollection. An object of this type will have
attributes for each file type generated, where each atttribute is an
object of type DAFile. In the above example, the variable
my_file.pdf will be the PDF DAFile, and the variable
my_file.rtf will be the RTF DAFile. A DAFile has the
following attributes:
filename: the path to the file on the filesystemmimetype: the MIME type of the fileextension: the file extension (e.g.,pdforrtf)number: the internal integer number used by docassemble to keep track of documents stored in the system
See objects for an explanation of the DAFile and
DAFileCollection classes.
Limiting availability of file formats
You limit the file formats that are generated by attachment.
question: Your document is ready.
attachment:
  - name: A hello world document
    filename: Hello_World_Document
    valid formats:
      - pdf
    description: |
      A document with a classic message
    content: |
      Hello, world!
mandatory: True
In this example, the user will not have the option of seeing an HTML preview and will only be able to download the PDF file.
Note that when you use docx template file, the user is normally
provided with both a PDF file and a DOCX file. The PDF file is
generated by converting the DOCX file to PDF format. To hide the PDF
file, set valid formats to docx only.
If you want to limit the file formats dynamically, you can specify
code under valid formats.
question: Your document is ready.
attachment:
  - name: A hello world document
    filename: Hello_World_Document
    valid formats:
      code: |
        ['pdf'] + (['rtf'] if user_has_privilege('admin') else [])
    description: |
      A document with a classic message
    content: |
      Hello, world!
mandatory: True
Using code to find a template file
Typically, when you refer to a filename in an attachment block
using pdf template file or docx template file, you refer to a file
in the data/templates directory of a package, or the “Templates”
folder of the Playground.
Alternatively, you can refer to files using code.
question: |
  Please upload the template file.
subquestion: |
  For best results, download
  [this file] and then upload
  it here.

  [this file]: ${ url_of('letter_template.docx') }
fields:
  - File: the_template_file
    datatype: file
---
mandatory: True
question: |
  Here is your document.
attachment:
  - name: Your letter
    filename: letter
    docx template file:
      code: |
        the_template_file
The code needs to refer to a Python expression (e.g., a variable
name). The expression can return:
- A
DAFile. - A
DAFileList. In the example above, the variablethe_template_filewill be set to aDAFileListwhen the file is uploaded. The first file in theDAFileListwill be used. - A URL beginning with
http://orhttps://. In this case, the file at the URL will be downloaded and used as the template. - A piece of text. In this case, the text will be treated in much the
same way as if it was used included directly in the YAML file.
For example:
- If the text is
sample_document.docx, docassemble will look for a file calledsample_document.docxin thedata/templatesdirectory of the package, or the “Templates” folder of the Playground. - If the text is
docassemble.missouri:data/static/sample_form.pdf, that file will be retrieved from thedocassemble.missouripackage.
- If the text is
Adding a DAFile to an attachment manually
Normally, the attachment block is used to perform document
assembly. If you already have a file that is complete, and you just
want to show it as an attachment, or as part of an attachment, you
can use the manual specifier. The manual specifier needs to refer
to a dictionary where the keys are file extensions (in lowercase) and
the values are Python expressions referencing DAFile objects.
question: Your document is ready.
attachment:
  - name: A merged document
    filename: report
    manual:
      pdf: pdf_concatenate(document_one, document_two)
mandatory: True
---
attachment:
  variable name: document_one
  content: |
    Hello, world!
---
attachment:
  variable name: document_two
  content: |
    Goodbye, world!
If you need to do a computation to figure out what extensions and
documents you need, you can use manual code instead. manual code
must refer to a Python expression that evaluates to a dictionary in
which the keys are file extensions (in lowercase) and the values are
DAFile objects.
question: Your document is ready.
attachment:
  - name: A merged document
    filename: report
    manual code: |
      {'pdf': pdf_concatenate(document_one, document_two)}
mandatory: True
---
attachment:
  variable name: document_one
  content: |
    Hello, world!
---
attachment:
  variable name: document_two
  content: |
    Goodbye, world!
You can use manual or manual code to show file types other than
PDF, DOCX, etc. Here is an example of showing a JPEG file:
imports:
  - PIL
---
objects:
  - my_image: DAFile
---
sets: my_image.initialized
code: |
  im = PIL.Image.new("RGB",
                     (512, 512),
                     "green")
  my_image.initialize(filename="green.jpg")
  im.save(my_image.path(), format='JPEG')
  del im
---
question: Your document is ready.
attachment:
  - name: A green square
    filename: greensquare
    manual:
      jpg: my_image
mandatory: True
It is possible to combine manual and manual code with docx
template file, pdf template file, content, etc. The manual file
extensions will take precedence.
Producing PDF/A files
If you want the PDF file produced by an attachment to be in
PDF/A format, you can set pdf/a to True:
question: Your document is ready.
subquestion: |
If you open the PDF file and look at
its properties, you will see that it
is a PDF/A file.
attachment:
- name: A hello world document
filename: Hello_World_Document
valid formats:
- pdf
description: |
A document with a classic message
content: |
Hello, world!
pdf/a: True
mandatory: True
You can also set it to Python code. If the code evaluates to
a True value, a PDF/A will be produced.
If pdf/a is not specified, the default behavior is determined by the
interview’s pdf/a features setting.
Producing tagged PDF files
You have the option of creating a “tagged PDF,” which includes tags that are helpful for accessibility, document conversion, and text extraction.
question: Your document is ready.
subquestion: |
The file is tagged PDF.
attachment:
- name: A hello world document
filename: Hello_World_Document
valid formats:
- pdf
description: |
A document with a classic message
docx template file: tagged.docx
tagged pdf: True
mandatory: True
You can also set it to Python code. If the code evaluates to
a True value, a tagged PDF will be produced.
If tagged pdf is not specified, the default behavior is determined
by the interview’s tagged pdf features setting.
Protecting PDF files with a password
If you want the PDF file produced by an attachment to be protected
with a password, you can set a password, and the PDF file will be
encrypted.
question: |
  Here is your document.
attachment:
  name: Your letter
  filename: letter
  pdf template file: letter_template.pdf
  password: nelson
There are two passwords that can be set: an “owner” password and a
“user” password. The password sets the “user” password. To set the
“owner” password, specify owner password:
question: |
  Here is your document.
attachment:
  name: Your letter
  filename: letter
  pdf template file: letter_template.pdf
  password: nelson
  owner password: abc123
Using encrypted templates
If your template file uses encryption, you can set a template
password to the password of the PDF template so that it can be
decrypted.
If you get an encryption error when trying to use a PDF, it might be the case that your PDF is encrypted with the empty string. In this case, it might help to do:
question: |
Here is your document.
attachment:
name: Your letter
filename: letter
pdf template file: letter_template.pdf
template password: ""Character style of hyperlinks in DOCX files
When you are using docx template file, you can insert hyperlinks
into your assembled file using the Markdown format for a hyperlink.
For example, you can put the following into a DOCX file.
For more information, visit {{r the_link | inline_markdown }}.
Then in your YAML you can write something like:
code: |
  if legal_issue == 'family':
    the_link = "the [Family Law Information Portal](https://familylawinfo.com)"
  else:
    the_link = "your [local law library](https://lawlibrarydirectory.org), which may be able to help you"
If your DOCX file contains a character style called Hyperlink (the
default in Microsoft Word) or InternetLink (the default in
LibreOffice), this character style will be used.
If you are using Microsoft Word, your document may not contain a
character style called Hyperlink. The character style is not
created by default when you create a new file in Microsoft Word.
However, it is easy to cause the style to be added: edit your template
in Microsoft Word, add a hyperlink manually (any hyperlink will do),
save the file, and then delete the hyperlink. When you create the
link, Microsoft Word will create the character style Hyperlink and
it the character style will persist even after you delete the
hyperlink.
It is important to set up your template in this way; insert a hyperlink into the document, and then delete it. If you do not do this, the hyperlinks that you insert through Markdown will not function as hyperlinks if LibreOffice converts the resulting DOCX file to PDF.
If you want to manually specify a character style to be used for
hyperlinks, you can set a hyperlink style.
mandatory: True
question: |
  Here is your document.
attachment:
  docx template file: resource_guide.docx
  hyperlink style: CustomStyle
---
code: |
  if legal_issue == 'family':
    the_link = "the [Family Law Information Portal](https://familylawinfo.com)"
  else:
    the_link = "your [local law library](https://lawlibrarydirectory.org), which may be able to help you"
If there is no hyperlink style and no character style called
Hyperlink or InternetLink, then underlined blue text will be used
for hyperlinks.
Assembling documents in a different language than the current language
If you need to produce a document in a different language than the user’s language, then the linguistic functions may operate in a way you do not want them to operate.
For example, if your user is Spanish-speaking, but you need to produce
an English language document, you may find that a word or two in the
English language document has been translated into Spanish. (E.g.,
this can happen if your document template uses linguistic functions.
You can remedy this by defining a language for the attachment.
initial: True
code: |
  set_language('es')
---
mandatory: True
language: es
question: El documento está listo.
attachment:
  - name: Alimentos
    language: en
    filename: food_order
    content: |
      This customer would like to order
      ${ comma_and_list('fries', 'a Coke') }.
Without language: en, the output would be:
This customer would like to order fries y a Coke.
With language: en, the output is:
This customer would like to order fries and a Coke.
The value of language must be plain text like en or fr; it
cannot be a Mako expression.
Assembling text files
If you want to use docassemble to assemble text files, set raw:
True and use a content file.
mandatory: True
question: |
Here is the source code.
attachment:
name: Hello, world program
filename: hello_world
raw:
True
content file: sample.cpp
The only option on the download screen will be a download.
If you use variable name, the result will be a
DAFileCollection object with the attribute raw set to a
DAFile object representing the assembled text file.
Controlling file permissions
By default, access to documents is limited to the user who created it
and to any other users who have joined the interview session. Access
to files can be managed using the methods .set_attributes(),
.user_access(), and .privilege_access() if you set a
variable name. You can also control the permissions on files
using specifiers under attachment.
By default, any file that a user uploads
during a session will be deleted when that session is deleted. If you
want the file to continue to exist after the session is deleted, you
can set the persistent specifier to True. The modifier also
accepts Python code; if the code evaluates to a true value, the file
will persist. This has the same effect as calling the
.set_attributes() method on the file variable using the keyword
attribute persistent.
By default, any file that a user uploads will
only be downloadable by a session user or by an administrator. If you
want the file to be accessible to anyone, set the field modifier
private to False. The modifier also accepts Python code; if the
code evaluates to a false value, the file will be available to anyone.
This has the same effect as calling the .set_attributes() method
on the file variable using the keyword attribute persistent.
If you set private: False, then the file
is available to anyone, including non-logged in users. Even a bot
that guesses URLs could download the file. If you want to share with
particular users, you can indicate specific users using the allow
users specifier. If allowed users refers to a YAML list, the list
is expected to be a list of e-mail addresses of users or integers
indicating the numeric user IDs of users. If allow users refers
to text, the text is treated as a single item. If allow users
refers to a YAML dictionary, the single key of which is code, you
can define the list with Python code. The code is expected to
evalute to an e-mail address, an integer user ID, an Individual
with the email attribute set, or a list or DAList of any of the
above. You can also use the .user_access() method to control
which users have access to a file.
Instead of granting access to specific
other users, you can grant access to categories of users by
referencing privileges by name, such as user, developer, or
advocate. If the allow privileges specifier refers to a YAML
list, the list items are expected to be text items like user or
developer. If allow privileges refers to a string, it is treated
as a single item. If it refers to a YAML dictionary, the single key
of which is code, you can define the privileges using Python code,
which is expected to evaluate to text (e.g., 'user') or a list of
text strings (e.g., ['user', 'developer']). You can also use the
.privilege_access() method to control which users have access to a
file.
Redacting information from documents
If you want to assemble a document but redact certain pieces of
information from it, you can use the redact() function on the
parts you want redacted, and the text will be replaced with black
rectangles. If you want to produce an unredacted version of the same
document, assemble it with redact: False.
template: petition_text
content: |
  Dear Judge,

  My name is ${ user }.
  I have a claim against
  the defendant.  A big one.

  My SSN is ${ redact(user.ssn) }.
  My phone number is
  ${ user.phone_number }.

  My home address is:

  ${ redact(user.address) }

  I demand ${ currency(money_claimed) }.

  Thank you.

  Sincerely,

  ${ user }
---
mandatory: True
question: |
  Here is your document.
subquestion: |
  You need to print both copies
  and file them in court.

  The unredacted version goes
  to the judge, and the redacted
  version will go in the public
  record.
attachments:
  - name: Unredacted petition
    filename: petition_unredacted
    redact: False
    valid formats:
      - pdf
      - rtf
      - docx
    content: |
      ${ petition_text }
  - name: Redacted petition
    filename: petition_redacted
    valid formats:
      - pdf
      - rtf
      - docx
    content: |
      ${ petition_text }
For more information about this feature, see the documentation for the
redact() function.
Using code to generate the list of attachments
The list of attachments shown in a question can be generated by
Python code that returns a list of DAFileCollection objects. If
attachment code is included in the question, the value will be
evaluated as Python code.
In the following example, the Python code returns an array of three
DAFileCollection objects, each of which was generated with a
separate attachment block.
mandatory: True
question: |
  Here are your documents!
attachment code: |
  [doc_one, doc_two, doc_three]
---
attachment:
  name: The first document
  filename: document_one
  description: |
    This is the first document
    of a series.
  variable name: doc_one
  content: |
    Hello, world number one!
---
attachment:
  name: The second document
  filename: document_two
  description: |
    This is the second document
    of a series.
  variable name: doc_two
  content: |
    Hello, world number two!
---
attachment:
  name: The third document
  filename: document_three
  description: |
    This is the third document
    of a series.
  variable name: doc_three
  content: |
    Hello, world number three!
Customizing the display of documents
Enabling the e-mailing of documents
Most internet service providers block e-mail communications as part of their efforts to combat spam, so when you first set up your docassemble server, the e-mail feature will probably not work “out of the box.”
As a result, in most cases you will need to edit your Configuration in order for e-mailing to work. The easiest and most effective way to enable e-mailing is to use the Mailgun API (which is free), but you can also use an external SMTP server hosted by Mailgun or another provider.
Customizing e-mailing
When the user e-mails a document to an e-mail address using the
attachment interface, the subject of the email consists of the names
of the document (defaulting to “Document”) and the body consists of
the message “Your document, (document name), is attached.” This
phrase can be translated or customized on a server-wide basis using
the words feature by providing translations of the following
phrases:
Your document, %s, is attached.Your documents, %s, are attached.
If you want to customize the subject and body of the e-mail, you can
use the email template modifier:
mandatory: True
question: Your document is ready.
email template: hello_email
email address default: |
  ${ user_email }
attachment:
  - name: A hello world document
    filename: Hello_World
    description: |
      A document with a classic message
    content: |
      Hello, world!
    valid formats:
      - pdf
      - docx
always include editable files: True
---
template: hello_email
subject: |
  Your hello world document
content: |
  Dear sir or madam,

  Your hello world document is attached hereto for your perusal.
---
code: |
  user_email = '[email protected]'
The email template modifier needs to refer to a Python expression
referring to a template.
Instead of setting email template, you can use the modifiers email
subject and email body. You can set these to text that you want to
appear in the subject and/or body of the e-mail. You can use Mako
and Markdown in these modifiers. Whether you use a template or email
subject and email body, Markdown will be converted to HTML for
purposes of creating the HTML version of the e-mail message. The email
subject and email body modifiers take precedence over the parts of
the template indicated by email template.
The e-mail address field in the attachment interface is blank by
default if the user is not logged in, and if the user is logged in, it
is set to the user’s e-mail address. If you would like to set another
default value, you can use the email address default modifier.
Mako and Markdown can be used. If the result does not look like
an e-mail address, it will be ignored.
For greater customization of the sending of e-mails attaching
documents, use the send_email() function in custom code. The
attachment interface is simple and exists only to allow an end user
to e-mail a document to an address of their own choosing. More
complex workflows should be created using send_email().
Always include editable files
By default, if an attachment includes a PDF version along with an
editable version, such as a DOCX file, the user will have an option of
including the editable version in the e-mail or download. If you want
the editable documents to always be included, set always include
editable files to True.
mandatory: True
question: Your document is ready.
attachment:
- name: A hello world document
filename: Hello_World
description: |
A document with a classic message
content: |
Hello, world!
valid formats:
- pdf
- docx
always include editable files: True
Preventing the user from e-mailing documents
When attachments are included in a question, the user will be
given an option to e-mail the documents to an e-mail address. If you
would like to disable this feature, set allow emailing to False.
By default, the user can e-mail documents:
mandatory: True
question: Your document is ready.
attachment:
  - name: A hello world document
    filename: Hello_World
    description: |
      A document with a classic message
    content: |
      Hello, world!
Including allow emailing: False will disable this:
mandatory: True
question: Your document is ready.
attachment:
  - name: A hello world document
    filename: Hello_World
    description: |
      A document with a classic message
    content: |
      Hello, world!
allow emailing: False
You can also use a Python expression instead of True or False.
Allowing the user to download all files at once
If you would like users to be able to download all of the
attachments as a single ZIP file, set allow downloading to
True. By default, this feature is disabled.
mandatory: True
question: Your documents are ready.
allow downloading: True
attachments:
  - name: A hello world document
    filename: Hello_World
    description: |
      A document with a classic message
    content: |
      Hello, world!
  - name: |
      A goodbye cruel world document
    filename: Goodbye_Cruel_World
    description: |
      Another document with a classic
      message
    content: |
      Goodbye, cruel world!
You can also use a Python expression instead of True or False.
You can customize the name of the ZIP file by setting a zip
filename:
mandatory: True
question: Your documents are ready.
allow downloading: True
zip
filename
: Hello_Goodbye.zip
attachments:
- name: A hello world document
filename: Hello_World
description: |
A document with a classic message
content: |
Hello, world!
- name: |
A goodbye cruel world document
filename: Goodbye_Cruel_World
description: |
Another document with a classic
message
content: |
Goodbye, cruel world!
Omitting parts of the display
By default, when an attachment is available, a message appears saying
“The following document has been created for you.” To omit this, set
include attachment notice to False.
By default, the download links appear under a tab called “Download.”
Sometimes there is a “Preview” tab or a “Markdown” tab. To omit this
tab bar, set include download tab to False.
question: Here is your document.
attachments:
  - name: Praecipe to discontinue
    docx template file: praecipe_discontinue.docx
    valid formats:
      - pdf
include attachment notice: False
include download tab: False
mandatory: True
To omit the descriptions of what each file type means, set describe
file types to False.
question: Here is your document.
attachments:
- name: Praecipe to discontinue
docx template file: praecipe_discontinue.docx
describe file types: True
mandatory: True
To omit all of the attachment display except for the “Email these
documents” and/or the “Download all documents as a ZIP file” boxes,
set manual attachment list to True.
mandatory: True
question: Here is your document.
subquestion: |
  [:file: Praecipe to Discontinue](${ praecipe.url_for(attachment=True) })
attachment code: praecipe
manual attachment list: True
Alternative ways of displaying documents
There are alternatives to using attachment or attachment code
for displaying assembled files to the user. If you use variable
name within an attachment to create a DAFileCollection
object that represents the assembled file, you can use this variable
to provide the file to the user in the context of a question in a
number of different ways:
mandatory: True
question: |
This interview is all done.
subquestion: |
To start your case,
[download your pleading],
print it, and take it
to clerk's office at the
court.
${ complaint }
If you want to make changes
to it first, you can download
the [RTF version].
[download your pleading]: ${ complaint.url_for() }
[RTF version]: ${ complaint.rtf.url_for() }
---
attachment:
filename: complaint
name: Complaint
variable name: complaint
content: |
This is a complaint.
Blah, blah, blah
[PAGEBREAK]
This is the certificate of service.
The .url_for() method works on DAFileCollection and DAFile
objects.
If a DAFile is inserted into a template
(e.g., with ${ complaint }), and the DAFile is a PDF, a shrunken
image of the first page is shown. If the DAFile is an RTF or a
DOCX file, a link is shown.
If a DAFileCollection object is inserted into a template, each
file type is inserted. If you use valid formats to limit the file
types created, only the specified file types will be inserted. For
example:
mandatory: True
question: |
  This interview is all done.
subquestion: |
  Here is your document!

  ${ complaint }
---
attachment:
  filename: complaint
  name: Complaint
  variable name: complaint
  content: |
    This is a complaint.

    Blah, blah, blah
    [PAGEBREAK]
    This is the certificate of service.
  valid formats:
    - pdf
If you want to include the “Email these documents” and/or the
“Download all documents as a ZIP file” boxes after your list of
documents, you can use attachment code in combination with manual
attachment list: True.
mandatory: True
question: Here is your document.
subquestion: |
[:file: Praecipe to Discontinue](${ praecipe.url_for(attachment=True) })
attachment code: praecipe
manual attachment list: TrueDocument caching and regeneration
Since document assembly can take the server a long time, docassemble uses caching to avoid assembling the same document more than once.
This interview demonstrates how the document caching works:
question: |
  What is your name?
fields:
  First Name: firstname
---
mandatory: True
field: first_round
question: |
  Here are your documents, ${ firstname }.
subquestion: |
  Look at the Preview tab of each
  document and note the time.
  This is the time the document
  was generated.
allow emailing: False
attachments:
  - name: Apples
    filename: apples
    variable name: apples
    content: |
      ${ firstname },

      Apples are tasty as of
      ${ format_time(current_datetime(), format='long') }.
  - name: Oranges
    filename: oranges
    variable name: oranges
    content: |
      ${ firstname },

      Oranges are tasty as of
      ${ format_time(current_datetime(), format='long') }.
---
attachment:
  name: Grapes
  filename: grapes
  variable name: grapes
  content: |
      ${ firstname },

      Grapes are tasty as of
      ${ format_time(current_datetime(), format='long') }.
---
mandatory: True
field: second_round
question: |
  Here is another set of documents,
  ${ firstname }.
subquestion: |
  You saw the Apples document on the
  previous screen.  The Grapes
  document is new.  The Apples
  document has not changed.

  When you press Continue, I will ask
  you again for your name.  Put in a
  different name this time.
allow emailing: False
attachment code: |
  [apples, grapes]
---
mandatory: True
code: |
  del firstname
---
mandatory: True
code: |
  firstname
---
mandatory: True
question: |
  Here is your final set of documents,
  ${ firstname }.
subquestion: |
  Note that even though your name
  changed, the documents did not.
allow emailing: False
attachment code: |
  [apples, oranges, grapes]
In most situations, document caching is a welcome feature because users do not have to wait as long. However, it might not always be what you want.
For example, if you present the same document in two different
questions using attachment code, the same document that was
assembled for the first question will be presented in the second
question, even if changes were made to the underlying variables in
the interim. To force the re-assembly of the document, you can use
code to delete the variable that represents the document. Here is
an example:
mandatory: True
code: |
  client = "Jane Doe"
  benefits = "G-432"
---
mandatory: True
code: |
  document_initially_shown
  first_draft_deleted
  client = "John Doe"
  benefits = "H-545"
  document_shown_again
---
attachment:
  name: Summary of Benefits
  filename: benefits_summary
  variable name: benefits_summary
  content: |
    [BOLDCENTER] Summary of Benefits

    ${ client } is entitled to
    benefits plan ${ benefits }.
---
question: |
  Here is your document.
attachment code: benefits_summary
field: document_initially_shown
---
code: |
  del benefits_summary
  first_draft_deleted = True
---
question: Here is your document again.
attachment code: benefits_summary
event: document_shown_again
If you want to turn off document caching entirely for a given
interview, see the cache documents feature.