This section contains miscellaneous recipes for solving problems in docassemble.
Require a checkbox to be checked
Using validation code
question: |
  You must agree to the terms of service.
fields:
  - I agree to the terms of service: agrees_to_tos
    datatype: yesnowide
validation code: |
  if not agrees_to_tos:
    validation_error("You cannot continue until you agree to the terms of service.")
---
mandatory: True
need: agrees_to_tos
question: All done.
Using datatype: checkboxes
question: |
  You must agree to the terms of service.
fields:
  - no label: agrees_to_tos
    datatype: checkboxes
    minlength: 1
    choices:
      - I agree to the terms of service
    validation messages:
      minlength: |
        You cannot continue unless you check this checkbox.
---
mandatory: True
need: agrees_to_tos
question: All done
Use a variable to track when an interview has been completed
One way to track whether an interview is completed is to set a variable when the interview is done. That way, you can inspect the interview answers and test for the presence of this variable.
objects:
  - user: Individual
---
question: |
  What is your name?
fields:
  - First name: user.name.first
  - Last name: user.name.last
---
mandatory: True
code: |
  user.name.first
  user_finish_time
  final_screen
---
code: |
  user_finish_time = current_datetime()
---
event: final_screen
question: |
  Goodbye, user!
buttons:
  Exit: exit
You could also use Redis to store the status of an interview.
objects:
  - user: Individual
  - r: DARedis
---
question: |
  What is your name?
fields:
  - First name: user.name.first
  - Last name: user.name.last
---
mandatory: True
code: |
  interview_marked_as_started
  user.name.first
  interview_marked_as_finished
  final_screen
---
code: |
  redis_key = user_info().filename + ':' + user_info().session
---
code: |
  r.set(redis_key, 'started')
  interview_marked_as_started = True
---
code: |
  r.set(redis_key, 'finished')
  interview_marked_as_finished = True
---
event: final_screen
question: |
  Goodbye, user!
buttons:
  Exit: exit
Exit interview with a hyperlink rather than a redirect
Suppose you have a final screen in your interview that looks like this:
mandatory: True
code: |
  kick_out
---
event: kick_out
question: Bye
buttons:
  - Exit: exit
    url: https://example.com
When the user clicks the “Exit” button, an Ajax request is sent to the docassemble server, the interview logic is run again, and then when the browser processes the response, the browser is redirected by JavaScript to the url (https://example.com).
If you would rather that the button act as a hyperlink, where clicking the button sends the user directly to the URL, you can make the button this way:
mandatory: True
code: |
  kick_out
---
event: kick_out
question: Bye
subquestion: |
  ${ action_button_html("https://example.com", size='md', color='primary', label='Exit', new_window=False) }
Ensure two fields match
question: |
  What is your e-mail address?
fields:
  - E-mail: email_address_first
    datatype: email
  - note: |
      Please enter your e-mail address again.
    datatype: email
  - E-mail: email_address
    datatype: email
  - note: |
      Make sure the e-mail addresses match.
    js hide if: |
      val('email_address') != '' && val('email_address_first') == val('email_address')
  - note: |
      <span class="text-success">E-mail addresses match!</span>
    js show if: |
      val('email_address') != '' && val('email_address_first') == val('email_address')
validation code: |
  if email_address_first != email_address:
    validation_error("You cannot continue until you confirm your e-mail address")
---
mandatory: True
question: |
  Your e-mail address is ${ email_address }.
Progressive disclosure
modules:
  - .progressivedisclosure
---
features:
  css: progressivedisclosure.css
---
template: fruit_explanation
subject: |
  Tell me more about fruit
content: |
  ##### What is a fruit?

  A fruit is the the sweet and
  fleshy product of a tree or
  other plant that contains
  seed and can be eaten as food.
---
template: favorite_explanation
subject: |
  Explain favorites
content: |
  ##### What is a favorite?

  If you have a favorite something,
  that means you like it more than
  you like other things of a similar
  nature.
---
question: |
  What is your favorite fruit?
subquestion: |
  Everybody has a favorite fruit.

  ${ prog_disclose(fruit_explanation) }

  Don't you have a favorite fruit?

  ${ prog_disclose(favorite_explanation) }

  You must have a favorite.
fields:
  - Favorite fruit: favorite_fruit
Add progressivedisclosure.css to the “static” data folder of your package.
a span.pdcaretopen {
    display: inline;
}

a span.pdcaretclosed {
    display: none;
}

a.collapsed .pdcaretopen {
    display: none;
}

a.collapsed .pdcaretclosed {
    display: inline;
}
Add progressivedisclosure.py as a Python module file in your
package.
import re

__all__ = ['prog_disclose']

def prog_disclose(template, classname=None):
    if classname is None:
        classname = ' bg-secondary-subtle'
    else:
        classname = ' ' + classname.strip()
    the_id = re.sub(r'[^A-Za-z0-9]', '', template.instanceName)
    return u"""\
<a class="collapsed" data-bs-toggle="collapse" href="#{}" role="button" aria-expanded="false" aria-controls="collapseExample"><span class="pdcaretopen"><i class="fas fa-caret-down"></i></span><span class="pdcaretclosed"><i class="fas fa-caret-right"></i></span> {}</a>
<div class="collapse" id="{}"><div class="card card-body{} pb-1">{}</div></div>\
""".format(the_id, template.subject_as_html(trim=True), the_id, classname, template.content_as_html())
This uses the collapse feature of Bootstrap.
Accordion user interface
Helper functions defined in a module file can be useful for inserting
complex HTML into your question blocks without making the question
blocks less readable.
In the docassemble.demo package, there is a module,
docassemble.demo.accordion, which demonstrates a set of functions,
start_accordion(), next_accordion(), and end_accordion(), that
return HTML.
The following example demonstrates how to use the functions exported
by docassemble.demo.accordion to create an accordion interface in
a review screen, using the accordion feature of Bootstrap.
modules:
  - docassemble.demo.accordion
---
event: review_screen
question: |
  Please review your answers.
review:
  - raw html: |
      ${ start_accordion('Pets', showing=True) }
  - Edit: favorite_cat
    button: |
      You said your favorite cat was
      **${ favorite_cat }**.
  - Edit: favorite_vegetable
    button: |
      You said your favorite dog was
      **${ favorite_dog }**.
  - raw html: |
      ${ next_accordion('Food') }
  - Edit: favorite_fruit
    button: |
      You said your favorite fruit was
      **${ favorite_fruit }**.
  - Edit: favorite_vegetable
    button: |
      You said your favorite vegetable was
      **${ favorite_vegetable }**.
  - raw html: |
      ${ next_accordion('Aesthetics') }
  - Edit: fashion_aesthetic
    button: |
      You said your fashion aesthetic was
      **${ fashion_aesthetic }**.
  - Edit: decor_aesthetic
    button: |
      You said your home decor aesthetic was
      **${ decor_aesthetic }**.
  - raw html: |
      ${ end_accordion() }
The same could be done with a fields list.
modules:
  - docassemble.demo.accordion
---
question: |
  Tell me about your preferences
fields:
  - raw html: |
      ${ start_accordion('Pets', showing=True) }
  - Favorite cat: favorite_cat
  - Favorite dog: favorite_dog
  - raw html: |
      ${ next_accordion('Food') }
  - Favorite fruit: favorite_fruit
    required: False
  - Favorite vegetable: favorite_vegetable
    required: False
  - Favorite meat dish: favorite_meat_dish
    show if:
      variable: favorite_dog
      is: spaniel
  - raw html: |
      ${ next_accordion('Aesthetics') }
  - Fashion aesthetic: fashion_aesthetic
    required: False
  - Decor aesthetic: decor_aesthetic
    required: False
  - raw html: ${ end_accordion() }
The above two examples make use of the raw html feature that was
introduced in version 1.4.94.
The functions in docassemble.demo.accordion can also be used in
other parts of a screen, such as the subquestion.
modules:
  - docassemble.demo.accordion
---
question: |
  Welcome to the interview.
subquestion:
  This interview will determine a recommended direction
  for your life.

  ${ start_accordion('What do I need to know before starting?') }

  Modernipsum dolor sit amet illusionism cubo-futurism international
  gothic historicism, neo-minimalism divisionism cobra intervention
  art art nouveau. Installation art futurism les nabis academic hudson
  river school young british artists, romanticism neo-expressionism
  street art orphism, lyrical abstraction avant-garde remodernism
  vorticism. Divisionism caravaggisti die brücke tachisme
  impressionism, gothic art luminism illusionism op art neoclassicism,
  street art situationist international neoism. Orphism russian
  symbolism academic ego-futurism kinetic art neo-dada dada stuckism
  international gründerzeit, post-impressionism impressionism
  postmodernism maximalism precisionism post-painterly
  abstraction. Russian symbolism superflat new media art jugendstil
  maximalism illusionism, gründerzeit scuola romana merovingian
  rayonism secularism, existentialism op art action painting lyrical
  abstraction.

  ${ next_accordion('What do I do after I finish the interview?') }

  Metaphysical art barbizon school carolingian neo-minimalism
  primitivism superflat neo-minimalism naturalism, der blaue reiter
  hard-edge painting new media art fluxus superstroke
  monumentalism. Art deco russian futurism cubo-futurism pop art
  relational art neo-expressionism, synchromism pre-raphaelites sound
  art photorealism classicism, surrealism gothic art hudson river
  school scuola romana. Rococo biedermeier cloisonnism secularism
  hudson river school fluxus, modernism, ego-futurism formalism
  manierism, gründerzeit deformalism abstract expressionism
  postmodernism. Classicism postminimalism superstroke lowbrow
  tonalism fauvism color field painting systems art, biedermeier
  post-impressionism hyperrealism structuralism neoclassicism. Dada
  tachisme luminism manierism surrealism, avant-garde performance art
  neoclassicism hard-edge painting neo-impressionism, nouveau realisme
  eclecticism tonalism.

  ${ end_accordion() }
continue button field: intro
If you need empty accordions to be hidden you can use some CSS to hide empty accordions.
modules:
  - docassemble.demo.accordion
---
features:
  css: docassemble.demo:data/static/accordion.css
---
question: |
  Tell me about your preferences
fields:
  - raw html: |
      ${ start_accordion('Pets', showing=True) }
  - Favorite cat: favorite_cat
    show if:
      code: ask_about_pets
  - Favorite dog: favorite_dog
    show if:
      code: ask_about_pets
  - raw html: |
      ${ next_accordion('Food') }
  - Favorite fruit: favorite_fruit
    required: False
  - Favorite vegetable: favorite_vegetable
    required: False
  - raw html: |
      ${ next_accordion('Aesthetics') }
  - Fashion aesthetic: fashion_aesthetic
    required: False
  - Decor aesthetic: decor_aesthetic
    required: False
  - raw html: ${ end_accordion() }
---
code: |
  ask_about_pets = False
The CSS in the accordion.css file is:
div.accordion-item:has(.accordion-body:empty) h2 {
    display: none;
}

div.accordion-item:has(.accordion-body:empty) div {
    display: none;
}
When using functions like these that change the HTML structure of the
screen, it is very important not to forget to call the functions that
insert closing HTML tags, like end_accordion() in this example. If
the correct functions are not called, the HTML of the screen could be
invalid.
docassemble add-on packages could be created that offer user
interface enhancements invoked through functions. In the examples
above, the functionality was imported through a modules block, but
it would also be possible to instruct users of an add-on package to
use an include block to activate the functionality. The include
block could point to a file in the questions folder of the add-on
package that contains a modules block that imports the functions, as
well as a features block that activates custom JavaScript and CSS.
Displaying cards
Bootstrap has a component called a Card that puts text in a box with rounded corners. Here is an example of an add-on utility that facilitates the use of the Card.
include:
  - docassemble.demo:data/questions/examples/cards.yml
---
question: |
  What is your favorite fruit?
subquestion: |
  ${ card_start("Why this is important", color="info", icon="comment") }
  We need to know your favorite fruit
  because if your favorite fruit is not
  a fruit that we think is tasty, then
  behind your back we will report you to
  the [police](https://www.interpol.int/).
  ${ card_end() }
fields:
  - Fruit: favorite_fruit
    choices:
      - Apple: apples
      - Orange: oranges
      - Peach: peaches
      - Pear: pears
      - Grapes: grapes
  - note: |
      ${ card_start("The real truth about apples", color="danger", icon="apple-alt") }
      We would advise you to stop eating
      apples immediately. Apples are produced
      by a [conglomerate] that is secretly
      owned by the teachers union, and they
      are trying to brainwash your kids
      into buying apples in order to enrich
      themselves.
      ${ card_end() }

      [conglomerate]: https://usapple.org/
    show if:
      variable: favorite_fruit
      is: apples
The YAML file cards.yml consists of:
modules:
  - .cards
The Python module cards.py consists of:
import re

__all__ = ['card_start', 'card_end']

def card_start(label, color=None, icon=None):
    if color not in ('primary',
                     'secondary',
                     'success',
                     'danger',
                     'warning',
                     'info',
                     'light',
                     'dark',
                     'link'):
        color_text = ''
    else:
        color_text = ' text-bg-' + color
    if icon is None:
        icon_text = ''
    else:
        icon_text = re.sub(r'^(fa[a-z])-fa-', r'\1 fa-', str(icon))
        if not re.search(r'^fa[a-z] fa-', icon_text):
            icon_text = 'fas fa-' + icon
        icon_text = '<i class="' + icon_text + '"></i> '
    return f'<div class="card{color_text} mb-3" markdown="span"><div class="card-body" markdown="1"><h2 class="card-title h4" markdown="span">{icon_text}{label}</h2>'

def card_end():
    return '</div></div>'
The module defines two functions, card_start() and card_end(),
which are used to mark the beginning and end of a Card. The two
functions return HTML. The text that you want to appear in the Card
is written in Markdown format in between the call to card_start()
and the call to card_end(). If you forget to include card_end(),
there will be an HTML error on the screen.
Note that the card_start() function makes use of the Markdown in
HTML extension. Using markdown="span" enables the parsing of
Markdown in the interior of the <div>. Otherwise, any Markdown
formatting in the body of the Card would be presented literally on
the screen.
To use this module in your own interviews, save cards.yml and
cards.py to your package and modify them as you wish. Since
cards.yml only has a single modules block, so you might be
tempted to do away with it and simply include cards.py directly in
interviews that need to use the Card UI. However, using a YAML file
makes sense because you may wish to format Card elements with custom
CSS classes. In that case, you can add a features block to your
cards.yml file, and any interviews that include cards.yml will
not need to be modified.
New object or existing object
The object datatype combined with the disable others can be
used to present a single question that asks the user either to select
an object from a list or to enter information about a new object.
Another way to do this is to use show if to show or hide fields.
This recipe gives an example of how to do this in an interview that asks about individuals.
objects:
  - boss: Individual
  - employee: Individual
  - customers: DAList.using(object_type=Individual)
---
mandatory: True
question: |
  Summary
subquestion: |
  The boss is ${ boss }.

  The employee is ${ employee }.

  The customers are ${ customers }.

  % if boss in customers or employee in customers:
  Either the boss or the employee is also a customer.
  % else:
  Neither the boss nor the employee is also a customer.
  % endif
---
question: Are there any customers?
yesno: customers.there_are_any
---
question: Is there another customer?
yesno: customers.there_is_another
---
code: |
  people = ([boss] if defined('boss') and boss.name.defined() else []) \
         + ([employee] if defined('employee') and employee.name.defined() else []) \
         + customers.complete_elements().elements
---
reconsider:
  - people
question: |
  Who is the boss?
fields:
  - Existing or New: boss.existing_or_new
    datatype: radio
    default: Existing
    choices:
      - Existing
      - New
  - Person: boss
    show if:
      variable: boss.existing_or_new
      is: Existing
    datatype: object
    choices: people
  - First Name: boss.name.first
    show if:
      variable: boss.existing_or_new
      is: New
  - Last Name: boss.name.last
    show if:
      variable: boss.existing_or_new
      is: New
  - Birthday: boss.birthdate
    datatype: date
    show if:
      variable: boss.existing_or_new
      is: New
---
reconsider:
  - people
question: |
  Who is the employee?
fields:
  - Existing or New: employee.existing_or_new
    datatype: radio
    default: Existing
    choices:
      - Existing
      - New
  - Person: employee
    show if:
      variable: employee.existing_or_new
      is: Existing
    datatype: object
    choices: people
  - First Name: employee.name.first
    show if:
      variable: employee.existing_or_new
      is: New
  - Last Name: employee.name.last
    show if:
      variable: employee.existing_or_new
      is: New
  - Birthday: employee.birthdate
    datatype: date
    show if:
      variable: employee.existing_or_new
      is: New
---
reconsider:
  - people
question: |
  Who is the ${ ordinal(i) } customer?
fields:
  - Existing or New: customers[i].existing_or_new
    datatype: radio
    default: Existing
    choices:
      - Existing
      - New
  - Person: customers[i]
    show if:
      variable: customers[i].existing_or_new
      is: Existing
    datatype: object
    choices: people
  - First Name: customers[i].name.first
    show if:
      variable: customers[i].existing_or_new
      is: New
  - Last Name: customers[i].name.last
    show if:
      variable: customers[i].existing_or_new
      is: New
  - Birthday: customers[i].birthdate
    datatype: date
    show if:
      variable: customers[i].existing_or_new
      is: New
This recipe keeps a master list of individuals in an object called
people. Since this list changes throughout the interview, it is
re-calculated whenever a question is asked that uses people.
When individuals are treated as unitary objects, you can do things
like use Python’s in operator to test whether an individual is a
part of a list. This recipe illustrates this by testing whether
boss is part of customers or employee is part of customers.
E-mailing the user a link for resuming the interview later
If you want users to be able to resume their interviews later, but you
don’t want to use the username and password system, you can e-mail
your users a URL created with interview_url().
default screen parts:
  under: |
    % if show_save_resume_message:
    [Save and resume later](${ url_action('save_and_resume') })
    % endif
---
mandatory: True
code: |
  target = 'normal'
  show_save_resume_message = True
  multi_user = True
---
mandatory: True
scan for variables: False
code: |
  if target == 'save_and_resume':
    if wants_email:
      if email_sent:
        log("We sent an e-mail to your e-mail address.", "info")
      else:
        log("There was a problem with e-mailing.", "danger")
      show_save_resume_message = False
    undefine('wants_email')
    undefine('email_sent')
    target = 'normal'
  final_screen
---
question: |
  What is your favorite fruit?
fields:
  - Favorite fruit: favorite_fruit
---
question: |
  What is your favorite vegetable?
fields:
  - Favorite vegetable: favorite_vegetable
---
question: |
  What is your favorite legume?
fields:
  - Favorite legume: favorite_legume
---
event: final_screen
question: |
  I would like you to cook a
  ${ favorite_fruit },
  ${ favorite_vegetable }, and
  ${ favorite_legume } stew.
---
event: save_and_resume
code: |
  target = 'save_and_resume'
---
code: |
  send_email(to=user_email_address, template=save_resume_template)
  email_sent = True
---
question: |
  How to resume your interview later
subquestion: |
  If you want to resume your interview later, we can
  e-mail you a link that you can click on to resume
  your interview at a later time.
fields:
  - no label: wants_email
    input type: radio
    choices:
      - "Ok, e-mail me": True
      - "No thanks": False
    default: True
  - E-mail address: user_email_address
    datatype: email
    show if: wants_email
under: ""
---
template: save_resume_template
subject: |
  Your interview
content: |
  To resume your interview,
  [click here](${ interview_url() }).
E-mailing or texting the user a link for purposes of using the touchscreen
Using a desktop computer is generally very good for answering questions, but it is difficult to write a signature using a mouse.
Here is an example of an interview that allows the user to use a desktop computer for answering questions, but use a mobile device with a touchscreen for writing the signature.
include:
  - docassemble.demo:data/questions/examples/signature-diversion.yml
---
mandatory: True
question: |
  Here is your document.
attachment:
  name: Summary of food
  filename: food
  content: |
    [BOLDCENTER] Food Attestation

    My name is ${ user }.

    My favorite fruit is
    ${ favorite_fruit }.

    My favorite vegetable is
    ${ favorite_vegetable }.

    I solemnly swear that the
    foregoing is true and
    correct.

    ${ user.signature.show(width="2in") }

    ${ user }
This interview includes a YAML file called
signature-diversion.yml, the contents of which are:
mandatory: True
code: |
  multi_user = True
---
question: |
  Sign your name
subquestion: |
  % if not device().is_touch_capable:
  Please sign your name below with your mouse.
  % endif
signature: user.signature
under: |
  ${ user }
---
sets: user.signature
code: |
  signature_intro
  if not device().is_touch_capable and user.has_mobile_device:
    if user.can_text:
      sig_diversion_sms_message_sent
      sig_diversion_post_sms_screen
    elif user.can_email:
      sig_diversion_email_message_sent
      sig_diversion_post_email_screen
---
question: |
  Do you have a mobile device?
yesno: user.has_mobile_device
---
question: |
  Can you receive text messages on your mobile device?
yesno: user.can_text
---
question: |
  Can you receive e-mail messages on your mobile device?
yesno: user.can_email
---
code: |
  send_sms(user, body="Click on this link to sign your name: " + interview_url_action('mobile_sig'))
  sig_diversion_sms_message_sent = True
---
code: |
  send_email(user, template=sig_diversion_email_template)
  sig_diversion_email_message_sent = True
---
template: sig_diversion_email_template
subject: Sign your name with your mobile device
content: |
  Make sure you are using your
  mobile device.  Then
  [click here](${ interview_url_action('mobile_sig') })
  to sign your name with
  the touchscreen.
---
question: |
  What is your e-mail address?
fields:
  - E-mail: user.email
---
question: |
  What is your mobile number?
fields:
  - Number: user.phone_number
---
event: sig_diversion_post_sms_screen
question: |
  Check your text messages.
subquestion: |
  We just sent you a text message containing a link.  Click the link
  and sign your name.

  Once we have your signature, you will move on automatically.
reload: 5
---
event: sig_diversion_post_email_screen
question: |
  Check your e-mail on your mobile device.
subquestion: |
  We just sent you an email containing a link.  With your mobile
  device, click the link and sign your name.

  Once we have your signature, you will move on automatically.
reload: 5
---
event: mobile_sig
need: user.signature
question: |
  Thanks!
subquestion: |
  We got your signature:

  ${ user.signature }

  You can now resume the interview on your computer.
The above interview requires setting multi_user = True. To avoid
this you can use the following pair of interviews.
First interview:
objects:
  - r: DARedis
---
mandatory: True
code: |
  email_sent
  signature_obtained
  final_screen
---
code: |
  send_email(to=email_address, template=email_template)
  email_sent = True
---
question: |
  What is your e-mail address?
fields:
  - E-mail address: email_address
    datatype: email
---
template: email_template
subject: |
  Your signature needed
content: |
  [Click here](${ interview_url(i=user_info().package + ':second-interview.yml', c=redis_key, new_session=1) })
  to sign your name with a touchscreen device.
---
code: |
  need(r)
  import random
  import string
  redis_key = ''.join(random.choice(string.ascii_lowercase) for i in range(15))
  r.set_data(redis_key, 'waiting', expire=60*60*24)
---
event: final_screen
question: Your signature
subquestion: |
  ${ signature }
---
event: timeout_screen
question: |
  Sorry, you didn't sign in time.
buttons:
  - Restart: restart
---
prevent going back: True
event: waiting_screen
question: |
  Waiting for signature
subquestion: |
  Open your e-mail on a touchscreen device.

  You should get an e-mail soon asking you
  to provide a signature.  Click the link
  in the e-mail.
reload: 5
---
code: |
  result = r.get_data(redis_key)
  if result is None:
    del result
    timeout_screen
  elif result == 'waiting':
    del result
    waiting_screen
  signature = DAFile('signature')
  signature.initialize(filename="signature.png")
  signature.write(result, binary=True)
  signature.commit()
  r.delete(redis_key)
  signature_obtained = True
  del result
Second interview (referenced in the first as second-interview.yml):
objects:
  - r: DARedis
---
mandatory: True
code: |
  signature_saved
  final_screen
---
code: |
  if 'c' not in url_args or r.get_data(url_args['c']) != 'waiting':
    message('Unauthorized', show_restart=False, show_exit=False)
  r.set_data(url_args['c'], signature.slurp(auto_decode=False), expire=600)
  signature_saved = True
---
question: Sign your name
signature: signature
---
prevent going back: True
event: final_screen
question: |
  Thanks!
subquestion: |
  You can now resume your interview.
Multi-user interview for getting a client’s signature
This is an example of a multi-user interview where one person (e.g.,
an attorney) writes a document that they want a second person (e.g, a
client) to sign. It is a multi-user interview (with multi_user set
to True). The attorney inputs the attorney’s e-mail address and
uploads a DOCX file containing:
{{ signature }}
where the client’s signature should go. The attorney then receives a hyperlink that the attorney can send to the client.
When the client clicks on the link, the client can read the unsigned document, then agree to sign it, then sign it, then download the signed document. After the client signs the document, it is e-mailed to the attorney’s e-mail address.
metadata:
  title: Signature
---
mandatory: True
code: |
  multi_user = True
---
mandatory: True
code: |
  multi_user = True
  signature = '(Your signature will go here)'
---
mandatory: True
code: |
  intro_seen
  email_address
  template_file
  notified_of_url
  agrees_to_sign
  signature_reset
  signature
  document_emailed
  final_screen
---
code: |
  notified_of_url = True
  prevent_going_back()
  force_ask('screen_with_link')
---
question: |
  What is your e-mail address?
subquestion: |
  The signed document will be e-mailed to this address.
fields:
  - E-mail: email_address
---
event: screen_with_link
question: |
  Share this link with the signer.
subquestion: |
  Suggested content for e-mailing to the signer:

  > I need you to sign a document.  You can
  > sign it using a touchscreen or with a
  > mouse.  To see the document and start
  > the signing process, [click here].

  [click here]: ${ interview_url() }
---
signature: signature
question: Sign your name
---
question: |
  Do you agree to sign this document?
subquestion: |
  Click the document image below to read the document
  before signing it.

  ${ draft_document.pdf }
field: agrees_to_sign
continue button label: I agree to sign
---
attachment:
  name: Document
  filename: signed_document
  variable name: draft_document
  docx template file:
    code: template_file
---
question: |
  Collect an electronic signature
subquestion: |
  If you provide your e-mail address and upload a document,
  you can get a link that you can give to someone, where
  they can click the link, sign their name, and then the
  signed document will be e-mailed to you.

  The document you upload needs to be in .docx format.

  In the place where you want the signature to be, you need to
  include the word "signature" surrounded by double curly brackets.
  For example:

  > I swear that the above is true and correct.
  >
  >
  >
  > Angela Washington

  If you do not include "" in exactly this way,
  a signature will not be inserted.
field: intro_seen
---
sets: template_file
question: |
  Unauthorized access
---
if: user_has_privilege(['admin', 'developer', 'advocate'])
question: |
  Please upload the document you want to be signed.
fields:
  - Document: template_file
    datatype: file
    accept: |
      "application/vnd.openxmlformats-officedocument.wordprocessingml.document"
---
code: |
  del signature
  signature_reset = True
---
attachment:
  name: Document
  filename: signed_document
  variable name: signed_document
  valid formats:
    - pdf
  docx template file:
    code: template_file
---
event: final_screen
prevent going back: True
question: |
  Here is your signed document.
attachment code: signed_document
---
template: email_template
subject: Signed document
content: |
  The attached document has been signed.
---
code: |
  send_email(to=email_address, template=email_template, attachments=signed_document.pdf)
  document_emailed = True
Here
is a more complex version that handles multiple documents in Word
or PDF format and integrates with the Legal Server case management
system. It requires login and expects the Configuration to contain
the Legal Server domain name in the directive legal server domain.
Validating uploaded files
Here is an interview that makes the user upload a different file if the file the user uploads is too large.
question: |
  Please upload a file.
fields:
  File: uploaded_file
  datatype: file
validation code: |
  if uploaded_file.size_in_bytes() > 100000:
    validation_error("That file is way too big!  Upload a smaller file.")
Mail merge
Here is an example interview that assembles a document for every row in a Google Sheet.
modules:
  - docassemble.demo.google_sheets
---
objects:
  - court: DAList.using(object_type=Person, auto_gather=False)
---
code: |
  court.clear()
  for row in read_sheet('court_list'):
    item = court.appendObject()
    item.name.text = row['Name']
    item.address.address = row['Address']
    item.address.city = row['City']
    item.address.state = row['State']
    item.address.zip = row['Zip']
    item.address.county = row['County']
    del item
  court.gathered = True
---
attachment:
  name: |
    ${ court[i].address.county } court
  filename: |
    ${ space_to_underscore(court[i].address.county) }_court_info
  variable name: court[i].info_sheet
  content: |
    [BOLDCENTER] ${ court[i] }

    [NOINDENT] Your friendly court for
    ${ court[i].address.county }
    is located at:

    ${ court[i].address_block() }
---
mandatory: True
question: |
  Court information
subquestion: |
  Here are information sheets
  for each court in your state.
attachment code: |
  [item.info_sheet for item in court]
Documents based on objects
This example is similar to the mail merge example in that it uses a single template to create multiple documents. In this case, however, the same template is used to generate a document for two different objects.
objects:
  - plaintiff: Individual
  - defendant: Individual
---
code: |
  plaintiff.opponent = defendant
  defendant.opponent = plaintiff
---
code: |
  title = "Summary of case"
---
question: |
  What is the name of the plaintiff?
fields:
  - Name: plaintiff.name.first
---
question: |
  What is the name of the defendant?
fields:
  - Name: defendant.name.first
---
generic object: Individual
attachment:
  variable name: x.document
  name: Document for ${ x.name.first }
  docx template file: generic-document.docx
---
mandatory: True
question: |
  Here are your documents.
attachment code: |
  [plaintiff.document, defendant.document]
This makes use of the generic object modifier. The template file
generic-document.docx refers to the person using the variable x.
Altering metadata of generated DOCX files
This example demonstrates using the docx package to modify the core document properties of a generated DOCX file.
attachment:
  variable name: assembled_file
  docx template file: docx-with-metadata.docx
  valid formats:
    - docx
---
mandatory: True
code: |
  assembled_file
  user_name
  from docx import Document
  docx = Document(assembled_file.path())
  docx.core_properties.author = user_name
  docx.save(assembled_file.path())
  del docx
---
mandatory: True
question: Your document
attachment code: assembled_file
---
question: |
  What planet are you from?
fields:
  - Planet: planet
---
question: |
  What is your name?
fields:
  - Name: user_name
Note that this interview uses Python code in a code block that
should ideally go into a module file. The docx variable is an
object from a third party module and is not able to be pickled. The
code works this way in this interview because the code block
ensures that the variable user_name is defined before the docx
variable is created, and it deletes the docx variable with del
docx before the code block finishes. If the variable user_name
was undefined, docassemble would try to save the variable docx
in the interview answers before asking about user_name, and this
would result in a pickling error. If the docx variable only existed
inside of a function in a module, there would be no problem with
pickling.
Log out a user who has been idle for too long
Create a static file called idle.js with the following contents.
var idleTime = 0;
var idleInterval;
$(document).ready(function(){
    idleInterval = setInterval(idleTimerIncrement, 60000);
    $(document).mousemove(function (e) {
        idleTime = 0;
    });
    $(document).keypress(function (e) {
        idleTime = 0;
    });
});

function idleTimerIncrement() {
    idleTime = idleTime + 1;
    if (idleTime > 60){
        url_action_perform('log_user_out');
        clearInterval(idleInterval);
    }
}
In your interview, include idle.js in a features block and
include an event: log_user_out block that executes
command('logout').
features:
  javascript: idle.js
---
event: log_user_out
code: |
  command('logout')
---
mandatory: True
code: |
  welcome_screen_seen
  final_screen
---
question: |
  Welcome to the interview.
field: welcome_screen_seen
---
event: final_screen
question: |
  You are done with the interview.
This logs the user out after 60 minutes of inactivity in the browser.
To use a different number of minutes, edit the line
if (idleTime > 60){.
Seeing the progress of a running background task
Since background tasks run in a separate Celery process, there is no simple way to get information from them while they are running.
However, Redis lists provide a helpful mechanism for keeping track of log messages.
Here is an example that uses a DARedis object to store log
messages about a long-running background task. It uses check in
to poll the server for new log messages.
objects:
  r: DARedis
---
mandatory: True
code: |
  log_key = r.key('log:' + current_context().session)
  messages = list()
---
mandatory: True
code: |
  if the_task.ready():
    last_messages_retrieved
    final_screen
  else:
    waiting_screen
---
code: |
  the_task = background_action('bg_task', 'refresh', additional=value_to_add)
---
question: |
  How much shall I add to 553?
fields:
  - Number: value_to_add
    datatype: integer
---
event: bg_task
code: |
  import time
  r.rpush(log_key, 'Waking up.')
  time.sleep(10)
  r.rpush(log_key, 'Ok, I am awake now.')
  value = 553 + action_argument('additional')
  time.sleep(17)
  r.rpush(log_key, 'I did the hard work.')
  time.sleep(14)
  r.rpush(log_key, 'Ok, I am done.')
  background_response_action('bg_resp', ans=value)
---
event: bg_resp
code: |
  answer = action_argument('ans')
  background_response()
---
event: waiting_screen
question: |
  Your process is running.
subquestion: |
  #### Message log

  <ul class="list-group" id="logMessages">
  </ul>
check in: get_log
---
event: get_log
code: |
  import json
  new_messages = ''
  while True:
    message = r.lpop(log_key)
    if message:
      messages.append(message.decode())
      new_messages += '<li class="list-group-item">' + message.decode() + '</li>'
      continue
    break
  background_response('$("#logMessages").append(' + json.dumps(new_messages) + ')', 'javascript')
---
code: |
  while True:
    message = r.lpop(log_key)
    if message:
      messages.append(message.decode())
      continue
    break
  last_messages_retrieved = True
---
event: final_screen
question: |
  The answer is ${ answer }.
subquestion: |
  #### Message log

  <ul class="list-group" id="logMessages">
  % for message in messages:
    <li class="list-group-item">${ message }</li>
  % endfor
  </ul>
Since the task in this case (adding one number to another) is not
actually long-running, the interview uses time.sleep() to make it
artificially long-running.
Sending information from Python to JavaScript
If you use JavaScript in your interviews, and you want your
JavaScript to have knowledge about the interview answers, you can
use get_interview_variables(), but it is slow because it uses
Ajax. If you only want a few pieces of information to be available
to your JavaScript code, there are a few methods you can use.
One method is to use the script modifier.
imports:
  - json
---
question: |
  What is your favorite color?
fields:
  - Color: favorite_color
---
question: |
  What is your favorite fruit?
fields:
  - Fruit: favorite_fruit
script: |
  <script>
    var myColor = ${ json.dumps(favorite_color) };
    console.log("I know your favorite color is " + myColor);
  </script>
---
mandatory: True
question: |
  Your favorites
subquestion: |
  Your favorite fruit is
  ${ favorite_fruit }.

  Your favorite color is
  ${ favorite_color }.
Note that the variable is only guaranteed to be defined on the screen
showing the question that includes the script modifier. While
the value will persist from screen to screen, this is only because
screen loads use Ajax and the JavaScript variables are not cleared
out when a new screen loads. But a browser refresh will clear the
JavaScript variables.
Another method is to use the "javascript" form of the log() function.
imports:
  - json
---
question: |
  What is your favorite color?
fields:
  - Color: favorite_color
---
initial: True
code: |
  log("var myColor = " + json.dumps(favorite_color) + ";", "javascript")
---
question: |
  What is your favorite fruit?
fields:
  - Fruit: favorite_fruit
script: |
  <script>
    console.log("I know that your favorite color is " + myColor);
  </script>
---
mandatory: True
question: |
  Your favorites
subquestion: |
  Your favorite fruit is
  ${ favorite_fruit }.

  Your favorite color is
  ${ favorite_color }.
In this example, the log() function is called from a code
block that has initial set to True. Thus, you can rely on the
myColor variable being defined on every screen of the interview
after favorite_color gets defined.
Another method is to pass the values of Python variables to the browser using the DOM, and then use JavaScript to retrieve the values.
imports:
  - json
---
question: |
  What are your favorites?
fields:
  - Color: color
  - Flavor: flavor
---
question: |
  What is your favorite fruit?
subquestion: |
  <div id="myinfo"
       data-color=${ json.dumps(color) }
       data-flavor=${ json.dumps(flavor) }
       class="d-none"></div>
fields:
  - Fruit: favorite_fruit
script: |
  <script>
    var myInfo = $("#myinfo").data();
    console.log("You like " + myInfo.color + " things that taste like " + myInfo.flavor + ".");
  </script>
---
mandatory: True
question: |
  Your favorite fruit is
  ${ favorite_fruit }.
All of these methods are read-only. If you want to be able to change
variables using JavaScript, and also have the values saved to the
interview answers, you can insert <input type="hidden"> elements
onto a page that has a “Continue” button.
imports:
  - json
---
question: |
  What is your favorite color?
fields:
  - Color: favorite_color
---
question: |
  What is your favorite fruit?
subquestion: |
  <input type="hidden"
         name="${ encode_name('favorite_color') }"
         value=${ json.dumps(favorite_color) }>
fields:
  - Fruit: favorite_fruit
script: |
  <script>
    var myColor = val('favorite_color');
    console.log("You said you liked " + myColor);
    setField('favorite_color', 'dark ' + myColor);
    console.log("But now you like " + val('favorite_color'));
  </script>
---
mandatory: True
question: |
  Your favorites
subquestion: |
  Your favorite fruit is
  ${ favorite_fruit }.

  Your favorite color is
  ${ favorite_color }.
This example uses the encode_name() function to convert the
variable name to the appropriate field name. For more information on
manipulating the docassemble front end, see the section on custom
front ends. The example above works for easily for text fields, but
other data types will require more work. Also, the example above only
works if the Configuration contains restrict input variables: false.
Running actions with Ajax
Here is an example of using JavaScript to run an action using Ajax.
code: |
  favorite_fruit = "apples"
---
id: guess favorite fruit
mandatory: True
question: |
  Guess my favorite fruit.
fields:
  - Your guess: guess
  - note: |
      ${ action_button_html("#", id_tag="getFavoriteFruit", label="Verify", size="md", color="primary") }
script: |
  <script>
    $(document).on('daPageLoad', function(){
      // hide the Continue button
      // and disable the form for
      // this question
      if ($(".question-guess-favorite-fruit").length > 0){
        $(".da-field-buttons").remove();
        $("#daform").off().on('submit', function(event){
          event.preventDefault();
          return false;
        });
      };
    });
    $("#getFavoriteFruit").click(function(event){
      event.preventDefault();
      if (!/\S/.test(val("guess"))){
        flash("You need to guess something!", "danger", true);
        return false;
      }
      flash("Verifying . . .", "info", true);
      action_call("verify_favorite_fruit", {"fruit": val("guess")}, function(data){
        if (data.success){
          flash("You're right!", "info", true);
        }
        else {
          flash("You're totally wrong.  I actually like " + data.fruit + ".", "danger", true);
        }
      });
      return false;
    });
  </script>
---
event: verify_favorite_fruit
code: |
  # No need to save the interview
  # answers after this action.
  set_save_status('ignore')

  # Pretend we have to think
  # about the answer.
  import time
  time.sleep(1)

  if favorite_fruit.lower() == action_argument('fruit').lower():
    success = True
  else:
    success = False
  json_response(dict(success=success, fruit=favorite_fruit))
The features used in this example include:
action_button_html()to insert the HTML of a button.- Running Javascript at page load time using the
daPageLoadevent. - Setting an
idand using the CSS custom class that results. flash()to flash a message at the top of the screen.action_call()to call an action using Ajax.val()to obtain the value of a field on the screen using JavaScript.set_save_status()to prevent the interview answers from being saved after an action completes.action_argument()to obtain the argument that was passed toaction_call().json_response()to return JSON back to the web browser.
Collating assembled and uploaded documents
Here is an interview that uses pdf_concatenate() to bring
assembled documents and user-provided documents in a single PDF file.
objects:
  - favorite: DADict.using(object_type=DAObject, keys=['fruit', 'vegetable', 'fungus'], gathered=True)
  - cover_page: DAList
---
question: |
  What is your favorite ${ i }?
fields:
  - "${ capitalize(i) }": favorite[i].variety
  - "Do you have documentation of this?": favorite[i].has_documentation
    datatype: yesnoradio
  - "Attach documentation": favorite[i].documentation
    datatype: file
    show if: favorite[i].has_documentation
---
attachment:
  variable name: summary_document
  content: |
    [BOLDCENTER] Your Favorite Things

    % for key, val in favorite.items():
    Your favorite ${ key } is
    ${ val.variety }.
    % if val.has_documentation:
    See Exhibit
    ${ alpha(val.documentation_reference) }.
    % endif

    % endfor
---
attachment:
  variable name: cover_page[i]
  docx template file: exhibit_insert.docx
---
mandatory: True
code: |
  information_gathered
  bundle
  final_screen
---
code: |
  indexno = 0
  for item in favorite.values():
    item.variety
    if item.has_documentation:
      item.documentation
      item.documentation_reference = indexno
      indexno += 1
  information_gathered = True
---
code: |
  document_list = list()
  document_list.append(summary_document)
  for item in favorite.values():
    if item.has_documentation:
      document_list.append(cover_page[item.documentation_reference])
      document_list.append(item.documentation)
  bundle = pdf_concatenate(document_list, filename="Favorites.pdf")
---
event: final_screen
question: |
  Your documents
subquestion: |
  ${ action_button_html(bundle.url_for(), color='link', label='Download bundle', icon='file-pdf') }
The Exhibit labeling sheets are generated by the template
exhibit_insert.docx.
Payment processing with Stripe
First, sign up for a Stripe account.
From the dashboard, obtain your test API keys. There are two keys: a “publishable key” and a “secret key.” Put these into your Configuration as follows:
stripe public key: pk_test_ZjkQYPUU0pjQibxamUq28PlM00381Pd25e
stripe secret key: sk_test_YW41CYyivW0Vo7EN0mFD5i4P01ZLeQAPS8
The stripe public key is the “publishable key.” The stripe secret
key is the “secret key.”
Confirm that you have the stripe package installed by checking the
list of packages under “Package Management”. If stripe is not
listed, follow the directions for installing a package. stripe is
available on PyPI.
Create a Python module called dastripe.py with the following contents:
import stripe
import json
from docassemble.base.util import word, get_config, action_argument, DAObject, prevent_going_back
from docassemble.base.standardformatter import BUTTON_STYLE, BUTTON_CLASS

stripe.api_key = get_config('stripe secret key')

__all__ = ['DAStripe']

class DAStripe(DAObject):
  def init(self, *pargs, **kwargs):
    if get_config('stripe public key') is None or get_config('stripe secret key') is None:
      raise Exception("In order to use a DAStripe object, you need to set stripe public key and stripe secret key in your Configuration.")
    super().init(*pargs, **kwargs)
    if not hasattr(self, 'button_label'):
      self.button_label = "Pay"
    if not hasattr(self, 'button_color'):
      self.button_color = "primary"
    if not hasattr(self, 'error_message'):
      self.error_message = "Please try another payment method."
    self.is_setup = False

  def setup(self):
    float(self.amount)
    str(self.currency)
    self.intent = stripe.PaymentIntent.create(
      amount=int(float('%.2f' % float(self.amount))*100.0),
      currency=str(self.currency),
    )
    self.is_setup = True

  @property
  def html(self):
    if not self.is_setup:
      self.setup()
    return """\
<div id="stripe-card-element" class="mt-2"></div>
<div id="stripe-card-errors" class="mt-2 mb-2 text-alert" role="alert"></div>
<button class="btn """ + BUTTON_STYLE + self.button_color + " " + BUTTON_CLASS + '"' + """ id="stripe-submit">""" + word(self.button_label) + """</button>"""

  @property
  def javascript(self):
    if not self.is_setup:
      self.setup()
    billing_details = dict()
    try:
      billing_details['name'] = str(self.payor)
    except:
      pass
    address = dict()
    try:
      address['postal_code'] = self.payor.billing_address.zip
    except:
      pass
    try:
      address['line1'] = self.payor.billing_address.address
      address['line2'] = self.payor.billing_address.formatted_unit()
      address['city'] = self.payor.billing_address.city
      if hasattr(self.payor.billing_address, 'country'):
        address['country'] = address.billing_country
      else:
        address['country'] = 'US'
    except:
      pass
    if len(address):
      billing_details['address'] = address
    try:
      billing_details['email'] = self.payor.email
    except:
      pass
    try:
      billing_details['phone'] = self.payor.phone_number
    except:
      pass
    return """\
<script>
  var stripe = Stripe(""" + json.dumps(get_config('stripe public key')) + """);
  var elements = stripe.elements();
  var style = {
    base: {
      color: "#32325d",
    }
  };
  var card = elements.create("card", { style: style });
  card.mount("#stripe-card-element");
  card.addEventListener('change', ({error}) => {
    const displayError = document.getElementById('stripe-card-errors');
    if (error) {
      displayError.textContent = error.message;
    } else {
      displayError.textContent = '';
    }
  });
  var submitButton = document.getElementById('stripe-submit');
  submitButton.addEventListener('click', function(ev) {
    stripe.confirmCardPayment(""" + json.dumps(self.intent.client_secret) + """, {
      payment_method: {
        card: card,
        billing_details: """ + json.dumps(billing_details) + """
      }
    }).then(function(result) {
      if (result.error) {
        flash(result.error.message + "  " + """ + json.dumps(word(self.error_message)) + """, "danger");
      } else {
        if (result.paymentIntent.status === 'succeeded') {
          action_perform(""" + json.dumps(self.instanceName + '.success') + """, {result: result})
        }
      }
    });
  });
</script>
    """
  @property
  def paid(self):
    if not self.is_setup:
      self.setup()
    if hasattr(self, "payment_successful") and self.payment_successful:
      return True
    if not hasattr(self, 'result'):
      self.demand
    payment_status = stripe.PaymentIntent.retrieve(self.intent.id)
    if payment_status.amount_received == self.intent.amount:
      self.payment_successful = True
      return True
    return False
  def process(self):
    self.result = action_argument('result')
    self.paid
    prevent_going_back()
Create an interview YAML file (called, e.g., teststripe.yml) with
the following contents:
modules:
  - .dastripe
---
features:
  javascript: https://js.stripe.com/v3/
---
objects:
  - payment: DAStripe.using(payor=client, currency='usd')
  - client: Individual
  - client.billing_address: Address
---
mandatory: True
code: |
  # Payor information may be required for some payment methods.
  client.name.first
  # client.billing_address.address
  # client.phone_number
  # client.email
  if not payment.paid:
    payment_screen
  favorite_fruit
  final_screen
---
question: |
  What is your name?
fields:
  - First: client.name.first
  - Last: client.name.last
---
question: |
  What is your phone number?
fields:
  - Phone: client.phone_number
---
question: |
  What is your e-mail address?
fields:
  - Phone: client.email
---
question: |
  What is your billing address?
fields:
  - Address: client.billing_address.address
    address autocomplete: True
  - Unit: client.billing_address.unit
    required: False
  - City: client.billing_address.city
  - State: client.billing_address.state
    code: states_list()
  - Zip: client.billing_address.zip
---
question: |
  How much do you want to pay?
fields:
  - Amount: payment.amount
    datatype: currency
---
event: payment.demand
question: |
  Payment
subquestion: |
  You need to pay up.  Enter your credit card information here.

  ${ payment.html }
script: |
  ${ payment.javascript }
---
event: payment.success
code: |
  payment.process()
---
question: |
  What is your favorite fruit?
fields:
  - Fruit: favorite_fruit
---
event: final_screen
question: Your favorite fruit
subquestion: |
  It is my considered opinion
  that your favorite fruit is
  ${ favorite_fruit }.
Test the interview with a testing card number and adapt it to your particular use case.
The attributes of the DAStripe object (known as payment in this
example) that can be set are:
payment.currency: this is the currency that the payment will use. Set this to'usd'for U.S. dollars. See supported accounts and settlement currencies for information about which currencies are available.payment.payor: this contains information about the person who is paying. You can set this to anIndividualorPersonwith a.billing_address(anAddress), a name, a.phone_number, and an.email. This information will not be sought through dependency satisfaction; it will only be used if it exists. Thus, if you want to send this information (which may be required for the payment to go through), make sure your interview logic gathers it.payment.amount: the amount of the payment to be made, in whatever currency you are using for the payment.payment.button_label: the label for the “Pay” button. The default is “Pay.”payment.button_color: the Bootstrap color for the “Pay” button. The default isprimary.payment.error_message: the error message that the user will see at the top of the screen if the credit card is not accepted. The default is “Please try another payment method.”
The attribute .paid returns True if the payment has been made or
False if it has not. It also triggers the payment process. If
payment.amount is not known, it will be sought.
The user is asked for their credit card information on a “special
screen” tagged with event: request.demand. The variable
request.demand is sought behind the scenes when the interview logic
evaluates request.paid.
The request.demand page needs to include ${ payment.html } in the
subquestion and ${ payment.javascript } in the script. The
JavaScript produced by ${ payment.javascript } assumes that the file
https://js.stripe.com/v3/ has been loaded in the browser already;
this can be accomplished through a features block containing a
javascript reference.
The “Pay” button is labeled “Pay” by default, but this can be
customized with the request.button_label attribute. This value is
passed through word(), so you can use the words translation system
to translate it.
If the payment is not successful, the user will see the error message
reported by Stripe, followed by the value of
request.error_message, which is 'Please try another payment
method.' by default. The value of request.error_message is passed
through word(), so you can use the words translation system to
translate it.
If the payment is successful, the JavaScript on the page performs the
request.success “action” in the interview. Your interview needs to
provide a code block that handles this action. The action needs to
call payment.process(). This will save the data returned by
Stripe and will also call the Stripe API to verify that payment
was actually made. The code block for the “action” will run to the
end, so the next thing it will do is evaluate the normal interview
logic. When request.paid is encountered, it will evaluate to True.
The Stripe API is only called once to verify that the payment was
actually made. Subsequent evaluations of request.paid will return
True immediately without calling the API again.
Thus, the interview logic for the process of requiring a payment is just two lines of code:
if not payment.paid:
  payment_screen
Payment processing is a very complicated subject, so this recipe should only be considered a starting point. The advantage of this design is that it keeps a lot of the complexity of payment processing out of the interview YAML and hides it in the module.
If you want to have the billing address on the same screen where the
credit card number is entered, you could use custom HTML forms, or a
fields block in which the Continue button is hidden.
When you are satisfied that your payment process work correctly, you
can set your stripe public key and stripe secret key to your
“live” Stripe API keys on your production server.
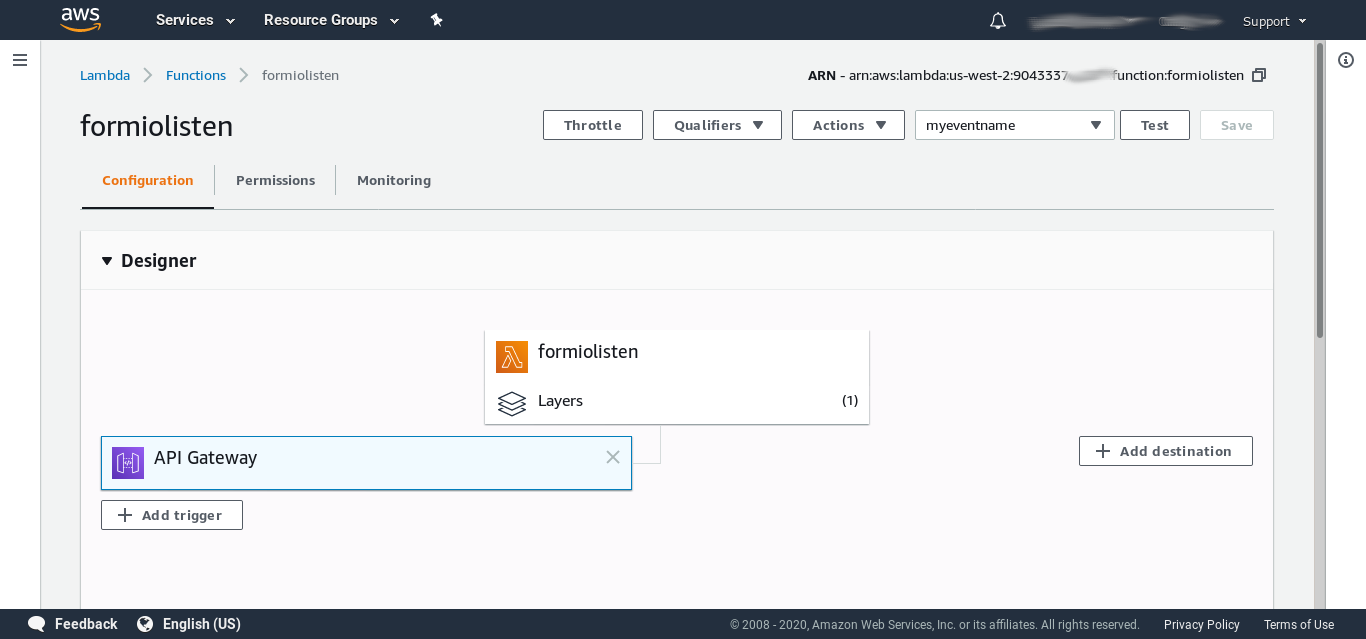
Integration with form.io, AWS Lambda, and the docassemble API
This recipe shows how you can set up form.io to send a webhook request to an AWS Lambda function, which in turn calls the docassemble API to start an interview session, inject data into the interview answers of the session, and then send a notification to someone to let them know that a session has been started.
On your server, create the following interview, calling it fromformio.yml.
mandatory: True
code: |
  multi_user = True
---
code: |
  start_data = None
---
mandatory: |
  start_data is not None
code: |
  send_email(to='[email protected]', template=start_of_session)
---
template: start_of_session
subject: Session started
content: |
  A session has started.  [Go to it now](${ interview_url() }).
---
mandatory: True
question: |
  The start_data is:

  `${ repr(start_data) }`
Create an AWS Lambda function and trigger it with an HTTP REST API that is authenticated with an API key.

Add a layer that provides the requests module. Then write a
function like the following.
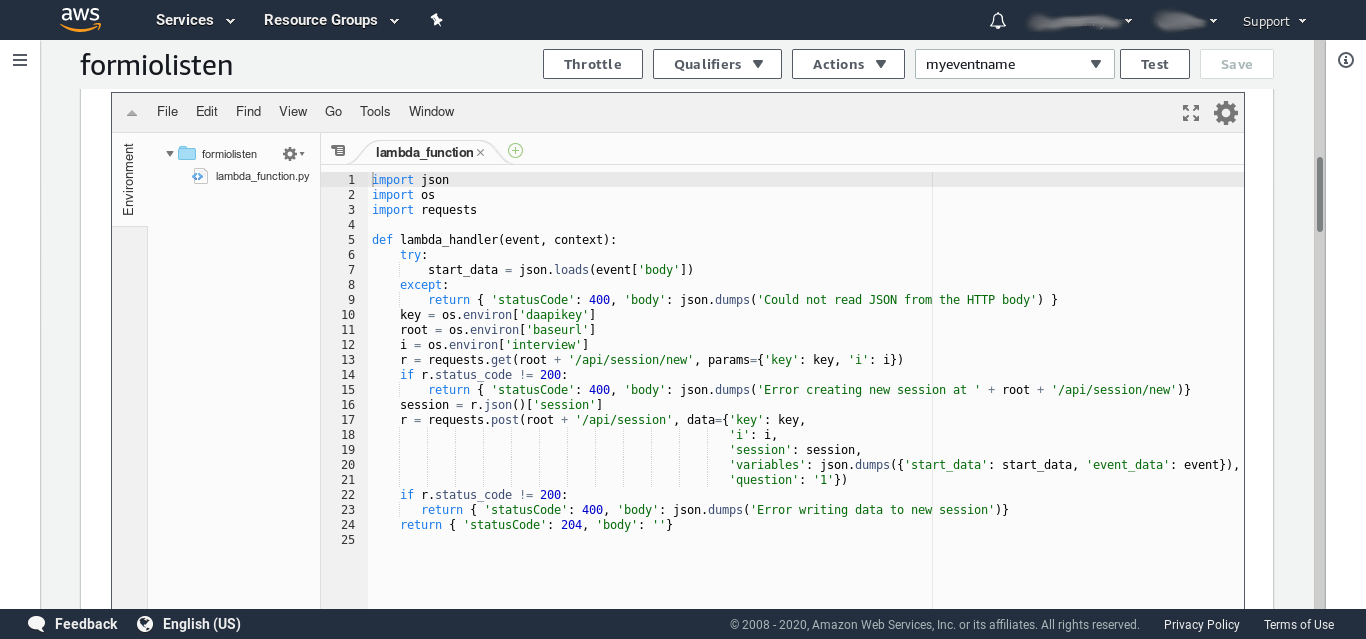
import json
import os
import requests
def lambda_handler(event, context):
try:
start_data = json.loads(event['body'])
except:
return { 'statusCode': 400, 'body': json.dumps('Could not read JSON from the HTTP body') }
key = os.environ['daapikey']
root = os.environ['baseurl']
i = os.environ['interview']
r = requests.get(root + '/api/session/new', params={'key': key, 'i': i})
if r.status_code != 200:
return { 'statusCode': 400, 'body': json.dumps('Error creating new session at ' + root + '/api/session/new')}
session = r.json()['session']
r = requests.post(root + '/api/session', data={'key': key,
'i': i,
'session': session,
'variables': json.dumps({'start_data': start_data, 'event_data': event}),
'question': '1'})
if r.status_code != 200:
return { 'statusCode': 400, 'body': json.dumps('Error writing data to new session')}
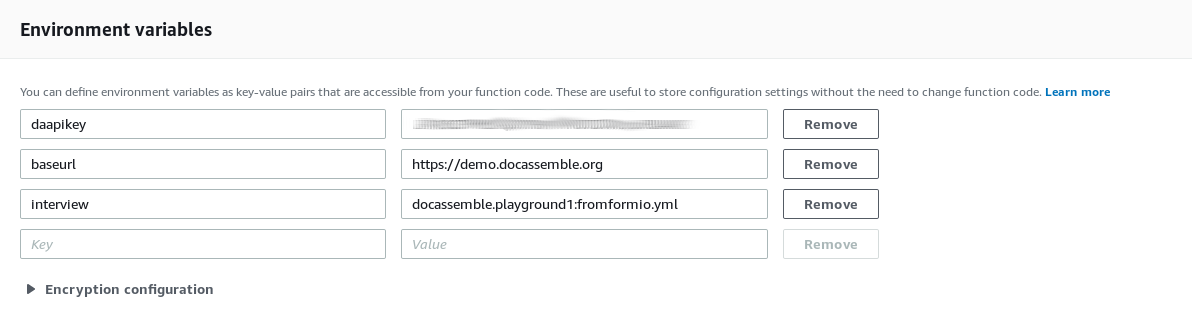
return { 'statusCode': 204, 'body': ''}Set the environment variables so that your provide the function with
an API key for the docassemble API (which you can set up in your
Profile), the URL of your server, and the name of the interview you
want to run (in this case, fromformio.yml is a Playground
interview).
Go to form.io and create a form that looks like this:
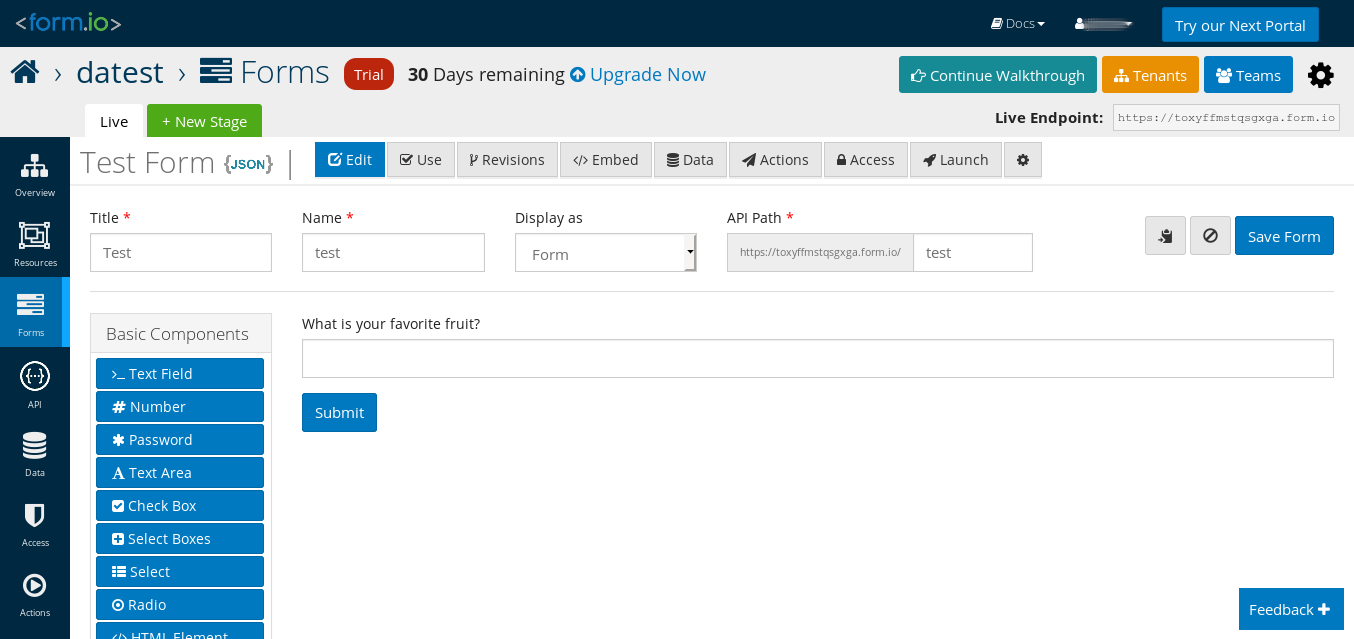
Attach a “webhook” action that sends a POST request to your AWS
Lambda endpoint. Add the API key for the HTTP REST API trigger as
the x-api-key header.
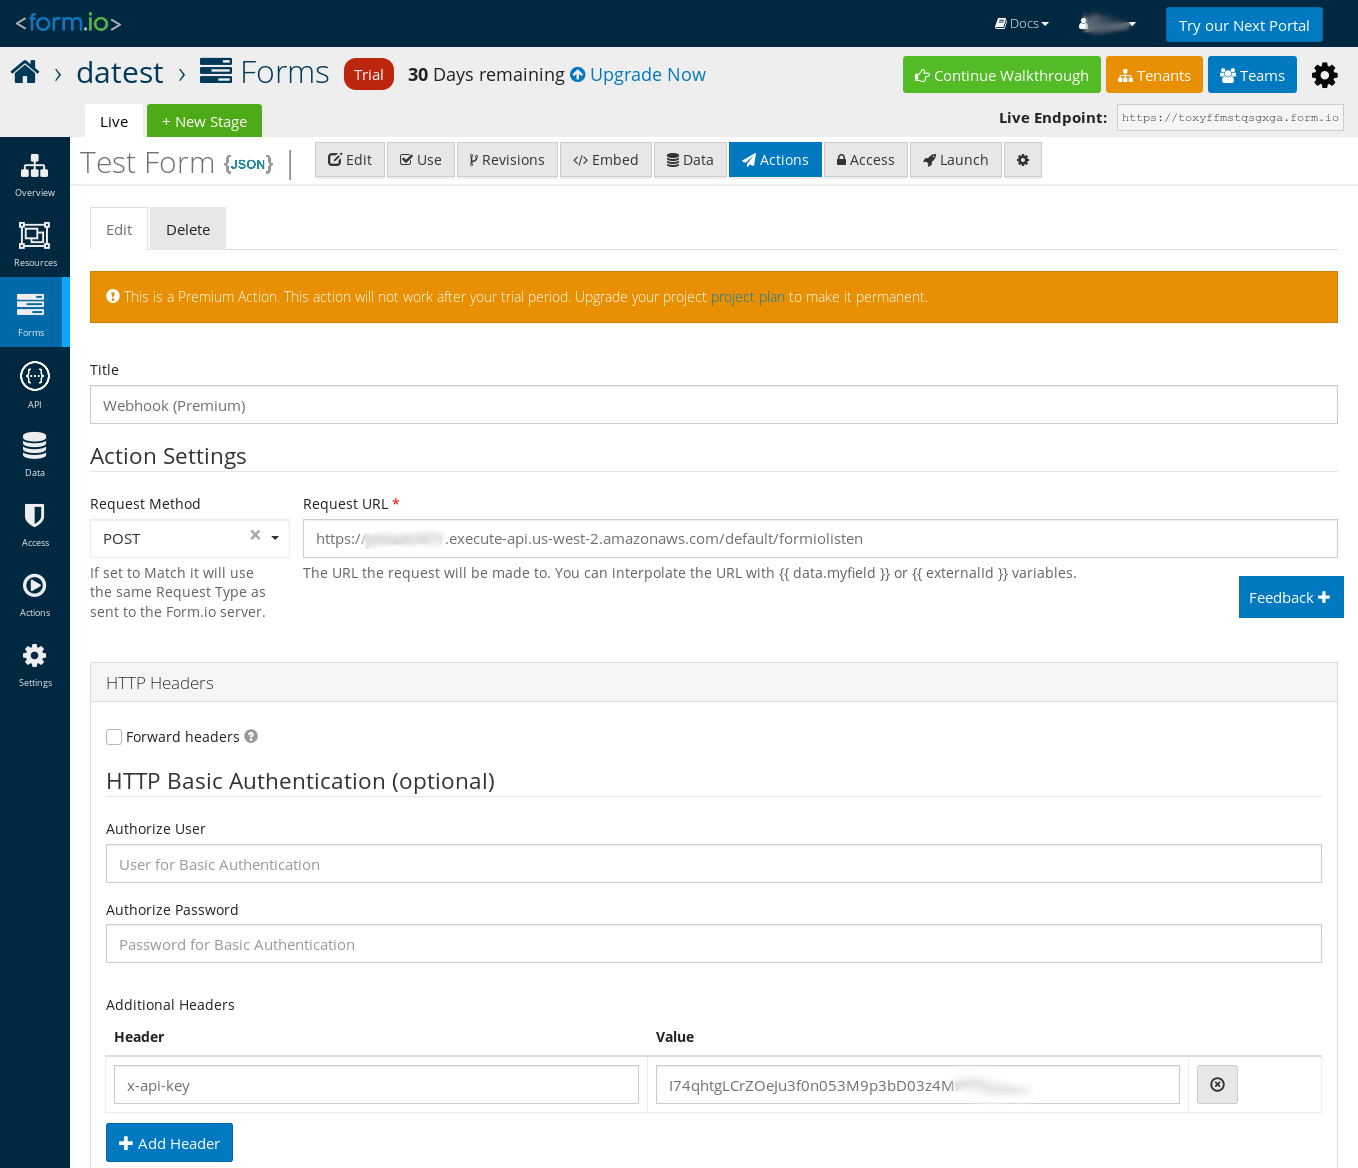
Under Forms, click the “Use” button next to the form that you created and try submitting the form. The e-mail recipient designated in your YAML code should receive an e-mail containing the text:
A session has started. Go to it now.
where “Go to it now” is a hyperlink to an interview session. When the
e-mail recipient clicks the link, they will resume an interview
session in which the variable start_data contains the information
from the form.io form.

Converting the result of object questions
When you gather objects using datatype: object_checkboxes or one
of the other object-based data types, you might not want the variable
you are setting to use object references. You can use the
validation code feature to apply a transformation to the variable
you are defining.
question: |
  Which fruits does ${ person[i] } like?
fields:
  - Fruits: person[i].fruit_preferences
    datatype: object_checkboxes
    choices:
      - fruit_data
validation code: |
  person[i].fruit_preferences = person[i].fruit_preferences.copy_deep(person[i].instanceName + '.fruit_preferences')
---
question: |
  How many seeds does
  ${ person[i].possessive('ideal ' + person[i].fruit_preferences[j].name.text) }
  have?
fields:
  Seeds: person[i].fruit_preferences[j].seeds
continue button field: person[i].fruit_preferences[j].preferred_seeds_verified
The result is that the fruit_preferences objects are copies of the
original fruit_data object and have separate instanceNames.
Repeatable session with defaults
If you want to restart an interview session and use the answers from
the just-finished session as default values for the new session, you
can accomplish this using the depends on feature.
mandatory: True
code: |
  version = 0
---
event: new_version
code: |
  version += 1
---
depends on: version
question: |
  What is your favorite fruit?
fields:
  - Fruit: favorite_fruit
---
depends on: version
question: |
  What is your favorite vegetable?
fields:
  - Vegetable: favorite_vegetable
---
depends on: version
question: |
  What is your favorite apple?
fields:
  - Apple: favorite_apple
---
mandatory: True
question: |
  Summary
subquestion: |
  You like ${ favorite_fruit }
  and ${ favorite_vegetable }.
  % if favorite_fruit == 'apple':

  Your favorite apple is
  ${ favorite_apple }
  % endif
action buttons:
  - label: Try again
    action: new_version
    color: primary
When the variable version is incremented by the new_version
action, all of the variables set by question blocks that use
depends on: version will be undefined, but the old values will be
remembered and offered as defaults when the question blocks are
encountered again.
Universal document assembler
Here is an example of using the catchall questions feature to provide an interview that can ask questions to define arbitrary variables that are referenced in a document.
features:
  use catchall: True
---
generic object: DACatchAll
question: |
  What is ${ x.object_name() }?
fields:
  - no label: x.value
validation code: |
  define(x.instanceName, x.value)
---
if: |
  x.context == 'float' or (x.context == 'add' and isinstance(x.operand, float))
generic object: DACatchAll
question: |
  How much is ${ x.object_name() }?
fields:
  - Amount: x.value
    datatype: currency
validation code: |
  define(x.instanceName, x.value)
---
if: |
  x.context == 'int' or (x.context == 'add' and isinstance(x.operand, int))
generic object: DACatchAll
question: |
  How much is ${ x.object_name() }?
fields:
  - Amount: x.value
    datatype: integer
validation code: |
  define(x.instanceName, x.value)
---
if: |
  x.context == 'str' and x.instanceName.lower() == 'signature'
generic object: DACatchAll
question: |
  Sign your name
signature: x.value
validation code: |
  define(x.instanceName, x.value)
---
question: |
  Please attach a .docx file that you would like to assemble.
subquestion: |
  Place variables in brackets like so:

  > The quick brown {{ animal }} jumped
  > over the {{ adjective }} {{ other_animal }}.

  To enter a signature, use `{{ signature }}`.

  To see how this works, try uploading this [test file].

  [test file]: ${ DAStaticFile(filename='universal-test.docx').url_for() }
fields:
  - no label: attached_template
    datatype: file
    accept: |
      "application/vnd.openxmlformats-officedocument.wordprocessingml.document"
---
mandatory: True
question: Here is your document.
attachment:
  - docx template file:
      code: attached_template
For security purposes, this example interview requires admin or
developer privileges. You can find the source on GitHub and try it
out on your own server.
Adjust Language for Second or Third Person
You may want to have a single interview that can be used either by a
person for themselves, or by a person who is assisting another person.
In the following example, there is an object named client that is of
the type Individual. The variable user_is_client indicates
whether the user is the client, or the user is assisting a third
party.
Here is the text of the question and subquestion written in second person:
question: |
  Should your attorney be compensated for out-of-pocket expenses
  out of your property?
subquestion: |
  Your attorney may incur expenses in administering your property.
  If you allow your attorney to be compensated for out-of-pocket
  expenses out of your property, that may make the attorney's life
  easier.

  Do you want your attorney to be compensated for out-of-pocket
  expenses out of your property?
yesno: should_be_compensated
Here is how you might convert that text so that it will work properly if the user is the client, or if the client is someone else:
initial: True
code: |
  if user_is_client:
    set_info(user=client)
---
question: |
  Should ${ client.possessive('attorney') } be compensated for
  out-of-pocket expenses out of ${ client.possessive('property') }?
subquestion: |
  ${ client.possessive('attorney', capitalize=True) }
  may incur expenses in administering
  ${ client.pronoun_possessive('property') }.
  If
  ${ client.subject() }
  ${ client.does_verb("allow") }
  ${ client.pronoun_possessive('attorney') }
  to be compensated for out-of-pocket expenses out of
  ${ client.pronoun_possessive('property') },
  that may make the attorney's life easier.

  ${ client.do_question('want', capitalize=True) }
  ${ client.pronoun_possessive('attorney') }
  to be compensated for out-of-pocket expenses out of
  ${ client.pronoun_possessive('property') }?
yesno: should_be_compensated
This one block can now do two different things, and is still relatively readable.
Possessives
The first mention of the client in the sentence should use the client’s
name. If the first mention of the client in the sentence is possessive,
you should use ${ client.possessive('object') } to generate either
“Client Name’s object” or “your object”.
Capitalization
Any of the language functions can be modified with capitalize=True if
they are being used at the start of a sentence.
Allow user to read a document before signing it
This interview uses depends on to force the reassembly of a
document after the user has viewed a draft version with a “sign here”
sticker in place of the signature.
objects:
  - user: Individual
  - friend: Individual
---
mandatory: True
code: |
  user.name.first
  friend.name.first
  prized_collection
  draft_screen_shown
  user.signature
  document_finalized
  final_screen
---
attachment:
  variable name: instrument
  name: Transfer of Ownership
  filename: Transfer-of-Ownership
  pdf template file: |
    Transfer-of-Ownership.pdf
  fields:
    - "grantor": ${ user }
    - "grantee": ${ friend }
    - "collection": ${ prized_collection }
    - "signature": ${ user.signature if final else "[FILE sign-here.png]" }
# If the variable "final" changes,
# the document needs to be reassembled
depends on: final
---
# What it means for the document
# to be finalized
code: |
  # Put the document into final mode
  final = True
  # Submit the document somewhere
  # send_email(...)
  # Prevent duplicate submissions
  prevent_going_back()
  document_finalized = True
---
# Set an initial value for final
code: |
  final = False
---
question: |
  What is your name?
fields:
  - First Name: user.name.first
  - Last Name: user.name.last
---
question: |
  What is your best friend's name?
fields:
  - First Name: friend.name.first
  - Last Name: friend.name.last
---
question: What objects do you collect?
fields:
  - Collection: prized_collection
    hint: baseball cards, fine china
---
question: |
  Please sign your name below.
signature: user.signature
under: |
  ${ user }
---
question: Your draft document
subquestion: |
  Please review the attached document and
  press Continue if you agree to sign it.
continue button field: draft_screen_shown
attachment code: instrument
---
event: final_screen
question: Congratulations!
subquestion: |
  You have now transferred everything
  you own to ${ friend }.

  Here is your signed document.
attachment code: instrument
Gathering multiple signatures on a document
This interview sends a document out for signature to an arbitrary number of signers, and then e-mails the document to the signers when all signatures have been provided.
include:
  - docassemble.demo:data/questions/sign.yml
---
objects:
  - user: Person
  - witnesses: DAList.using(object_type=Person, there_are_any=True)
  - sign: SigningProcess.using(documents='statement')
---
mandatory: True
code: |
  user.name.text
  user.favorite_fruit
  witnesses.gather()
  sign.out_for_signature()
  final_screen
---
attachment:
  name: |
    ${ user.possessive('Declaration of Favorite Fruit') }
  filename: |
    fruit_declaration_${ space_to_underscore(user) }
  docx template file: declaration_of_favorite_fruit.docx
  variable name: statement
---
reload: 60
event: final_screen
question: |
  % if sign.all_signatures_in():
  Your document is ready.
  % else:
  Your document is out for signature.
  % endif
subquestion: |
  % if not sign.all_signatures_in():
  You will receive an e-mail
  when your document has been
  signed by all parties.
  % endif
attachment code: |
  sign.list_of_documents(refresh=True)
This interview uses include to bring in the contents of
docassemble.demo:data/questions/sign.yml. This YAML file
disables server-side encryption by setting multi_user to True,
and loads the SigningProcess class from the
docassemble.demo.sign module. The object sign, an instance of
SigningProcess, controls the gathering and display of signatures.
Note the way signatures and the dates of signatures are included in
the DOCX template file, declaration_of_favorite_fruit.docx:
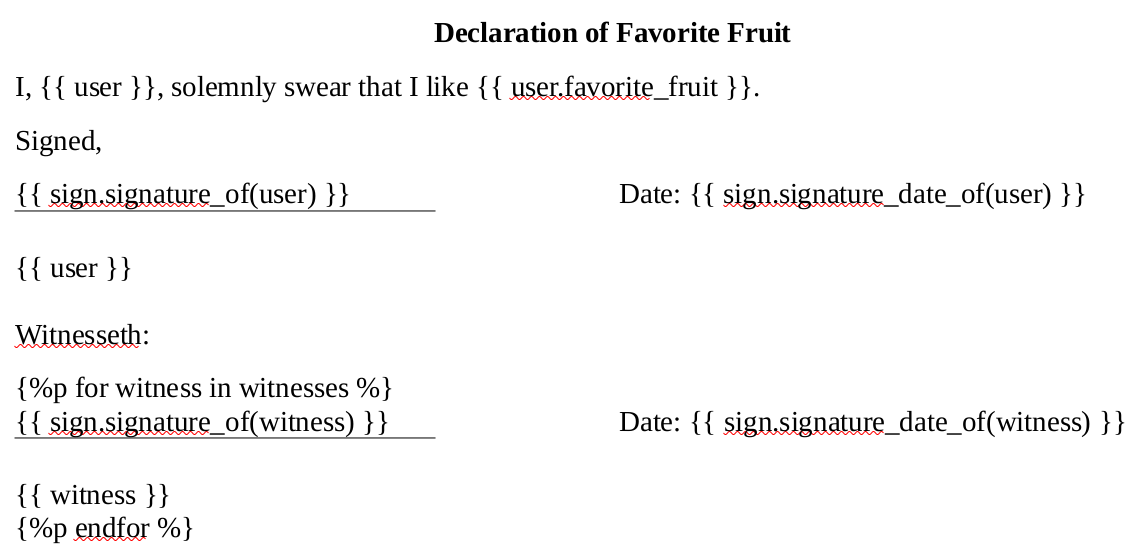
The template uses methods on the sign object to include the
signature images and dates. To include a signature of an Individual
or Person called the_person, you would call
sign.signature_of(the_person). To include the date when the person
signed, you would call sign.signature_date_of(the_person).
Note also the way that a line is placed underneath the signature
image: on the line following the reference to
sign.signature_of(user), there is an empty table with a top
border and no other borders.
The interview gathers the user’s name, the user’s e-mail address, and the names and e-mail addresses of one or more witnesses.
When the interview logic calls sign.out_for_signature(), this
triggers the following process:
- In a background process, e-mails are sent to the user and the witnesses with a hyperlink they can click on to sign the document.
- The hyperlink was created by
interview_url_action()using the action namesign.request_signatureand an action argument calledcodethat contains a special code that identifies who the signer is. - When the signer clicks the hyperlink, they join the interview
session and the action is run, and the action calls
force_ask()to set up a series of screens that signer should see. First the signer agrees to sign, then the signer signs, and then the signer sees a “thank you” screen on which the signer can download the document containing their signature. - When all of the signatures have been collected, e-mails are sent to the signers attaching the final signed document.
The sign.signature_of(the_person) method is smart; it will return the empty
string '' if the_person has not signed yet, and it will return the
person’s signature if the_person has signed. Similarly,
sign.signature_date_of(the_person) returns a line of underscores if
the person has not signed yet, and otherwise returns a DADateTime
object containing the date when the person signed. Specifically, when
the person has not signed yet, the methods return a DAEmpty
object. This means you can safely write
sign.signature_of(the_person).show(width='1in') or
sign.signature_date_of(the_person).format('yyyy-MM-dd') and the
method will still return the empty string or a line of underscores.
In this example, only one document, statement, is assembled. When
you initialize a SigningProcess object, you could specify more than
one document. For example, instead of documents='statement', you
could write documents=['statement', 'certificate_of_service']. Then
the system would send out two documents for signature.
objects:
  - user: Person
  - witnesses: DAList.using(object_type=Person, there_are_any=True)
  - sign: SigningProcess.using(documents=['statement', 'certificate_of_service'])
Note that documents refers not to the actual variables statement
and certificate_of_service, but to the variables as text:
'statement' and 'certificate_of_service'. This is important; if
you were to write documents=statement or documents=[statement,
certificate_of_service], you would get an error. It is necessary to
refer to the documents using text references because the document
itself contains references to sign, and if sign could not be
defined until statement was defined, that would be a Catch-22.
The SigningProcess object knows who the signers are because of the
calls to sign.signature_of() and sign.signature_date_of() that
were made while the document was being assembled. Therefore, you
don’t have to explicitly state who needs to sign the document; you can
use logic in your document to determine who the signers are.
Note that in the attachment code part of the final question, it
refers to sign.list_of_documents(refresh=True) instead of
statement. This is important because the underlying document is
constantly changing as the signatures are added. Calling
sign.list_of_documents(refresh=True) will re-assemble the document
and then return [statement] (the statement document inside a
Python list). The list_of_documents() method simply returns a list of
DAFileCollection objects.
The signing process is customizable. The sign.yml file, which is
included at the top of the interview YAML file above, contains
default template and question blocks that you can override in
your own YAML. For example, the default content for the initial
e-mail to a signer is:
generic object: SigningProcess
template: x.initial_notification_email[i]
subject: |
  Your signature needed on
  ${ x.singular_or_plural('a document', 'documents') }:
  ${ x.documents_name() }
content: |
  ${ x.signer(i) },

  Your signature is requested on
  % if x.number_of_documents() == 1:
  a document called
  ${ x.documents_name() }.
  % else:
  the following
  ${ x.singular_or_plural('document', 'documents') }:

  % for document in x.list_of_documents():
  * ${ document.info['name'] }
  % endfor
  % endif

  To sign, [click here].

  If you are willing to sign this document, please do so
  in the next ${ nice_number(x.deadline_days) } days.
  If you do not sign by
  ${ today().plus(days=x.deadline_days) }, the above link
  will expire.

  [click here]: ${ x.url(i) }
You can overwrite this by including the following rule in your own YAML, which will take precedence over the above rule.
template: sign.initial_notification_email[i]
subject: |
  Please sign the Declaration of Favorite Fruit for ${ user }.
content: |
  ${ sign.signer(i) },

  I would greatly appreciate it if you would sign the
  Declaration of Favorite Fruit for ${ user } by
  [clicking here](${ sign.url(i) }).

  If you are not willing to sign, please
  call me at 555-555-2929.
For more information about what templates are used, see the
sign.yml file. Some of the blocks in this file define actions;
do not try to modify these unless you are sure you know what you are
doing.
The methods of the SigningProcess object that you might use are as
follows.
sign.out_for_signature() initiates the signing process. It is safe
to run this more than once. If the signing process has already been
started, the method will not do anything.
sign.signer(i) is usually invoked in a template in a context where
i is a code that uniquely identifies the signer. It returns the
signer as an object.
sign.url(i) is also used inside of template blocks. It returns
the link that a signer should click on in order to join the interview
and sign the document or documents.
sign.list_of_documents() returns the assembled documents as a list
of DAFileCollection objects. If the optional keyword parameter
refresh is set to True, then the documents will be re-assembled
before they are returned.
sign.number_of_documents() returns the number of documents as an
integer.
sign.singular_or_plural() is useful when writing templates. The
first argument is what should be returned if there is one document.
The second argument is what should be returned if there are multiple
documents.
sign.documents_name() will return a comma_and_list() of the names
of the documents.
sign.has_signed(the_signer) will return True if the_signer has
signed the document yet, and otherwise will return False.
sign.all_signatures_in() will return True if all of the signers
have signed, and otherwise will return False.
sign.list_of_signers() will return a DAList() of the signers.
sign.number_of_signers() will return the number of signers as an
integer. sign.signers_who_signed() will return the subset who have
signed, and sign.signers_who_did_not_sign() will return the subset
who have not yet signed.
The methods sign.signature_of(the_signer) and
sign.signature_date_of(the_signer) are discussed above. These are
typically used inside of documents.
There is also the method sign.signature_datetime_of(the_signer),
which returns a DADateTime object representing the exact time the
signer’s signature was recorded. There is also the method
sign.signature_ip_address_of(the_signer), which returns the IP
address the signer was using. The IP address, along with the date and
time, are widely used ingredients of digital signatures.
sign.sign_for(the_signer, the_signer.signature) will insert a
signature manually, where the_signer is a person whose signature is
referenced in the document, using the signature_of() method, and
the_signer.signature is a variable defined by a signature block
(a DAFile object). Note that if this method is called more than
once, each new time the date of the signature will be updated. You
may want to avoid this by doing:
if not sign.has_signed(the_signer):
  sign.sign_for(the_signer, the_signer.signature)
Then this code can safely be called more than once without changing the date of the signature.
Calling sign.refresh_documents() will generate fresh copies of the
documents. (It uses the reconsider() function.)
Note that in the sign.yml file, the signature block uses
validation code that calls x.validate_signature(i). This is
important because it performs the additional tasks necessary to record
the signature, such as recording the IP address. You will probably
not need to call validate_signature() outside of this context; the
sign_for() method calls validate_signature() for you.
Validating international phone numbers
Here is a simple way to validate international phone numbers.
objects:
  - user: Individual
---
question: |
  Is your mobile phone number
  based in the United States
  or Canada?
field: user.phone_international
buttons:
  - U.S. or Canada: False
  - Another country: True
---
question: |
  What country is associated
  with your mobile phone number?
field: user.phone_country
dropdown:
  code: countries_list()
---
code: |
  if not user.phone_international:
    user.phone_country = 'US'
---
question: |
  What is your phone number?
subquestion: |
  % if user.phone_international:
  Enter your phone number as you
  would dial it in
  ${ country_name(user.phone_country) }.
  % endif
fields:
  - Phone number: user.phone_number
    validate: |
      lambda y: phone_number_is_valid(y, country=user.phone_country) or validation_error("Please enter a valid " + country_name(user.phone_country) + " phone number." )
---
mandatory: True
question: |
  I will text you at
  `${ user.sms_number(country=user.phone_country) }`.
Here is a way to validate international phone numbers using a single screen.
objects:
  - user: Individual
---
question: |
  What is your phone number?
fields:
  - label: |
      Is your mobile phone number
      based in the United States
      or Canada?
    field: user.phone_international
    datatype: noyesradio
    default: False
  - label: |
      What country is associated
      with your mobile phone number?
    field: user.phone_country
    code: countries_list()
    show if: user.phone_international
  - label: |
      Enter your phone number
    field: user.mobile_number
validation code: |
  if user.phone_international:
    if not phone_number_is_valid(user.mobile_number, country=user.phone_country):
      validation_error('Please enter a valid phone number for ' + country_name(user.phone_country) + '.', field='user.mobile_number')
  else:
    if not phone_number_is_valid(user.mobile_number):
      validation_error('Please enter a valid phone number.', field='user.mobile_number')
---
code: |
  if not user.phone_international:
    user.phone_country = 'US'
---
mandatory: True
question: |
  I will text you at
  `${ user.sms_number(country=user.phone_country) }`.
Customizing the date input
If you don’t like the way that web browsers implement date inputs, you can customize the way dates are displayed.
features:
  javascript: datereplace.js
---
question: |
  When were you born?
fields:
  - Date of birth: date_of_birth
    datatype: date
This interview uses a JavaScript file datereplace.js. The
JavaScript converts a regular date input element into a hidden
element and then adds name-less elements to the DOM. This approach
preserves default values.
Running side processes outside of the interview logic
Normally, the order of questions in a docassemble interview is determined by the interview logic: questions are asked to obtain the definitions of undefined variables, and the interview ends when all the necessary variables have been defined.
Sometimes, however, you might want to send the user through a logical process that is not driven by the need to definitions of undefined variables. For example, you might want to:
- Ask a series of questions again to make sure the user has a second chance to get the answers right;
- Ask the user specific follow-up questions after the user makes an edit to an answer.
- Give the user the option of going through a process one or more times.
The following interview is an example of the latter. At the end of the interview logic, the user has the option of pressing a button in order to go through a repeatable multi-step process that contains conditional logic.
objects:
  - user: Individual
  - court_filing_unit: DAEmailRecipient.using(name='Prothonotary of the Court', address='[email protected]')
---
question: |
  Please provide your name and
  e-mail address.
fields:
  - First Name: user.name.first
  - Last Name: user.name.last
  - E-mail address: user.email
    datatype: email
---
question: |
  What is your favorite fruit?
fields:
  - Fruit: user.favorite_fruit
---
attachment:
  name: |
    Praecipe to Declare Favorite Fruit
  filename: Praecipe_Favorite_Fruit_${ space_to_underscore(user) }
  content: |
    [BOLDCENTER] Praecipe to Declare
    Favorite Fruit

    I, ${ user }, on ${ today() }, hereby
    inform all interested parties that my
    favorite fruit is
    ${ user.favorite_fruit }.
  variable name: court_document
---
mandatory: True
question: |
  Your Praecipe to Declare Favorite Fruit
subquestion: |
  % if task_performed('filed_in_court'):
  You have filed your **Praecipe to Declare
  Favorite Fruit** in court.

  Follow up with the court if you have
  any questions about the legal process.
  % else:
  When you are ready to file your Praecipe
  to Declare Favorite Fruit in court, press
  this button.

  ${ action_button_html(url_action('filing_process'),
                        label='Submit this to the court',
                        size='md',
                        color='warning') }

  Until then, take your time and look
  over the document to make sure you
  really want to file it.
  % endif
attachment code: court_document
---
event: filing_process
code: |
  if task_performed('filed_in_court'):
    # This is unlikely to happen but
    # still worth protecting against.
    log('You have already filed the document.', 'danger')
  else:
    force_ask('wants_to_file',
              'email_address_confirmed',
              'really_wants_to_file',
              {'recompute': ['document_filed']},
              'end_of_filing_process')
---
question: |
  Are you completely and totally
  sure you want to file your Praecipe
  to Declare Favorite Fruit?
subquestion: |
  Once you file your Praecipe, you
  can't take it back.
field: wants_to_file
buttons:
  - "Yes, I am sure I want to file.": True
  - "On second thought, I am not ready": False
---
if: wants_to_file
question: |
  What is your e-mail address?
subquestion: |
  I am going to e-mail your document
  to the court.  I need to cc you on
  the e-mail so you have it for your
  records.

  Please confirm that this is your
  e-mail address.
fields:
  - E-mail: user.email
continue button field: email_address_confirmed
---
if: wants_to_file
question: |
  Are you completely and totally sure
  beyond a shadow of a doubt that you
  wish to file your Praecipe in court?
subquestion: |
  You can [take one last look at it]
  before submitting.

  [take one last look at it]: ${ court_document.pdf.url_for() }
field: really_wants_to_file
buttons:
  - "Submit the document now": True
  - "Get me out of here!": False
---
template: filing_template
subject: |
  E-filing: Praecipe to Declare
  Favorite Fruit on behalf of
  ${ user }
content: |
  To the Prothonotary:

  Please accept the attached
  Praecipe to Declare Favorite Fruit,
  which I am filing on behalf of
  ${ user }.

  Thank you,

  A local docassemble server

  Cc: ${ user } via e-mail at ${ user.email }
---
code: |
  if wants_to_file and really_wants_to_file:
    document_filed = send_email(to=court_filing_unit,
                                cc=user,
                                template=filing_template,
                                attachments=court_document,
                                task='filed_in_court')
    if document_filed:
      prevent_going_back()
    else:
      log('There was a problem with the e-mail system.  Your document was not filed.', 'danger')
  else:
    document_filed = False
---
if: wants_to_file and really_wants_to_file and document_filed
question: |
  Congratulations!
subquestion: |
  Your document is now on its way to the
  court.
continue button field: end_of_filing_process
This takes advantage of an important feature of force_ask(). If
you give force_ask() a variable and there is no question in the
interview YAML that can be asked in order to define that variable,
then force_ask() will ignore that variable. The call to
force_ask() lists all of the questions that might be asked in the
process, and the if modifiers are used to indicate under what
conditions the questions should be asked.
Passing variables from one interview session to another
Using create_session(), set_session_variables(), and
interview_url(), you can start a user in one session, collect
information, and then initiate a new session, write variables into the
interview answers of that session, and direct the user to that session.
objects:
  - user: Individual
---
question: |
  What is your name?
fields:
  - First name: user.name.first
  - Last name: user.name.last
---
question: |
  What is your favorite fruit?
fields:
  - Fruit: favorite_fruit
---
code: |
  part_two = user_info().package + ':data/questions/examples/stage-two.yml'
---
code: |
  user.name.first
  favorite_fruit
  session_id = create_session(part_two)
  set_session_variables(part_two, session_id, {'user': user, 'favorite_fruit': favorite_fruit}, overwrite=True)
  new_session_created = True
---
event: final_screen
question: |
  All done
subquestion: |
  [Proceed to the next part](${ interview_url(i=part_two, session=session_id) })
---
mandatory: True
code: |
  new_session_created
  final_screen
The interview that the user is directed to is the following.
mandatory: True
question: |
  You like ${ favorite_fruit } and
  ${ favorite_vegetable }.
Note that when the user starts the session in the second interview,
the interview already knows the object user and already knows the
value of favorite_fruit.
Making generic questions customizable
If you have a lot of questions in your interviews that are very
similar, such as questions that ask for names and addresses, you might
want to create a YAML file that contains generic object
questions and then include that YAML file in all of your interviews.
This is a way to ensure consistency across your interviews without
having to maintain the same information in multiple places across your
YAML files.
Having a common set of generic object questions does not inhibit
your ability to customize question blocks when you need to; you
can always override the generic object question with a more
specific question if you would like to ask a question a different way
if you have a special case.
It is also possible to customize your generic object questions
without overriding. This recipe demonstrates a method of designing
generic object questions that allows for the customization of
specific details of questions.
Here is an example of an interview that gathers names, e-mail
addresses, and addresses of three Individuals while relying
entirely on generic object questions to gather the information.
include:
  - docassemble.demo:data/questions/demo-basic-questions.yml
comment: |
  The "basic questions" loaded by this include
  block allow interview to gather information
  about names, e-mail addresses, and addresses
  in a variety of ways without specifying any
  question blocks.  The "basic questions" are
  configurable using object attributes.
---
objects:
  - client: Individual
  - advocate: Individual
  - antagonist: Individual
---
initial: True
code: |
  set_info(user=client)
comment: |
  Since this isn't a multi-user interview,
  setting up the user is just a single call to
  set_info().  The generic "basic questions"
  use the first person when the generic object
  instance is the user.
---
code: |
  client.ask_email_with_name = True
comment: |
  By default, the question that asks for an
  individual's name does not also ask for the
  individual's e-mail address, but if you set
  the ask_email_with_name attribute to True, an
  additional field will be included.
---
code: |
  client.ask_about_homelessness = True
comment: |
  There are multiple variations of the question
  that asks for an individual's address.  One
  variation allows the user to check a box
  stating that the individual is homeless, and
  if so, only the city and state are gathered.
  We want to ask the question this way when we
  ask for the client's address.
---
code: |
  client.email_required = False
comment: |
  When we ask for the client's e-mail address,
  we want to let the user leave the field
  blank.
---
code: |
  advocate.ask_email_with_name = True
comment: |
  When we ask for the advocate's name, we also
  want to ask for the advocate's e-mail
  address.
---
code: |
  antagonist.name.default_first = "Brutus"
  antagonist.name.default_last = "Morpheus"
comment: |
  By default, when the name of a user is asked,
  the field is blank if the name has not been
  defined yet.  The "basic questions" allow us
  to specify a default value.
---
comment: |
  It is not strictly necessary in this
  interview to specify the above rules as
  separate code blocks, but it is good practice
  to do so because in interviews where such
  values may be pre-set or change as a result
  of user input, cramming the rules into a
  single rule may cause unintended side
  effects, such as overwriting the value of
  client.email_required just because the
  definition of advocate.ask_email_with_name
  was needed.
---
mandatory: True
code: |
  client.name.uses_parts = False
comment: |
  We want to ask for the client's name in a
  single field.  This is useful because the
  client might have a name that does not fit
  the standard "first name, last name"
  structure.

  This block is mandatory because
  .name.uses_parts is defined automatically by
  the class definition; thus to override it we
  need to force this code to run.  The other
  settings in the previous block are undefined
  by default and their definitions will be
  sought out, so we can use non-mandatory
  blocks to provide their definitions.
---
template: client.description
content: petitioner
comment: |
  This is a very small template, but it is
  useful to use a template because template
  content can be translated using the
  spreadsheet translation feature.
---
template: advocate.description
content: the lawyer
---
template: advocate.ask_address_template
subject: |
  How can we send mail to the lawyer's office?
content: |
  Make sure you get this right.
comment: |
  We want to ask the address question a little
  differently when when the object is the
  advocate.  The subject of the template
  corresponds to the "question" and the content
  corresponds to the "subquestion."
---
mandatory: True
question: |
  Summary
subquestion: |
  % for person in (client, advocate, antagonist):
  ${ person.description } is:

  ${ person.name.full() } [BR]
  % if person.ask_about_homelessness and person.address.homeless:
  ${ person.address.city }, ${ person.address.state }
  % else:
  ${ person.address.block() }
  % endif
  % if person.email:
  [BR] ${ person.email }
  % endif

  % endfor
The interview starts by including demo-basic-questions.yml. This
is a parent YAML file for including other YAML files. Its full
contents are:
include:
  - demo-basic-questions-name.yml
  - demo-basic-questions-address.yml
The contents of demo-basic-questions-name.yml are as follows.
generic object: Individual
question: |
  ${ x.ask_name_template.subject }
subquestion: |
  ${ x.ask_name_template.content }
fields:
  - First name: x.name.first
    required: x.first_name_required
    show if:
      code: x.name.uses_parts
    default: ${ x.name.default_first }
  - Middle name: x.name.middle
    required: x.middle_name_required
    show if:
      code: x.name.uses_parts and x.ask_middle_name
    default: ${ x.name.default_middle }
  - Last name: x.name.last
    required: x.last_name_required
    show if:
      code: x.name.uses_parts
    default: ${ x.name.default_last }
  - Name: x.name.text
    show if:
      code: not x.name.uses_parts
  - E-mail: x.email
    datatype: email
    required: x.email_required
    show if:
      code: x.ask_email_with_name
---
generic object: Individual
question: |
  ${ x.ask_email_template.subject }
subquestion: |
  ${ x.ask_email_template.content }
fields:
  - E-mail: x.email
    datatype: email
---
generic object: Individual
template: x.ask_name_template
subject: |
  % if get_info('user') is x:
  What is your name?
  % else:
  What is the name of ${ x.description }?
  % endif
content: ""
---
generic object: Individual
if: x.ask_email_with_name
template: x.ask_name_template
subject: |
  % if x is get_info('user'):
  What is your name and e-mail address?
  % else:
  What is the name and e-mail address of ${ x.description }?
  % endif
content: ""
---
generic object: Individual
template: x.ask_email_template
subject: |
  % if x is get_info('user'):
  What is your e-mail address?
  % else:
  What is the e-mail address of ${ x.description }?
  % endif
content: ""
---
generic object: Individual
code: |
  x.description = x.object_name()
---
generic object: Individual
code: |
  if user_logged_in() and user_info().first_name:
    x.name.default_first = user_info().first_name
  else:
    x.name.default_first = ''
---
generic object: Individual
code: |
  if user_logged_in() and user_info().last_name:
    x.name.default_last = user_info().last_name
  else:
    x.name.default_last = ''
---
generic object: Individual
code: |
  x.name.default_middle = ''
---
generic object: Individual
code: |
  x.first_name_required = True
---
generic object: Individual
code: |
  x.last_name_required = True
---
generic object: Individual
code: |
  x.email_required = True
---
generic object: Individual
code: |
  x.ask_middle_name = False
---
generic object: Individual
code: |
  x.middle_name_required = False
---
generic object: Individual
code: |
  x.ask_email_with_name = False
The contents of demo-basic-questions-address.yml are as follows.
generic object: Individual
question: |
  ${ x.ask_address_template.subject }
subquestion: |
  ${ x.ask_address_template.content }
fields:
  - "Street address": x.address.address
    address autocomplete: True
  - 'Unit': x.address.unit
    required: x.address_unit_required
  - 'City': x.address.city
  - 'State': x.address.state
    code: states_list()
  - 'Zip code': x.address.zip
    required: x.address_zip_code_required
---
if: x.ask_about_homelessness
generic object: Individual
question: |
  ${ x.ask_address_template.subject }
subquestion: |
  ${ x.ask_address_template.content }
fields:
  - label: |
      % if get_info('user') is x:
      I am
      % else:
      ${ x } is
      % endif
      experiencing homelessness.
    field: x.address.homeless
    datatype: yesno
  - "Street address": x.address.address
    address autocomplete: True
    hide if: x.address.homeless
  - 'Unit': x.address.unit
    required: x.address_unit_required
    hide if: x.address.homeless
  - 'City': x.address.city
  - 'State': x.address.state
    code: states_list()
  - 'Zip code': x.address.zip
    required: x.address_zip_code_required
    hide if: x.address.homeless
---
generic object: Individual
template: x.ask_address_template
subject: |
  % if get_info('user') is x:
  Where do you live?
  % else:
  What is the address of ${ x }?
  % endif
content: ""
---
generic object: Individual
code: |
  x.address_zip_code_required = True
---
generic object: Individual
code: |
  x.address_unit_required = False
---
generic object: Individual
code: |
  x.ask_about_homelessness = False
Note that all of the blocks in these YAML files are generic object
blocks. There are question blocks that define questions to be
used. These question blocks make reference to a lot of different
object attributes that function as “settings.” After the question
blocks, there are template blocks and code blocks that
set default values for these settings.
This means that in your own interviews, you have the option of
overriding any of those settings simply by including a block that
sets a value for one of the settings. For example, the default value
of the .ask_about_homelessness attriute is False, but in the
example interview, this was overridden for the object client:
code: |
  client.ask_about_homelessness = True
Note the strategies that are being used in the
demo-basic-questions-name.yml file and the
demo-basic-questions-address.yml file to provide a variety of
options for the ways that questions are asked:
- Using
templates to specify thequestionandsubquestiontext, using thesubjectpart and thecontentpart of the template. Alternatively, you could use separate templates for thequestionandsubquestion, so that your interviews could override thequestionpart without overriding thesubquestionpart, and vice-versa. - Specifying multiple
questionblocks and using theifmodifier to choose which one is applicable, depending on the values of “settings.” - Using the
codevariant ofshow ifto select or deselect fields in a list of fields, depending on the values of settings.
When making use of these strategies, make sure you understand how docassemble finds questions for variables.
Showing a partial preview of document assembly
This example uses the [TARGET]
feature
to show a document assembly preview in the right portion of the
screen that continually updates as the user enters information into
fields.
features:
  centered: False
---
question: |
  The food section
right: |
  <div class="da-page-header">
    <h1 class="h3">Preview</h1>
  </div>

  [TARGET food_section_text]
fields:
  - Favorite fruit: favorite_fruit
  - Favorite vegetable: favorite_vegetable
  - Like mushrooms: likes_mushrooms
    datatype: yesnoradio
  - Favorite mushroom: favorite_mushroom
  - Favorite dessert: favorite_dessert
    choices:
      - Pie: pie
      - Cake: cake
check in: question_food
---
template: question_food
content: |
  I am a really big fan of
  ${ action_argument('favorite_fruit') or "[BLANK]" }.
  With dinner I like to have a side of
  ${ action_argument('favorite_vegetable') or "[BLANK]" }.
  % if action_argument('likes_mushrooms') == 'True':
  And I usually can't resist adding sauteed
  ${ action_argument('favorite_mushroom') or "[BLANK]" }
  to my
  ${ action_argument('favorite_vegetable') or "[BLANK]" }.
  % endif
  [BR][BR]
  My favorite part of the meal is dessert,
  when I can have a nice big slice of
  ${ action_argument('favorite_dessert') or "[BLANK]" }.
target: food_section_text
Using a spreadsheet as a database for looking up information
If you have a table of information and you want to be able to look things up in that table of information during your interview, one of the ways you can accomplish this is by keeping the information in a spreadsheet in the Source folder of your package. Python can be used to read the spreadsheet and look up information in it.
The fruit_database module uses the pandas module to read an
XLSX spreadsheet file into memory. The get_fruit_names() function
returns a list of fruits (from the “Name” column) and the
fruit_info() function returns a dictionary of information about a
given fruit.
modules:
  - .fruit_database
---
question: |
  Pick a fruit.
fields:
  - Fruit: favorite_fruit
    code: get_fruit_names()
---
mandatory: True
question: |
  Your favorite fruit,
  ${ favorite_fruit },
  is
  ${ fruit_info(favorite_fruit)['color'] }
  and has
  ${ fruit_info(favorite_fruit)['seeds'] }
  seeds.
Note that the interview does not simply import the
fruit_info_by_name dictionary into the interview answers. Although
technically you can import dictionaries, lists, and other Python data
types into your interview, doing so is generally not a good idea
because those values will then become part of the interview answers
that are stored in the database for every step of the interview. This
wastes hard drive space and it also wastes time re-loading the data
out of your module every time the screen loads. It is a best practice
to use helper functions like get_fruit_names() and fruit_info() to
bring in information on an as-needed basis.
If your database is particularly large, reading it into memory may not be a good idea. You might want to rewrite the functions so that they read information out of the file on an as-needed basis. You also might want to adapt the functions to read data from a Google Sheet or Airtable rather than from an Excel spreadsheet that is part of your package.
Using a template that lives on Google Drive
When you use the docx template file or pdf template file
features to assemble documents, your document templates are typically
located in the Templates folder of your package, and you refer to
templates by their file names. However, the docx template file or
pdf template file specifiers can be given code instead of a
filename. Your template could be a DAFile object.
You can use this feature to retrieve templates from Google Drive.
There is a convenient Python package called googledrivedownloader
that allows you to download a file from Google Drive based on its ID.
The following example demonstrates how to use this in a document
assembly interview:
modules:
  - google_drive_downloader
---
objects:
  template_file: DAFile
---
code: |
  template_file.initialize(filename='fruit_info.docx')
  GoogleDriveDownloader().download_file_from_google_drive(file_id='1MsiAA632Ehyj0jEW_WEBpZOd-qokqyni', dest_path=template_file.path())
  template_file.commit()
  template_file.fetched = True
---
attachment:
  name: Information about fruit
  filename: fruit_info_sheet
  variable name: assembled_document
  docx template file:
    code: template_file
need: template_file.fetched
---
question: |
  Which fruits do you like?
fields:
  - Fruit: likes_fruit
    datatype: checkboxes
    choices:
      - Apple: apple
      - Banana: banana
      - Peach: peach
      - Grapes: grapes
---
mandatory: True
question: |
  Here is a customized information sheet about the fruits you like.
attachment code: assembled_document
It is necessary that the sharing settings on the file in Google Drive
be set so that “anyone with the link” can view the file. In this
example, the Google Drive file is a DOCX file with this sharing
link. The
ID of the file on Google Drive is
'1MsiAA632Ehyj0jEW_WEBpZOd-qokqyni'. This ID can be seen inside of
the URL, before the query part (the part beginning with ?).
If you wish to use a file on Google Drive without creating a link that
anyone in the world can view, you can use the DAGoogleAPI object,
which allows you to use Google’s API with service account
credentials that are stored in the Configuration under service
account credentials within the google directive.
This example uses a Google Drive file with the id of
'1IGvzA-oOB_bVTmDB7TPW9UgQT-6MGtSe'. This file is not accessible
via a link; it is shared only with the special e-mail address of the
service account.
modules:
  - .gd_fetch
---
objects:
  template_file: DAFile
---
code: |
  template_file.initialize(filename='fruit_info.docx')
  fetch_file('1IGvzA-oOB_bVTmDB7TPW9UgQT-6MGtSe', template_file.path())
  template_file.commit()
  template_file.fetched = True
---
attachment:
  name: Information about fruit
  filename: fruit_info_sheet
  variable name: assembled_document
  docx template file:
    code: template_file
need: template_file.fetched
---
question: |
  Which fruits do you like?
fields:
  - Fruit: likes_fruit
    datatype: checkboxes
    choices:
      - Apple: apple
      - Banana: banana
      - Peach: peach
      - Grapes: grapes
---
mandatory: True
question: |
  Here is a customized information sheet about the fruits you like.
attachment code: assembled_document
This interview uses a Python module docassemble.demo.gd_fetch,
which provides a function called fetch_file(), which downloads a
file from Google Drive.
from docassemble.base.util import DAGoogleAPI
import apiclient

__all__ = ['fetch_file']

def fetch_file(file_id, path):
    service = DAGoogleAPI().drive_service()
    with open(path, 'wb') as fh:
        response = service.files().get_media(fileId=file_id)
        downloader = apiclient.http.MediaIoBaseDownload(fh, response)
        done = False
        while done is False:
            status, done = downloader.next_chunk()
The fetch_file() function retrieves the file with the given
file_id from Google Drive, using Google’s API, and then saves the
contents of the file to path, which is a file path.
The Python module apiclient provides the interface to Google’s API.
apiclient is the name of the module contained in the
google-api-python-client package. The fetch_file() function
uses a DAGoogleAPI object to get authentication credentials from
the Configuration. All that .drive_service() does is:
apiclient.discovery.build('drive', 'v3', http=self.http('https://www.googleapis.com/auth/drive'))On the server demo.docassemble.org, the Configuration contains
credentials for a Google service account, and the Google Drive file
'1IGvzA-oOB_bVTmDB7TPW9UgQT-6MGtSe' has been shared with that
service account.
Although it is convenient for document templates to be stored in Google Drive instead of inside of a package, keep in mind that there are risks to storing templates on Google Drive. If you have a production interview that uses your template from Google Drive, and you edit the template in such a way that it causes an error (for example, a Jinja2 syntax error), your users will start seeing errors immediately. It would be better if you only released a new version of a template as part of a process that involves testing and validating your changes to a template. Another issue is that you are opening up a back door for code injection. If someone has edit access to the template on Google Drive, they could potentially find a way to use Jinja2 to execute arbitrary Python code on your server. Templates are a form of software, so ideally they should live where the other software lives, which is inside of a software package.
Changing the language using the navigation bar
This example interview provides the user with a language selector
interface in the navigation bar. It uses default screen parts to
set the navigation bar html, which is a screen part inside of a
<ul class="nav navbar-nav"> element in the navigation bar.
metadata:
  title:
    en: Fruit
    es: Fruta
---
default screen parts:
  navigation bar html: |
    <li class="nav-item dropdown">
      <a class="nav-link dropdown-toggle" href="#" id="languageSelector" data-bs-toggle="dropdown" aria-haspopup="true" aria-expanded="false">
        <img src="${ url_of('docassemble.demo:data/static/united-kingdom.svg') }" style="width:20px;" /><img src="${ url_of('docassemble.demo:data/static/mexico.svg') }" style="margin-left:-5px;width:20px;" />
      </a>
      <div class="dropdown-menu" aria-labelledby="languageSelector">
        <a class="dropdown-item" href="${ url_action('set_lang', lang='en') }">[FILE docassemble.demo:data/static/united-kingdom.svg, 20px] English</a>
        <a class="dropdown-item" href="${ url_action('set_lang', lang='es') }">[FILE docassemble.demo:data/static/mexico.svg, 20px] Español</a>
      </div>
    </li>
---
objects:
  - user: Individual.using(language='en')
---
initial: True
code: |
  set_language(user.language)
---
event: set_lang
code: |
  if action_argument('lang') in ('en', 'es'):
    user.language = action_argument('lang')
    set_save_status('overwrite')
Note that default screen parts is used instead of metadata so
that Mako can be used. The url_of() function is used to insert
the URL of an image into the src attribute of an <img> element.
The action that changes the language uses set_save_status() to
prevent language switches from introducing a step in the interview
process.
For more information about docassemble’s support for multi-lingual interviews, see the Language Support section.
Tracking statistics about user activity
Redis has a convenient feature for incrementing a counter. Since the
data in Redis is not affected by the deletion of interview sessions
or users pressing the Back button, Redis can be used to keep track
of event counters. The following interview uses a DARedis object
to access Redis and increment counters that track how many times
particular screens in an interview were reached.
objects:
  r: DARedis
  milestone: DADict.using(gathered=True)
---
code: |
  r.incr(r.key(i))
  milestone[i] = True
---
mandatory: True
code: |
  milestone['01 started']
  intro_screen
  milestone['02 got past intro']
  favorite_fruit
  favorite_vegetable
  milestone['03 collected info']
  user_name
  the_document
  milestone['04 document assembled']
  final_screen
---
event: final_screen
question: |
  Thank you for providing this information.
subquestion: |
  Statistics about this interview:

  % for step in sorted(milestone.keys()):
  * ${ step[2:] }: ${ r.get(r.key(step)).decode() }

  % endfor
attachment code: the_document
When you retrieve data from Redis, it comes through as non-decoded
binary data, so you have to decode it with .decode().
Note that r.incr() was not called inside the
mandatory code block. If it had been, then the
counters for the early parts of the interview would be repeatedly
incremented every time the screen loaded. Using the milestone
dictionary to track whether the milestone has been reached ensures
that the counters are not incremented duplicatively.
Headless document assembly
If you want to use the document assembly features of docassemble without the user interface, you can use the API to drive a “headless” interview.
For example, you could use an interview like this:
mandatory: True
code: |
  json_response(the_document.pdf.number)
---
attachment:
  variable name: the_document
  content: |
    Your favorite fruit is ${ favorite_fruit }.
Then you could drive the interview with the API using code like this:
root = 'https://docassemble.myhostname.com/api'
headers = {'X-API-Key': 'XXXSECRETAPIKEYXXX'}
username = 'jsmith'
password = 'xxxsecretpasswordxxx'
i = 'docassemble.mypackage:data/questions/headless.yml'

r = requests.get(root + '/secret', params={'username': username, 'password': password}, headers=headers)
if r.status_code != 200:
    sys.exit(r.text)
secret = r.json()

r = requests.get(root + '/session/new', params={'secret': secret, 'i': i}, headers=headers)
if r.status_code != 200:
    sys.exit(r.text)
session = r.json()['session']

r = requests.post(root + '/session', json={'secret': secret, 'i': i, 'session': session, 'variables': {'favorite_fruit': 'apple'}}, headers=headers)
if r.status_code != 200:
    sys.exit(r.text)
file_number = r.json()

r = requests.get(root + '/file/' + str(file_number), params={'i': i, 'session': session, 'secret': secret}, headers=headers)
if r.status_code != 200:
    sys.exit(r.text)
with open('the_file.pdf', 'wb') as fp:
    fp.write(r.content)
Building a database for reporting
If you want to be able to run reports on variables in interview
sessions, calling interview_list() may be too inefficient because
unpickling the interview answers of a large quantity of interview
sessions is computationally intensive.
The store_variables_snapshot() function allows you to save
variable values to a dictionary in a PostgreSQL database. This
database can be the the standard database where interview answers are
stored (db) or a different database (variables snapshot
db). You can then write queries that use JSONB to access the
variables in the dictionary.
Here is an example of a module, index.py, that uses
store_variables_snapshot() to create a database that lets you run
reports showing the names of users along with when they started and
stopped their interviews.
import json
from docassemble.base.util import store_variables_snapshot, DAObject, user_info, start_time, variables_snapshot_connect

__all__ = ['MyIndex']

class MyIndex(DAObject):
    def init(self, *pargs, **kwargs):
        super().init(*pargs, **kwargs)
        if not hasattr(self, 'data'):
            self.data = {}
        if not hasattr(self, 'key'):
            self.key = 'myindex'
    def save(self):
        data = dict(self.data)
        data['session'] = user_info().session
        data['filename'] = user_info().filename
        data['start_time'] = start_time().astimezone()
        store_variables_snapshot(data, key=self.key)
    def set(self, data):
        if not isinstance(data, dict):
            raise Exception("MyIndex.set: data parameter must be a dictionary")
        self.data = data
        self.save()
    def update(self, new_data):
        self.data.update(new_data)
        self.save()
    def report(self, filter_by=None, order_by=None):
        if filter_by is None:
            filter_string = ''
        else:
            filter_string = ' and ' + filter_by
        if order_by is None:
            order_string = ''
        else:
            order_string = ' order by ' + order_by
        with variables_snapshot_connect() as conn:
            with conn.cursor() as cur:
                cur.execute("select data from jsonstorage where tags='" + self.key + "'" + filter_string + order_string)
                results = [record[0] for record in cur.fetchall()]
        return results
Here is an example of an interview that uses a MyIndex object to
store information about each interview in JSON storage.
modules:
  - docassemble.demo.index
---
mandatory: True
objects:
  - index: MyIndex
---
on change:
  user.name.first: |
    index.update({'first_name': user.name.first})
  user.name.last: |
    index.update({'last_name': user.name.last})
---
objects:
  - user: Individual
---
mandatory: True
code: |
  favorite_fruit
  favorite_vegetable
  finish_time_stored
  final_screen
---
question: |
  What is your name?
fields:
  - First: user.name.first
  - Last: user.name.last
---
question: |
  What is your favorite fruit, ${ user }?
fields:
  - Fruit: favorite_fruit
---
question: |
  What is your favorite vegetable?
fields:
  - Vegetable: favorite_vegetable
---
code: |
  index.update({'finish_time': current_datetime()})
  finish_time_stored = True
---
event: final_screen
question: |
  Thank you for that information.
Note that the index object is defined in a mandatory block. This
ensures that the index object exists before the on change code
runs. Code that runs inside of on change cannot encounter any
undefined variables.
To run a query on the data, you can do something like this:
modules:
  - docassemble.demo.index
---
objects:
  - index: MyIndex
---
mandatory: True
question: |
  People who have used the interview in the last month
subquestion: |
  % for data in index.report(filter_by="(data->>'start_time')::date > 'today'::date - '1 month'::interval", order_by="(data->>'start_time')::timestamp"):
  * ${ data['first_name'] } ${ data['last_name'] }
    % if 'finish_time' not in data:
  (unfinished)
    % endif
  % endfor
Building a custom page with Flask
docassemble is a Flask application, which means that web
endpoints can be added simply by declaring a function that uses the
Flask route decorator.
Here is an example of a Python module that, when installed on a
docassemble server, enables /hello as a GET endpoint.
# pre-load

from docassemble.webapp.app_object import app
from flask import render_template_string
from markupsafe import Markup

@app.route('/hello', methods=['GET'])
def hello_endpoint():
    content = """\
{% extends "base_templates/base.html" %}

{% block main %}
<div class="row">
  <div class="col">
    <h1>Hello, {{ planet }}!</h1>

    <p>Modi velit ut aut delectus alias nisi a. Animi
    in rerum quia error et. Adipisci dolores occaecati
    quasi veniam aliquid asperiores sint sint. Aliquid
    veritatis qui autem quo laborum. Enim et repellendus
    sed sed quasi.</p>
  </div>
</div>
{% endblock %}
"""
    return render_template_string(
        content,
        bodyclass='daadminbody',
        title='Hello world',
        tab_title='Hello tab',
        page_title='Hello there',
        extra_css=Markup('\n    <!-- put your link href="" stuff here -->'),
        extra_js=Markup('\n    <!-- put your script src="" stuff here -->'),
        planet='world')
This example uses the base_templates/base.html Jinja2 template,
which is the default template for pages in docassemble. Using this
template allows you to create a page that uses the same look-and-feel
and the same metadata as other pages of the docassemble app. Note
that the keyword arguments to render_template_string() define
variables that the base_templates/base.html uses. You can customize
different parts of the page by setting these values. The exception is
planet, which is a variable that is used in the HTML for the
/hello page. Note that in order to insert raw HTML using keyword
parameters, you need to use the Markup() function.
Flask only permits one template folder, and the template folder in
the docassemble app is the one in docassemble.webapp. This
cannot be changed. However, you can provide a complete HTML page to
render_template_string() if you do not want to use a template.
The line # pre-load at the top of the module is important. This
ensures that the module will be loaded when the server starts. Note
that it is important not to load multiple modules that contain a
definition of the same endpoint; if you do, Flask will give an
error. You may need to use the module blacklist Configuration
directive to avoid this.
The root endpoint / already has a definition in
docassemble.webapp.server, but you can tell the server to redirect
requests from / to a custom endpoint that you create.
root redirect url: /helloYou might want to use this technique to host your own web site on
various endpoints of the docassemble server and then incorporate
docassemble interviews using a <div> or an <iframe>. This
avoids problems with CORS that might otherwise interfere with
embedding.
Building a custom API endpoint with Flask
Much as you can create a custom page in the web application using Flask, you can create a custom API endpoint.
Here is an example of a Python module that, when installed on a
docassemble server, enables /create_prepopulate as a POST
endpoint. This endpoint creates a session in an interview indicated by
the URL parameter i, and then prepopulates variables in the
interview answers using the POST data. This might be useful in a
situation where you want to combine multiple API calls into one.
# pre-load
from flask import request, jsonify
from flask_cors import cross_origin
from docassemble.base.util import create_session, set_session_variables, interview_url
from docassemble.webapp.app_object import app, csrf
from docassemble.webapp.server import api_verify, jsonify_with_status

@app.route('/create_prepopulate', methods=['POST'])
@csrf.exempt
@cross_origin(origins='*', methods=['POST', 'HEAD'], automatic_options=True)
def create_prepopulate():
    if not api_verify():
        return jsonify_with_status({"success": "False", "error_message": "Access denied."}, 403)
    post_data = request.get_json(silent=True)
    if post_data is None:
        post_data = request.form.copy()
    if 'i' not in request.args:
        return jsonify_with_status({"success": False, "error_message": "No 'i' specified in URL parameters."}, 400)
    session_id = create_session(request.args['i'])
    if len(post_data):
        set_session_variables(request.args['i'], session_id, post_data, overwrite=True, process_objects=False)
    url = interview_url(i=request.args['i'], session=session_id, style='short_package', temporary=90*24*60*60)
    return jsonify({"success": True, "url": url})
The api_verify() function handles authentication using
docassemble’s API key system, and it logs in the owner of the API
key, so that subsequent Python code will run with the permissions of
that user. Note that the code in an API endpoint does not run in the
context of a docassemble interview session, so there are many
functions that you cannot call because they depend on that context
The POST data may be in application/json or
application/x-www-form-urlencoded format.
The line # pre-load at the top of the module is important. This
ensures that the module will be loaded when the server starts. Note
that it is important not to load multiple modules that contain a
definition of the same endpoint; if you do, Flask will give an
error. You may need to use the module blacklist Configuration
directive to avoid this.
Running background tasks from endpoints
docassemble has a background tasks system that can be called
from inside of interview logic. The background_action() function
cannot be called from a custom endpoint, however, because it
depends upon the interview logic context.
In order to run background tasks from a custom endpoint, you need to interface with Celery directly.
First, you need to create a .py file that defines Celery task
functions. In this example, the file is custombg.py in the
docassemble.mypackage package:
# do not pre-load
from docassemble.webapp.worker_common import workerapp, bg_context, worker_controller as wc


@workerapp.task
def custom_add_four(operand):
    return operand + 4


@workerapp.task
def custom_comma_and_list(*pargs):
    with bg_context():
        return wc.util.comma_and_list(*pargs)
The first line, # do not pre-load, is important. This file should
not be loaded as an ordinary Python module. Instead, it should be
loaded using the celery modules directive:
celery modules:
  - docassemble.mypackage.custombg
The celery modules directive ensures that the module will be
loaded at the correct time and in the correct context.
Then create a second Python file containing the code for your Flask
endpoints. The following file is testcustombg.py in the
docassemble.mypackage package.
from flask import request, jsonify
from flask_cors import cross_origin
from docassemble.webapp.app_object import app, csrf
from docassemble.webapp.server import api_verify, jsonify_with_status
from docassemble.webapp.worker_common import workerapp
from docassemble.base.config import in_celery
if not in_celery:
    from docassemble.mypackage.custombg import custom_add_four, custom_comma_and_list


@app.route('/api/start_process', methods=['GET'])
@csrf.exempt
@cross_origin(origins='*', methods=['GET', 'HEAD'], automatic_options=True)
def start_process():
    if not api_verify():
        return jsonify_with_status({"success": False, "error_message": "Access denied."}, 403)
    try:
        operand = int(request.args['operand'])
    except:
        return jsonify_with_status({"success": False, "error_message": "Missing or invalid operand."}, 400)
    task = custom_add_four.delay(operand)
    return jsonify({"success": True, 'task_id': task.id})


@app.route('/api/start_process_2', methods=['GET'])
@csrf.exempt
@cross_origin(origins='*', methods=['GET', 'HEAD'], automatic_options=True)
def start_process_2():
    if not api_verify():
        return jsonify_with_status({"success": False, "error_message": "Access denied."}, 403)
    task = custom_comma_and_list.delay('foo', 'bar', 'foobar')
    return jsonify({"success": True, 'task_id': task.id})


@app.route('/api/poll_for_result', methods=['GET'])
@csrf.exempt
@cross_origin(origins='*', methods=['GET', 'HEAD'], automatic_options=True)
def poll_for_result():
    if not api_verify():
        return jsonify_with_status({"success": False, "error_message": "Access denied."}, 403)
    try:
        result = workerapp.AsyncResult(id=request.args['task_id'])
    except:
        return jsonify_with_status({"success": False, "error_message": "Invalid task_id."}, 400)
    if not result.ready():
        return jsonify({"success": True, "ready": False})
    if result.failed():
        return jsonify({"success": False, "ready": True})
    return jsonify({"success": True, "ready": True, "answer": result.get()})
To prevent a circularity in module loading, it is important to refrain
from importing the background task module,
docassemble.mypackage.custombg, into this module if in_celery is
true (meaning that Celery rather than the web application is loading
the docassemble.mypackage.custombg module). Although this creates a
situation where custom_add_four and custom_comma_and_list are
undefined when in_celery is true, this does not matter because the
code for your endpoints will never be called by Celery.
The custom_add_four and custom_comma_and_list functions are called
in the standard Celery fashion. See the Celery documentation for
more information about using Celery.
The testcustombg.py file above demonstrates how you can create
separate API endpoints for starting a long-running process and polling
for its result.
Synchronizing screen parts with interview answers
If you run multiple sessions in the same interview and you want to be
able to keep sessions organized on the My Interviews page, you might
want to use set_parts() to dynamically change the interview title
or subtitle. You can use metadata to set default values of title
or subtitle that will apply when the user first starts the
interview. Then after the user answers certain questions, you can call
set_parts() to change the title or subtitle. That way, when you
go to the My Interviews page, you will be able to tell your sessions
apart.
This example uses on change to trigger calls to set_parts()
when a variable changes. Although you could also call set_parts()
in your ordinary interview logic, using on change is helpful because
if you allow the user to make changes to variables in a review
screen, you don’t need to worry about making sure that set_parts()
gets called again.
metadata:
  title: Custody Complaint
---
on change:
  user.name.first: |
    set_parts(title='Custody Complaint for ' + user.name.full())
  standing_reason: |
    set_parts(subtitle=standing_reason + ' standing ')
Inserting a watermark when using Markdown to PDF
If you are using the Markdown-to-PDF document assembly method and you
want the resulting PDF documents to bear a watermark on each page,
you can use the draftwatermark package in LaTeX to place an
image in the center of each page. This package is not enabled by
default in the default LaTeX template or its default metadata, so
you need to tell docassemble to load it in the preamble of the
.tex file. The default LaTeX template allows you to add your own
lines to the preamble of the .tex file by setting the
header-includes metadata variable to a list of lines.
objects:
  - watermark_image: DAStaticFile.using(filename='draft.eps')
---
mandatory: True
question: |
  Document
attachment:
  content: |
    Hello, ${ planet }!
  metadata:
    header-includes:
      - \usepackage{draftwatermark}
      - \SetWatermarkText{\includegraphics{${ watermark_image.path() }}}
---
question: |
  What is the name of the planet you wish to greet?
fields:
  - Planet: planet
Another LaTeX package that does something similar is background.
E-mailing a calendar invite
If you install the ics package, you can send calendar invites
using send_email().
modules:
  - .calendar
---
objects:
  - event: Thing
  - user: Person
  - attendees: DAList.using(object_type=Person)
---
question: |
  Tell me about yourself.
fields:
  - Name: user.name.text
  - E-mail: user.email
    datatype: email
---
question: |
  Would you like to invite any attendees?
yesno: attendees.there_are_any
---
question: |
  Tell me about the ${ ordinal(i) } attendee.
fields:
  - Name: attendees[i].name.text
  - E-mail: attendees[i].email
    datatype: email
---
question: |
  Are there any more attendees besides ${ attendees }?
yesno: attendees.there_is_another
---
question: |
  Tell me about the event.
fields:
  - Title: event.title
  - Location: event.location
    required: False
  - Start date: event.begin_date
    datatype: date
  - Start time: event.begin_time
    datatype: time
  - End date: event.end_date
    datatype: date
  - End time: event.end_time
    datatype: time
  - Description: event.description
    input type: area
    required: False
validation code: |
  if event.end_date < event.begin_date:
    raise DAValidationError('The end date must be on or after the start date.', field='event.end_date')
  if event.end_date.replace_time(event.end_time) < event.begin_date.replace_time(event.begin_time):
    raise DAValidationError('The end time must be after the start time.', field='event.end_time')
---
template: email_template
subject: |
  ${ event.title }
content: |
  You are invited to ${ event.title } \
  % if event.location:
  at ${ event.location } \
  % endif
  from \
  % if event.begin_date == event.end_date:
  ${ format_time(event.begin_time, 'hh:mm a') } to \
  ${ format_time(event.end_time, 'hh:mm a') } \
  on ${ event.begin_date }.
  % else:
  ${ format_time(event.begin_time, 'hh:mm a') } \
  on ${ event.begin_date } to \
  ${ format_time(event.end_time, 'hh:mm a') } \
  on ${ event.end_date }.
  % endif
  % if event.description:

  ${ event.description }
  % endif
---
code: |
  ics_file = make_event(title=event.title,
                        location=event.location,
                        description=event.description,
                        begin_date=event.begin_date,
                        begin_time=event.begin_time,
                        end_date=event.end_date,
                        end_time=event.end_time,
                        organizer=user,
                        attendees=attendees)
---
code: |
  email_sent = send_email(to=[user] + attendees,
                          template=email_template,
                          attachments=ics_file)
---
event: final_screen
prevent going back: True
question: |
  The invitation was sent.
---
mandatory: True
code: |
  user.name.text
  attendees.gather()
  email_sent
  final_screen
This interview uses the module file calendar.py, which imports
the ics package.
Duplicating a session
This example shows to use create_session(),
set_session_variables(), and all_variables() to create a new
session pre-populated with variables from the current session.
Note that there are hidden variables (stored in the _internal
variable) that pertain to the session that can be carried
over. Copying over all of them is usually not a good idea, but some of
them can be transferred. This example copies answered and answers,
which keep track of which mandatory blocks have been completed and
what the answers to multiple-choice
questions
are. The device_local and user_local hidden variables are also
copied. The starttime and referer variables are not copied over,
but they could be. This example does not copy over data about any
current “actions” in progress (event_stack).
objects:
  - user: Individual
---
question: |
  What is your favorite fruit?
fields:
  - Fruit: user.favorite_fruit
---
attachment:
  variable name: receipt
  name: Favorite fruit receipt
  filename: fruit
  content: |
    Let it be known that your favorite fruit is
    ${ user.favorite_fruit }.
---
event: duplicate_session
code: |
  session_id = create_session(current_context().filename)
  set_session_variables(current_context().filename, session_id,
                        all_variables(simplify=False),
                        overwrite=True)
  set_session_variables(current_context().filename, session_id,
                        {"_internal['answered']": _internal['answered'],
                         "_internal['answers']": _internal['answers'],
                         "_internal['device_local']": _internal['device_local'],
                         "_internal['user_local']": _internal['user_local']},
                         overwrite=True)
  set_save_status('overwrite')
  log('A <a href="' + interview_url(session=session_id, from_list=1) + '">duplicate session</a> has been created.', 'info')
---
mandatory: True
question: |
  Your favorite fruit is ${ user.favorite_fruit }.
subquestion: |
  You can [duplicate this session](${ url_action('duplicate_session') }).
attachment code: receipt
A table in a DOCX file that uses a list nested in a dictionary
This example illustrates how to use a docx template file and
Jinja2 to construct a table in a DOCX file that contains a list
nested in a dictionary, with a total and subtotals. The template file
is nested_list_table.docx.
objects:
  - fruits: DADict.using(object_type=DAList.using(object_type=Thing, there_are_any=True), keys=['Apple', 'Orange'], gathered=True)
---
question: |
  Tell me about the ${ ordinal(j) } variety of ${ i.lower() }.
fields:
  - Variety: fruits[i][j].name.text
  - Cost: fruits[i][j].cost
    datatype: currency
---
question: |
  Are there more ${ noun_plural(i).lower() } besides ${ fruits[i] }?
yesno: fruits[i].there_is_another
---
# this would get done implicitly through document assembly, but it is
# more efficient to trigger the gathering in a code block
mandatory: True
code: |
  for fruit_type, items_of_type in fruits.items():
    items_of_type.gather()
---
mandatory: True
question: |
  Here is a summary of the fruit you listed.
subquestion: |
  S/N { .text-center }            | Fruit Type { .text-center } | Value { .text-center }
  ------------------------------- | --------------------------- | -----------------------
  % for fruit_type, items_of_type in fruits.items():
  ${ loop.index + 1 }.            | **${ fruit_type }**         | **Subtotal: ${ currency(sum(y.cost for y in items_of_type), decimals=False) }**  { .text-end }
    % for fruit in items_of_type:
  ${ alpha(loop.index).lower() }. | ${ fruit.name.full() }      | ${ currency(fruit.cost, decimals=False) } { .text-end }
    % endfor
  % endfor
                             |                        | **Gross Value: ${ currency(sum(y.cost for y in chain(*fruits.values())), decimals=False) }** { .text-end }
attachment:
  docx template file: nested_list_table.docx
Generating a graph and inserting it into a document
This interview uses the matplotlib library (which is not installed
by default on a docassemble server) to generate a pie chart based
on user-supplied input.
modules:
  - .graph
---
objects:
  - graph: DAFile
  - pets: DADict.using(there_are_any=True)
---
question: |
  Tell me about an animal in your house.
fields:
  - Species of animal: pets.new_item_name
  - Number of pets of this type: pets.new_item_value
    datatype: integer
    min: 1
---
question: |
  Do you have any more animals in your house?
yesno: pets.there_is_another
---
code: |
  make_pie(pets, graph)
  graph.loaded = True
---
need: graph.loaded
mandatory: True
question: |
  Here is your document with a graph.
attachment:
  docx template file: graph.docx
The bulk of the work is done in the graph.py module, the contents
of which are as follows.
__all__ = ['make_pie']

import matplotlib.pyplot as plt

def make_pie(data, the_file):
    the_file.initialize(filename='graph.svg')
    fig = plt.figure(figsize=(6, 6))
    ax = fig.add_axes([0.1, 0.1, 0.8, 0.8])

    labels = list(data.keys())
    fracs = list(data.values())

    pies = ax.pie(fracs, labels=labels, autopct='%1.1f%%')
    with open(the_file.path(), 'wb') as f:
        plt.savefig(f, format="svg")
    the_file.commit()
    the_file.retrieve()
The document template, graph.docx, inserts the DAFile object graph.
Restyling checkboxes as buttons
CSS is a very powerful tool for customizing the user interface. Here is an example that replaces docassemble’s standard checkboxes with buttons that are grey when unselected and red when selected
features:
  css: button-checkboxes.css
---
question: |
  Please tell me what you think.
fields:
  - "Select the fruits you like": likes_fruit
    datatype: checkboxes
    choices:
      - apple
      - peach
      - pear
  - "What is your favorite fruit overall?": favorite_fruit
The transformation is done by the button-checkboxes.css file.
Adding a continuation page to a PDF form
If you have a PDF form that only allows a few lines for a list of things, you can conditionally generate a continuation page. Here is one way to do it.
objects:
  - fruits: DAList.using(there_are_any=True)
---
question: |
  What is your ${ ordinal(i) } favorite fruit?
fields:
  - Fruit: fruits[i]
---
question: |
  Do you have other favorite fruits besides ${ fruits }?
subquestion: |
  Hint: enter at least five.
yesno: fruits.there_is_another
Editing a DAFileList of file uploads
If you allow your users to “edit” a file upload by sending them back
to the question with the datatype: file or datatype: files
field, the only way they can “edit” the upload is by re-uploading a
new file or a new set of files. The value of the DAFileList is
simply replaced. This is because datatype: files and datatype:
file produce an <input type="file"> HTML element, which is
incapable of having a default value.
To allow the user to edit a file upload, you can instead send them to
a question that lets them see the files they have uploaded, delete
particular ones, reorder the files, and add additional files.
include:
  - upload-handler.yml
---
objects:
  - exhibits: DAFileList
---
event: final_screen
question: |
  % if exhibits.number() == 0:
  Good luck making your case without evidence.
  % else:
  Thank you for uploading
  ${ exhibits.quantity_noun('exhibits') }.
  % endif
---
mandatory: True
code: |
  if exhibits.number() > 0:
    exhibits.verified
  final_screen
In this example, the file upload-handler.yml defines rules that
apply to any DAFileList (the blocks use generic object:
DAFileList). The complicated part is the validation code on the
question that sets x[i]. Without this, the DAFileList x would
be a list of DAFileList objects rather than a list of DAFile
objects.
Note that the interview requires a definition of
exhibits.verified. This is important; if your interview doesn’t have
logic that seeks out the .verified attribute, the user will not see
the screens that allow them to edit the list of uploaded files.
This recipe requires docassemble version 1.4.73 or higher.
Using js show if with yesnomaybe
Here is an example of using js show if with datatype: yesnomaybe.
question: |
  Please fill in the following information.
fields:
  - Favorite fruit: fruit
  - Favorite vegetable: vegetable
  - "Do you like mushrooms?": likes_mushrooms
    datatype: yesnomaybe
  - Favorite mushroom: mushroom
    js show if: |
      val("likes_mushrooms") == true
  - "How could you now know?": reason_why_unsure
    input type: area
    js show if: |
      val("likes_mushrooms") == "None"
---
question: |
  Thank you for that information.
subquestion: |
  You like ${ fruit } and ${ vegetable }.

  % if likes_mushrooms is None:
  You said you don't know if you like
  mushrooms. Your ridiculous explanation
  was:

  ${ quote_paragraphs(reason_why_unsure) }
  % elif likes_mushrooms:
  Your favorite mushroom is ${ mushroom }.
  % endif
mandatory: True
A subclass of Individual that reduces to text differently depending on the context
Normally, when you reduce an object of class Individual to text, the
result is the same as when you call .name.full() on the
object. You can make a subclass of Individual that reduces to text
in a different way.
Here is an example module that uses current_context().inside_of to
detect whether the object representing an individual is being reduced
to text inside of a document that is being assembled. If it is, the
.name_full() name is returned, but if the object is being reduced to
text for purposes of displaying in the web app, the first name is
returned.
from docassemble.base.util import current_context, Individual, log

__all__ = ['AltIndividual']


class AltIndividual(Individual):

    def __str__(self):
        if current_context().inside_of != 'standard':
            return self.name.full()
        return self.name.familiar()
Here is an interview that demonstrates the use of the AltIndividual
class.
objects:
  - boss: Individual
  - employee: Individual
  - customers: DAList.using(object_type=Individual)
---
mandatory: True
question: |
  Summary
subquestion: |
  The boss is ${ boss }.

  The employee is ${ employee }.

  The customers are ${ customers }.

  % if boss in customers or employee in customers:
  Either the boss or the employee is also a customer.
  % else:
  Neither the boss nor the employee is also a customer.
  % endif
---
question: Are there any customers?
yesno: customers.there_are_any
---
question: Is there another customer?
yesno: customers.there_is_another
---
code: |
  people = ([boss] if defined('boss') and boss.name.defined() else []) \
         + ([employee] if defined('employee') and employee.name.defined() else []) \
         + customers.complete_elements().elements
---
reconsider:
  - people
question: |
  Who is the boss?
fields:
  - Existing or New: boss.existing_or_new
    datatype: radio
    default: Existing
    choices:
      - Existing
      - New
  - Person: boss
    show if:
      variable: boss.existing_or_new
      is: Existing
    datatype: object
    choices: people
  - First Name: boss.name.first
    show if:
      variable: boss.existing_or_new
      is: New
  - Last Name: boss.name.last
    show if:
      variable: boss.existing_or_new
      is: New
  - Birthday: boss.birthdate
    datatype: date
    show if:
      variable: boss.existing_or_new
      is: New
---
reconsider:
  - people
question: |
  Who is the employee?
fields:
  - Existing or New: employee.existing_or_new
    datatype: radio
    default: Existing
    choices:
      - Existing
      - New
  - Person: employee
    show if:
      variable: employee.existing_or_new
      is: Existing
    datatype: object
    choices: people
  - First Name: employee.name.first
    show if:
      variable: employee.existing_or_new
      is: New
  - Last Name: employee.name.last
    show if:
      variable: employee.existing_or_new
      is: New
  - Birthday: employee.birthdate
    datatype: date
    show if:
      variable: employee.existing_or_new
      is: New
---
reconsider:
  - people
question: |
  Who is the ${ ordinal(i) } customer?
fields:
  - Existing or New: customers[i].existing_or_new
    datatype: radio
    default: Existing
    choices:
      - Existing
      - New
  - Person: customers[i]
    show if:
      variable: customers[i].existing_or_new
      is: Existing
    datatype: object
    choices: people
  - First Name: customers[i].name.first
    show if:
      variable: customers[i].existing_or_new
      is: New
  - Last Name: customers[i].name.last
    show if:
      variable: customers[i].existing_or_new
      is: New
  - Birthday: customers[i].birthdate
    datatype: date
    show if:
      variable: customers[i].existing_or_new
is: NewControlling access to interviews
You can control access to interviews using the username/password
system, and you can use the require login and required
privileges.
If you already have a username/password system on another web site, and you don’t want users to have to log in twice, there are ways around this:
- If both your other site and your docassemble side use the same social sign-on system, like Azure, the login process can be fairly transparent.
- Your other site could synchronize the usernames and passwords between your other site and the docassemble site. The docassemble API allows for creating users, deleting users, and changing their passwords.
- Your users can use the docassemble site without logging in to the docassemble site. Your interviews can control access and identify the user through a different means.
To make an interview non-public, you can put something like this at the top of the interview:
mandatory: True
code: |
  authorized = False
  multi_user = True
---
initial: True
code: |
  if not authorized:
    command('exit', url="https://example.com/login")
  process_action()
If a random person on the internet tries to access the docassemble
interview through a URL, they will be immediately redirected. A new
session will be created, but it will immediately be deleted by
the operation of command('exit').
Meanwhile, users of your web site will be able to use interview sessions that your site creates for them. Your site can call the following API endpoints:
-
interview with the filename
i. AsessionID is returned. -
interview answers of a session identified by
iandsession. For example, using thesessionID it obtained by calling the previous endpoint, your site could call the/api/sessionPOST endpoint withvariablesset to{'authorized': true}.
Now you can direct the user to the URL
https://da.example.com/interview?i=docassemble.mypackage:data/questions/myinterview.yml&session=afj32vnf23wjfhf2393d928j39d8j
or, equivalently, https://da.example.com/run/mypackage/myinterview/?session=afj32vnf23wjfhf2393d928j39d8j.
The session that the user resumes will have the variable authorized
set to True and thus the user will not be redirected away. The
session code is the security mechanism.
At the same time that your site defines authorized as True, it
could also define variables such as the user’s email address, or a
unique ID for the user’s account on your site. These might be useful
to have in an interview.
There are other strategies for authentication without login. For
example, you could use to use the API to stash data in
docassemble, and then direct the user to an interview with a link
like
https://da.example.com/start/mypackage/myinterview/?k=AFJI23FJOIJ239FASD2&s=IRUWJR2389EFIJW2333
where AFJI23FJOIJ239FASD2 and IRUWJR2389EFIJW2333 are the
stash_key and the secret returned by the /api/stash_data
endpoint. Your interview logic could retrieve these values from the
url_args and then use retrieve_stashed_data() to obtain the
data.
mandatory: True
code: |
  if 'k' not in url_args or 's' not in url_args:
    command('exit', url="https://example.com/login")
  data = retrieve_stashed_data(url_args['k'], url_args['s'])
  if not data:
    command('exit', url="https://example.com/login")
  user_name = data['user_name']
scan for variables: False
---
initial: True
code: |
  process_action()
The interview can commence only if k and s are present in the URL
parameters, and only if they are valid. When you stash the data you
can set a time period after which the data will be automatically
deleted.
This method has the advantage that it does not require using
multi_user = True. However, if the user does not log in to the
docassemble site, the user will not be able to resume an encrypted
session if multi_user is not set to True.
Using the OpenAI API
You can use generative AI as a tool in a docassemble interview.
Here is an example that uses the openai Python package to
communicate with the OpenAI Platform.
Prerequisites:
- On the Package Management page, install the
openaiPython package. (If you are developing a package, make sure thatopenaiis a dependency.) - In the OpenAI Platform, create an account, enter a payment method, and obtain an API key.
- Put the API key into your Configuration under
openai key.
Create this module in your Playground or in your package, calling it
chatbot.py:
import openai
from docassemble.base.util import get_config, DAObject

openai.api_key = get_config('openai key')


class Conversation(DAObject):

    def init(self, *pargs, **kwargs):
        self.conversation = []
        super().init(*pargs, **kwargs)

    def ask(self, prompt):
        self.conversation.append({"role": "user", "content": prompt})
        completion = openai.chat.completions.create(
            model="gpt-5",
            messages=self.conversation
        )
        response = completion.choices[0].message.content
        self.conversation.append({"role": "assistant", "content": response})
        return response
Then create an interview with the following contents, calling it
chatbot.yml:
modules:
  - .chatbot
---
objects:
  - name_address: Conversation
  - user: Individual
---
mandatory: True
code: |
  bot_response = name_address.ask("""Pretend that you are a polite, helpful \
  chatbot called Freddy and I am someone living in the United States who is \
  asking you for help. Ask me for my name and address. You need my name and \
  address so that you can help me. Make sure I give you both my first name \
  and my last name. Once I give you my full name and address, your response \
  should be solely a JSON object containing the keys first_name, last_name, \
  street_address, city, and state. If I change the subject of conversation \
  to something other than my name and address, or smalltalk, your response \
  should be solely a JSON object {"error": "True"}. Start pretending \
  immediately.""")
---
mandatory: True
code: |
  while True:
    bot_response = name_address.ask(prompt)
    try:
      address = json.loads(bot_response)
      assert isinstance(address, dict) and \
      ('error' in address or 'first_name' in address)
      break
    except:
      pass
    del prompt
---
mandatory: True
code: |
  if not address.get("error", False):
    user.name.first = address.get('first_name', '')
    user.name.last = address.get('last_name', '')
    user.address.address = address.get('street_address', '')
    user.address.city = address.get('city', '')
    user.address.state = address.get('state', '')
  del address
---
mandatory: True
question: |
  Your name and address
subquestion: |
  % if user.name.defined():
  ${ user.address_block() }
  % else:
  You failed to cooperate.
  % endif
---
question: |
  Freddy, a chatbot
subquestion: |
  ${ bot_response }
fields:
  - no label: prompt
    datatype: area
As you can see, interfacing with the OpenAI API requires very little
code. The conversation attribute of the Conversation object is a
list such as:
[
  {"role": "user", "content": "What is the capital of Argentina?"},
  {"role": "assistant", "content": "Buenos Aires, the capital of Argentina, is the country's economic and political centre."},
  {"role": "user", "content": "What is the most popular food there? Answer in one word."}
]
Each time the OpenAI API is called, the list with the whole
conversation is passed to the API. Whatever the API returns is then
appended to the list as a dict like {"role": "assistant", "content": "Asado"}.
The OpenAI server does not remember the context of the
conversation. Each request it receives from the docassemble server
is new. ChatGPT understands the context of the conversation
because the whole conversation is provided to the API each time.
In this example, the initial instruction tells ChatGPT to respond with pure JSON when the conversation reaches a stopping point. The interview logic detects whether the response is a JSON object by trying to parse the response as JSON. As a safety measure, ChatGPT is instructed to respond with a JSON object if the user changes the subject of conversation.
The JSON that ChatGPT returns is then used to populate variables in the interview answers
In this manner, you can use generative AI to replace question blocks
with a conversational interface, while still achieving the same end
goal of populating the interview answers with specific pieces of
information.
The question that is shown during the conversation is:
question: |
  Freddy, a chatbot
subquestion: |
  ${ bot_response }
fields:
  - no label: prompt
    datatype: area
This question defines prompt if prompt is undefined. It requires
bot_response to be defined.
The interview logic that causes this question to be shown repeatedly
to the user is:
mandatory: True
code: |
  bot_response = name_address.ask(initial_prompt)
---
mandatory: True
code: |
  while True:
    bot_response = name_address.ask(prompt)
    try:
      address = json.loads(bot_response)
      assert isinstance(address, dict) and \
      ('error' in address or 'first_name' in address)
      break
    except:
      pass
    del prompt
In the first block, the initial bot_response is obtained, which is
some type of greeting from ChatGPT, after ChatGPT has been given
instructions about how to behave.
Once bot_response is defined initially in the first code block,
that code block is not run again because it is mandatory and it
has run to completion. Now the second code block will run every time
the screen loads, until it runs to completion without raising an
exception.
The second code block is a loop; the while True means that the
code inside will continue to run indefinitely. The first thing the
code tries to do inside the loop is bot_response =
name_address.ask(prompt). However, prompt is undefined, so an
undefined variable exception is raised (leaving bot_response
unchanged) and docassemble asks the question that defines
prompt. Thus, the user sees the above question where
bot_response is the welcome message that ChatGPT came up with after
being instructed to pretend to be a chatbot. The user then provides a
prompt, and this code block executes again, because it is
mandatory and has not run to completion. Now, prompt is defined,
so bot_response is defined by the .ask() method. Then the code
tries to parse the response as JSON. The json.loads() method will
return an exception if the response is not JSON. If the response is
JSON, the assert command will raise an AssertionError if the data
structure is not expected. (This is unlikely to happen, but perhaps a
clever user could trick ChatGPT into responding with arbitrary valid
JSON.) If the JSON was expected, then break terminates the while
True loop, and the mandatory block will not run again, since it
runs to completion. However, if an exception is raised, then the
exception is trapped, pass does nothing, prompt is undefined, and
then the loop goes back to the beginning. The user sees the new
bot_response and can respond to another iteration of the
conversation.
The next mandatory code block takes the
ChatGPT-generated JSON and populates variabes in the interview answers
as a result.
mandatory: True
code: |
if not address.get("error", False):
user.name.first = address.get('first_name', '')
user.name.last = address.get('last_name', '')
user.address.address = address.get('street_address', '')
user.address.city = address.get('city', '')
user.address.state = address.get('state', '')
del addressNote that the code tries to adjust for every eventuality. Maybe the response was the signal that the user changed the subject. Maybe ChatGPT failed to return a complete JSON object with all of the requested keys. The code defaults to populating the empty string if something is missing.
You can use multiple Conversation objects in the same interview,
each one of which fulfills a particular mission.
In this example, the .ask() method of the Conversation object is
called in a loop, because the conversation could have any number of
iterations. You could also use Conversation objects in the
background that only have a prompt and a response. For example:
modules:
- .chatbot
---
objects:
- q: Conversation
---
question: |
In what state were you injured?
fields:
- State: state
code: states_list()
---
code: |
years = int(q.ask(f"""Generally, how many years is the statute of \
limitations for tort actions in the state of {state_name(state)}? \
Answer only with digits 0-9, and no punctuation."""))
---
mandatory: True
question: |
You have ${ quantity_noun(years, "year") } to bring a claim.Note that the ChatGPT API is slow. If your server has a lot of traffic, calling the ChatGPT API in the foreground may cause your server to become unresponsive.
Calling the OpenAI API in the background is possible. For example,
create a Python module chatbot_bg.py with the following contents:
import openai
from docassemble.base.util import get_config, DAObject, background_action
openai.api_key = get_config('openai key')
class Conversation(DAObject):
def init(self, *pargs, **kwargs):
self.conversation = []
self.stage = 0
super().init(*pargs, **kwargs)
def fg_ask(self, prompt):
self.conversation.append({"role": "user", "content": prompt})
completion = openai.chat.completions.create(
model="gpt-5",
messages=self.conversation
)
response = completion.choices[0].message.content
self.conversation.append({"role": "assistant", "content": response})
return response
def ask(self, prompt):
if self.stage == 0:
self.bg_action = background_action(self.attr_name('bg_ask'), prompt=prompt)
self.stage = 1
self.wait
if self.stage == 1:
if not self.bg_action.ready():
self.wait
response = self.bg_action.get()
self.conversation.append({"role": "user", "content": prompt})
self.conversation.append({"role": "assistant", "content": response})
self.stage = 0
del self.bg_action
return response
return "error"Then create a YAML interview file called chatbot-bg.yml with the
following contents:
modules:
- .chatbot_bg
---
generic object: Conversation
event: x.bg_ask
code: |
background_response(x.fg_ask(action_argument('prompt')))
---
generic object: Conversation
event: x.wait
question: |
Please wait . . .
reload: 5Then create a YAML file for testing this system, called
chatbot-slow.yml:
include:
- chatbot-bg.yml
---
objects:
- name_address: Conversation
- user: Individual
---
mandatory: True
code: |
bot_response = name_address.ask("""Pretend that you are a polite, helpful \
chatbot called Freddy and I am someone living in the United States who is \
asking you for help. Ask me for my name and address. You need my name and \
address so that you can help me. Make sure I give you both my first name \
and my last name. Once I give you my full name and address, your response \
should be solely a JSON object containing the keys first_name, last_name, \
street_address, city, and state. If I change the subject of conversation \
to something other than my name and address, or smalltalk, your response \
should be solely a JSON object {"error": "True"}. Start pretending \
immediately.""")
---
mandatory: True
code: |
while True:
bot_response =
name_address.ask(prompt)
try:
address = json.loads(bot_response)
assert isinstance(address, dict) and \
('error' in address or 'first_name' in address)
break
except:
pass
del prompt
---
mandatory: True
code: |
  if not address.get("error", False):
    user.name.first = address.get('first_name', '')
    user.name.last = address.get('last_name', '')
    user.address.address = address.get('street_address', '')
    user.address.city = address.get('city', '')
    user.address.state = address.get('state', '')
  del address
---
mandatory: True
question: |
Your name and address
subquestion: |
% if user.name.defined():
${ user.address_block() }
% else:
You failed to cooperate.
% endif
---
question: |
Freddy, a chatbot
subquestion: |
${ bot_response }
fields:
- no label: prompt
datatype: areaThe only difference between chatbot-slow.yml and the earlier
chatbot.yml is that chatbot-slow.yml does:
include:
  - chatbot-bg.yml
instead of:
modules:
  - .chatbot
Any time the OpenAI API is called, the user will see the waiting screen.
Helper class for using LLMs
This recipe provides an example of an AIHelper class that
facilitates using an LLM to have a conversation with the user and
define a variable when a goal is achieved. It uses the
BackgroundAction class so that time-consuming API calls to the LLM
do not delay HTTP responses.
Here is an example interview that uses the AIHelper class. The
AIHelper class is brought into the interview through the include
block that incorporates the aihelper.yml file.
include:
  - aihelper.yml
---
objects:
  - ai: AIHelper
  - user: Individual
---
question: |
  What is your name?
fields:
  - First name: user.name.first
  - Last name: user.name.last
---
mandatory: true
question: |
  Download your affidavit
attachment:
  name: Favorite fruit affidavit
  filename: affidavit
  content: |
    [CENTER]Affidavit of Favorite Fruit

    ${ life_story }

    ${ favorite_fruit_explanation }
---
code: |
  life_story = ai['life'].interact()
---
question: |
  What is your life story?
subquestion: |
  ${ ai['life'].output }
fields:
  - no label: ai['life'].input
    input type: area
---
template: ai['life'].initial_output
content: |
  Please cover such details as where you were born, where you grew up,
  where you went to school, and who you live with currently.
---
template: ai['life'].prompt
content: |
  You are a helpful assistant who is having a conversation with
  ${ user } about ${ user.possessive('life story') }. You need to find
  out from ${ user } where they were born, where they grew up, where
  they went to school, and how they came to live with the people they
  currently live with. When you have gathered this information, call
  the conversation_complete tool with a 2 to 5 paragraph summary of
  ${ user.possessive('life story') } written in first-person as
  ${ user }, that includes all of these elements.
---
code: |
  favorite_fruit_explanation = ai['fruit'].interact()
---
question: |
  What is your favorite fruit and why?
subquestion: |
  ${ ai['fruit'].output }
fields:
  - no label: ai['fruit'].input
    input type: area
---
template: ai['fruit'].initial_output
content: |
  Please explain your reasoning.
---
template: ai['fruit'].prompt
content: |
  You are a helpful assistant who is having a conversation with ${
  user } about ${ user.possessive('favorite fruit') }. Your job is to
  elicit from ${ user } what their favorite fruit is and specifically
  why they like the fruit so much, compared with other fruits. When
  you have gathered this information, call the conversation_complete
  tool with a 2 to 3 sentence testimonial, written in first-person as
  ${ user }, saying what their favorite fruit is and why.
The aihelper.yml file is as follows. It imports names from
aihelper.py and provides some generic object blocks that run
code in the context of background actions.
modules:
  - .aihelper
---
generic object: AIInteraction
event: x.prompt_ai
code: |
  answer = x.conv.ask(action_argument('system_prompt'), action_argument('user_input'))
  background_response_action(x.attr_name('save_ai_response'), conv=x.conv, answer=answer)
---
generic object: AIInteraction
event: x.save_ai_response
code: |
  x.conv = action_argument('conv')
  x.output = action_argument('answer')
  x.delattr('input', 'bg')
  background_response()
The aihelper.py file is as follows.
from docassemble.base.util import get_config, DAObject, BackgroundAction, DADict
import anthropic

__all__ = ['AIHelper', 'AIInteraction']

client = anthropic.Anthropic(api_key=get_config('anthropic api key'))

tools = [
    {
        "name": "conversation_complete",
        "description": "Call this tool when you have collected all necessary information from the user.",
        "input_schema": {
            "type": "object",
            "properties": {
                "output": {
                    "type": "string",
                    "description": "The output that was requested of you"
                }
            },
            "required": ["output"]
        }
    }
]


class Conversation(DAObject):
    def init(self, *pargs, **kwargs):
        self.conversation = []
        self.done = False
        super().init(*pargs, **kwargs)

    def ask(self, system_prompt, prompt):
        str(system_prompt)
        self.conversation.append({"role": "user", "content": prompt})
        response = client.messages.create(
            model="claude-sonnet-4-6",
            max_tokens=1024*8,
            system=str(system_prompt),
            tools=tools,
            messages=self.conversation
        )
        tool_use_block = None
        text_blocks = []
        for block in response.content:
            if block.type == "tool_use" and block.name == "conversation_complete":
                tool_use_block = block
            elif block.type == "text":
                text_blocks.append(block.text)
        if tool_use_block:
            result = tool_use_block.input
            self.done = True
            self.output = result['output']
            return self.output
        self.conversation.append({"role": "assistant", "content": response.content})
        return ' '.join(text_blocks)


class AIInteraction(DAObject):
    def init(self, *pargs, **kwargs):
        self.initializeAttribute('conv', Conversation)
        self.started = False
        super().init(*pargs, **kwargs)

    def interact(self):  # pylint: disable=inconsistent-return-statements
        if not self.started:
            str(self.prompt)
            self.output = str(self.initial_output)
            self.input  # pylint: disable=pointless-statement
            self.started = True
        if self.conv.done:
            self.delattr('bg')
            return self.output
        if not hasattr(self, 'bg'):
            sys_prompt = str(self.prompt)
            prompt = self.input
            self.initializeAttribute('bg', BackgroundAction)
            self.bg.run(self.attr_name('prompt_ai'), system_prompt=sys_prompt, user_input=prompt)
        self.bg.run(self.attr_name('prompt_ai'))
        self.delattr('input')
        self.delattr('bg')
        self.input  # pylint: disable=pointless-statement


class AIHelper(DADict):
    def init(self, *pargs, **kwargs):
        self.object_type = AIInteraction
        super().init(*pargs, **kwargs)
This example uses Anthropic, and assumes that there is an anthropic
api key defined in the Configuration, but the usage of AI is not
specific to Anthropic and could be implemented using other LLM models.
Launching a side process from a button always on the screen
This interview shows how you can place a button in the navigation bar that when pressed will take the user to a side process (launched as an action, which is a diversion from the ordinary interview logic) that sends an email.

The side process has three steps:
- Show the
questionthat definesquestion_for_lawyer; - Run the
codeblock that definesquestion_emailed_to_lawyer; and - Show the
questionthat definesquestion_for_lawyer_acknowledgment.
The force_ask() function is used to carry out this process because
the user might need to send several emails throughout the interview,
and we always want the three parts of the process to be carried out,
regardless of whether the variables are defined.
Note how current_context().question_id is used to omit the button
from the navigation bar when the side process is ongoing.